Weslo 850 Instruction Manual - Page 7
Trouble-shooting And Storage, Operation And Adjustment, Danger
 |
View all Weslo 850 manuals
Add to My Manuals
Save this manual to your list of manuals |
Page 7 highlights
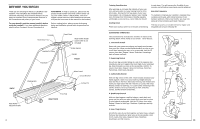
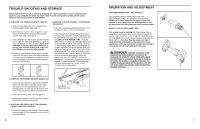
TROUBLE-SHOOTING AND STORAGE Most treadmill problems can be solved by following the simple steps below. Find the symptom that applies to your treadmill and follow the steps listed. If further assistance is needed, please call our Customer Service Department at 0345-089009. 1. SYMPTOM: THE POWER DOES NOT TURN ON a. Make sure that the power cord is plugged into a properly earthed outlet. (See page 7.) b. After the power cord has been plugged in, make sure that the SAFEKEY is fully inserted into the console. (See step 1 on page 8.) c. If the SAFEKEY is in the console and the treadmill will not operate, remove the SAFEKEY, wait for at least one second, and then reinsert it. Note: If the SAFEKEY is removed while the walking belt is moving, wait until the walking belt stops completely before you reinsert the SAFEKEY. d. Check the circuit breaker located on the treadmill frame near the power cord. If the switch protrudes as shown, the circuit breaker has tripped. To reset the circuit breaker, wait for five minutes and then press the switch back in. 4. SYMPTOM: THE WALKING BELT SLOWS WHEN WALKED ON a. Use only a 14-gauge general-purpose three cord of cable of 5 feet (1,5 m) or less in length. b. If the walking belt is overtightened, treadmill performance may decrease and the walking belt may be permanently damaged. Remove the SAFEKEY and UNPLUG THE POWER CORD. Using the allen wrench, turn both rear roller adjustment bolts counterclockwise, 1/4 of a turn (see the drawing on the following page). When the walking belt is properly tightened, you should be able to lift each side of the walking belt 2" to 3" (5 to 7 cm) off the walking platform. The centre of the walking belt should just touch the walking platform. Be careful to keep the walking belt centred. Plug in the power cord, insert the SAFEKEY and run the treadmill for a few minutes. Repeat until the walking belt is properly tightened. If the walking belt still slows when walked on, please call our Customer Service Department. Tripped Reset 2. SYMPTOM: THE POWER TURNS OFF DURING USE a. Check the circuit breaker located on the treadmill frame near the power cord. If the circuit breaker has tripped, the switch will protrude. (See the drawing above.) To reset the circuit breaker, wait for five minutes and then press the switch back in. b. Make sure that the power cord is plugged in. c. Remove the SAFEKEY from the console. Reinsert the SAFEKEY fully into the console. 3. SYMPTOM: THE DISPLAYS OF THE CONSOLE DO NOT FUNCTION PROPERLY a. Check the batteries in the console. (See assembly step 4 on page 6.) Most problems are the result of drained batteries. 10 Rear Roller Adjustment Bolts 2" to 3" OPERATION AND ADJUSTMENT THE PERFORMANT LUBETM WALKING BELT Your treadmill features a walking belt coated with PERFORMANT LUBETM, a high-performance lubricant. IMPORTANT: Never apply silicone spray or other substances to the walking belt or the walking platform. They will deteriorate the walking belt and cause excessive wear. HOW TO PLUG IN THE POWER CORD This product must be earthed. If it should malfunction or break down, earthing provides a path of least resistance for electric current to reduce the risk of electric shock. This product is equipped with a cord having an equipment-earthing conductor and a earthing plug. Plug the power cord into a surge protector, and plug the surge protector into an appropriate outlet that is properly installed and earthed in accordance with all local codes and ordinances. DANGER: Improper connection of the equipment-earthing conductor can result in an increased risk of electric shock. Check with a qualified electrician or serviceman if you are in doubt as to whether the product is properly earthed. Do not modify the plug provided with the product-if it will not fit the outlet, have a proper outlet installed by a qualified electrician. FUSED 7
-
 1
1 -
 2
2 -
 3
3 -
 4
4 -
 5
5 -
 6
6 -
 7
7 -
 8
8
 |
 |
