Weslo Cadence 715 English Manual - Page 8
Trainnes, Aerobic, Speed, Dist.
 |
View all Weslo Cadence 715 manuals
Add to My Manuals
Save this manual to your list of manuals |
Page 8 highlights
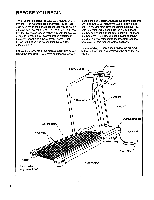
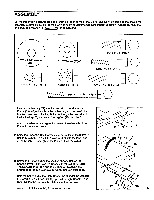
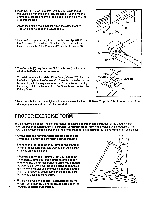
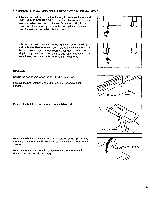
DIAGRAM OF THE CONSOLE ING TRZAOINNES WARM UP SPEED.RESET MR( Moll FAT BURN . Speed Control AEROBIC MAX F l tn• s s Gu l d• E l•c i r•nl c s SPEEDIIR RR Fil)! TIME DIST. CAL ON/OFF MODE Monitor Display Note: If there is a thin sheet of dear plastic on the face of the console, remove it. Keep all liquids away from the console. o 0 ON OFF A sAFEKEY V Key o Clip die Before operating console, read the following important pr utioni "ti0tstand•Ortthe•W n On: OW whenu'.. eyewearTheta fiat! • .. s • P9ra d" he`console':. teh.....".".70 .W- 111r1eiililtqo1f-f f be a pause before the walking belt begins I - The`training zones marked a> a control are general guidelines onl ONDITIONING GUIDELINES on t e STEP BY STEP CONSOLE OPERATION Before operating the console, make sure that the power cord is properly plugged in. (See HOW TO PLUG IN THE POWER CORD on page 7). Next, step onto the foot rails of the treadmill. Find the clip attached to the key (see the drawing above), and slide the clip onto the waistband of your clothing. Follow the simple steps below to operate the console: 8 Insert the key fully into the power switch. Note: The display will not appear when the key is first inserted. 0 0 0 ON Off A wear v Key - --------o .„/ Press the ON/OFF button. The display will appear. Note: If batteries were just installed, the display will already appear. STEI OBES,ME OP DIST. CAL SCAN ON/OFF MODE CI Reset the speed control and start the walking Ca belt. Slide the speed control fully to the lir vaNG WAINLP left, to the 'SPEED RESET' position. Next, slide the con- SPEED•RESIT Wt _I L trol to the right until the walking belt begins to move at slow speed. WASH MILK : "Aux Carefully step onto the walking belt and begin walking. Change the speed of the walking belt as desired by sliding the speed control. Note: To stop
-
 1
1 -
2
-
 3
3 -
 4
4 -
 5
5 -
 6
6 -
 7
7 -
 8
8 -
 9
9 -
 10
10 -
 11
11 -
 12
12 -
 13
13 -
14
-
15
-
16
 |
 |
