Weslo Cardio Glide Tr2 English Manual - Page 4
Assembly
 |
View all Weslo Cardio Glide Tr2 manuals
Add to My Manuals
Save this manual to your list of manuals |
Page 4 highlights
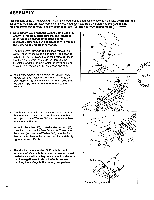
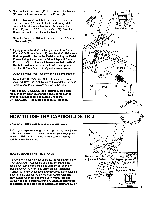
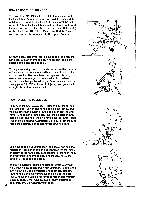
ASSEMBLY Place all parts of the CARDIOGLIDE TR 2 in a cleared area and remove the packing materials. Do not dispose of the packing materials until assembly is completed. Read each step carefully before you begin. Assembly requires the following tools: The included pedal tool CO , and your own rubber mallet 1. Note: Before you attach the 9.5mm Dome Caps (42) shown in this step, make sure that the Handlebar (2) is turned as shown. If the Handlebar is incorrectly attached, it will be necessary to remove the Dome Caps and order new ones. Tap two 9.5mm Bushings (25) into the Frame (6) as shown. Align the indicated holes in the Handlebar (2) with the 9.5mm Bushings (25) in the Frame (6). Insert the 9.5mm x 275mm Pivot Axle (21) through the Handlebar and the Frame. Center the Pivot Axle and tap a 9.5mm Dome Cap (42) onto each end of it. 1 2 42 25 ---. . . Holes 21 42 25 2. Hold the Handlebar (2) in the position shown. Hold the Handle (20) and hook the Link Arms (4, 7) onto the 2 lower Rollers (33) on the Handlebar. Make sure that 2 , ' the Link Arms are securely connected to the Rollers. 4 33 20 7 ./. 3. The Seat (3) is attached to the underside of the Seat Frame (5) for shipping purposes. Remove the Seat Knob (38) and the Washer (36) and remove the Seat from the Seat Frame. 3 3 --... 45 Insert the Seat Bolt (45), located under the Seat (3), down into the slot in the Seat Frame (5). Thread the Seat Knob (38), with the Washer (36), onto the Seat Bolt. Slide the Seat to the desired position and firmly tighten the Seat Knob. .0:0000 5 36 ------ 4 , ( 38-4 4. The Monitor (1) requires two "AA" batteries (not included). Alkaline batteries are recommended. Insert two batteries into the battery compartment. Make sure that the negative (-) ends of the batteries are touching the springs in the battery compartment. 4 Batteries 0 1 0 . . Battery Compartment 4
-
 1
1 -
 2
2 -
 3
3 -
 4
4 -
 5
5 -
 6
6 -
 7
7 -
 8
8 -
 9
9 -
 10
10 -
11
-
12
 |
 |
