Weslo Cardio Glide Tr2 English Manual - Page 8
Maintenance, Trouble, Shooting
 |
View all Weslo Cardio Glide Tr2 manuals
Add to My Manuals
Save this manual to your list of manuals |
Page 8 highlights
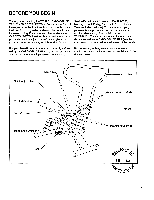
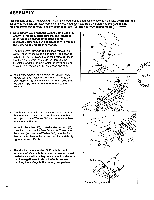
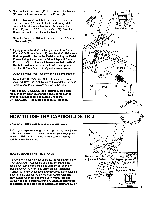
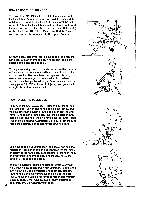
MAINTENANCE AND TROUBLE-SHOOTING Inspect and tighten all parts of the CARDIOGLIDE TR 2 regularly. Make sure that the Foam Pad (26) is pushed all of the way onto the axle at the front. The CARDIOGLIDE TR 2 can be cleaned with a soft, damp cloth. Keep liquids away 26 from the monitor. Do not expose the monitor to direct sunlight or the display may be damaged. When storing the CARDIOGLIDE TR 2, remove the batteries from the monitor. HOW TO REPLACE THE BATTERIES If the display of the Monitor (1) becomes dim, the two "AA" batteries should be replaced. Lift the Monitor off the Frame (6). Disconnect the Sensor Wire (15) from the Monitor. Make sure that the end of the Sensor Wire does not slip Into the Frame. Remove the two old batteries from the Monitor. Insert two new batteries. Make sure that the negative (-) ends of the batteries are touching the springs in the Monitor. Connect the Sensor Wire (15) to the wire on the Monitor (1). Insert all excess wire into the Frame (6). Press the Monitor onto the Frame (see assembly step 5 on page 5). HOW TO ADJUST THE MAGNET AND REED SWITCH If the monitor displays incorrect feedback, the Magnet (27) and Reed Switch (15) st-iculd be checked. Pivot the 1, 6-dal Frame (32) until the Magnet is aligned with the Reed Switch. Loosen the Reed Switch Screw (18) shown in the inset drawing. Slide the Reed Switch slightly closer to the Magnet. Tighten the Reed Switch Screw. Exercise on the CARDIOGLIDE TR 2 for a moment. Repeat until the monitor displays correct feedback. Make sure that the Magnet does not hit the Reed Switch. ifJ 1 Batteries 15 6 1 Clip y yy„ 15 27 32 18 15 27 32 HOW TO LUBRICATE THE CARDIOGLIDE TR 2 Every three months, a small amount of light multi-purpose oil should be applied to the CARDIOGLIDE TR 2. Apply a few drops of oil between the dome caps and the frame in the locations shown at the right. Make sure to apply oil to both sides of the CARDIOGLIDE TR 2. Apply Oil 8
-
 1
1 -
2
-
 3
3 -
 4
4 -
 5
5 -
 6
6 -
 7
7 -
 8
8 -
 9
9 -
 10
10 -
 11
11 -
 12
12
 |
 |
