Westinghouse MT80A THIN Installation Instructions - Page 7
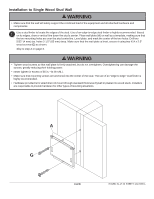
Caution, Warning - flat wall mount
 |
View all Westinghouse MT80A THIN manuals
Add to My Manuals
Save this manual to your list of manuals |
Page 7 highlights
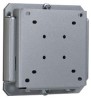
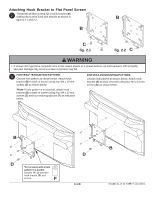
Installing and Removing Flat Panel Screen 4 Hook screen onto wall plate (A) figure 4.1. Tighten M5 x 12 mm screws (C), shown in figure 4.2 and detail 1. Note: For security models, tighten M5 x 12 mm screws (C) using 4 mm allen wrench (I) To remove screen from mount, loosen screws (C) and lift screen off of mount. WARNING • Do not lift more weight than you can handle. Use additional man power or mechanical lifting equipment to safely handle placement of the screen. • Failure to lock hook bracket with screws (C) can cause screen to come off mount if hit accidentally. CAUTION • Do not tighten screws with excessive force. Overtightening can cause damage to mount. Tighten screws to 20 in. • lb (2.26 N.M.) maximum torque. SCREEN A fig. 4.1 B A C fig. 4.2 7 of 8 A B C DETAIL 1 ISSUED: 01-17-06 SHEET #: 202-9090-1
-
 1
1 -
 2
2 -
 3
3 -
 4
4 -
 5
5 -
 6
6 -
 7
7 -
 8
8
 |
 |
