Whirlpool DU018DWTB Installation Instructions
Whirlpool DU018DWTB - 35" Height 5 Cycle Built Manual
 |
UPC - 883049133898
View all Whirlpool DU018DWTB manuals
Add to My Manuals
Save this manual to your list of manuals |
Whirlpool DU018DWTB manual content summary:
- Whirlpool DU018DWTB | Installation Instructions - Page 1
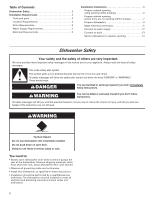
Installation Instructions Undercounter Dishwasher Instructions d'installation Lave-vaisselle encastré Table of Contents 2 Table des matières 15 W10102500A - Whirlpool DU018DWTB | Installation Instructions - Page 2
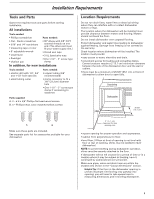
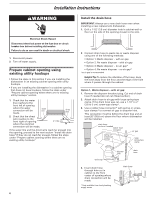
door until latched. • Observe all governing codes and ordinances. • Install this dishwasher as specified in these instructions. • Installation should be performed by a qualified service technician. The dishwasher must be installed to meet all electrical and plumbing national and local codes and - Whirlpool DU018DWTB | Installation Instructions - Page 3
for new installations Tools needed: • electric drill with 1/2", 3/4" and 1-1/2" hole saw bits • small tubing cutter Parts needed: service personnel. Make sure pipes, wires and drain hose are within the shaded area shown in the "Cutout dimensions" section. Helpful Tip: If the floor in the dishwasher - Whirlpool DU018DWTB | Installation Instructions - Page 4
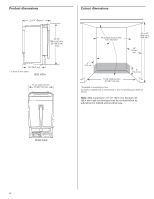
cm) max 18" (45.7 cm) * to front of door frame SIDE VIEW 17-1/2" (44.5 cm) min. 18" (45.7 cm) max. Cutout dimensions All surfaces 18" (45.7 cm) max. *Underside of countertop to floor. Cut holes in shaded area of cabinet walls or floor for plumbing and electrical service. Note: ADA installation - Whirlpool DU018DWTB | Installation Instructions - Page 5
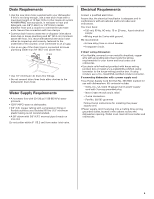
C-500 7/8 inch strain relief. - 3 wire connectors. - Part No. 302797 grommet Follow the kit instructions for installing the power supply cord. • Power supply cord must plug into a mating three prong, grounded outlet, located in the cabinet next to the dishwasher opening. Outlet must meet all local - Whirlpool DU018DWTB | Installation Instructions - Page 6
Installation Instructions WARNING Install the drain hose IMPORTANT: Always use a new drain hose even when installing a new replacement dishwasher. 1. Drill a 1-1/2" (3.8 cm) diameter hole in cabinet wall or floor on the side of the opening closest to the sink. 1. Disconnect power. 2. Turn off - Whirlpool DU018DWTB | Installation Instructions - Page 7
and at least 20" (50.8 cm) above the floor where dishwasher will be installed. drain hose - cut here if needed rubber hose connector air gap the front center of opening where drain connection will be made. * Parts available from local plumbing supply stores drain hose drain hose Option 3, Waste - Whirlpool DU018DWTB | Installation Instructions - Page 8
hole with grommet (Part No. 302797) included with power supply cord kit. Install the water line copper tubing to the water line with a manual shutoff valve. copper tubing 4. Slowly feed copper 20" (50.8 cm) above the floor where dishwasher will be installed. drain hose - cut here if needed rubber - Whirlpool DU018DWTB | Installation Instructions - Page 9
to the front center of opening where drain connection will be made. * Parts available from local plumbing supply stores Prepare dishwasher WARNING drain hose drain hose Tip Over Hazard Do not use dishwasher until completely installed. Do not push down on open door. Doing so can result in serious - Whirlpool DU018DWTB | Installation Instructions - Page 10
cord kit, do so now, following kit instructions. The power supply cord kit must be U.L.-listed and marked for use with dishwashers (i.e. Power Supply Cord Kit part no. 4317824). Helpful Tip: Put cardboard under dishwasher until it is installed in cabinet opening. The cardboard will help protect - Whirlpool DU018DWTB | Installation Instructions - Page 11
ground dishwasher. Connect ground wire to green ground connector in terminal box. Do not use an extension cord. Failure to follow these instructions can result in death, fire, or electrical shock. 1. Route direct wire so that it does not touch dishwasher motor or lower part of dishwasher tub - Whirlpool DU018DWTB | Installation Instructions - Page 12
an adapter. Do not use an extension cord. Failure to follow these instructions can result in death, fire, or electrical shock. The power cord and . 5. Check the power supply cord does not touch dishwasher motor or lower part of dishwasher tub. Connect to water supply Helpful Tip: Compression fittings - Whirlpool DU018DWTB | Installation Instructions - Page 13
disposer with clamps. NOTE: Total drain hose length must not exceed 10 ft (3.05m), for proper drain operation. Tip Over Hazard Do not use dishwasher until completely installed. Do not push down on open door. Doing so can result in serious injury or cuts. 1. If you have not already done so, open - Whirlpool DU018DWTB | Installation Instructions - Page 14
cord. Failure to follow these instructions can result in death, fire, or electrical shock. 5. Reconnect power or plug in dishwasher. Check operation 1. Read the Use and Care Guide that came with your dishwasher. 2. Check that all parts have been installed and no steps were skipped. 3. Check - Whirlpool DU018DWTB | Installation Instructions - Page 15
é du lave-vaisselle 15 Exigences d'installation 16 Outillage et pièces 16 Emplacement d'installation 16 Spécifications de la canalisation d'évacuation 18 Spécifications de l'alimentation en eau 18 Spécifications électriques 18 Instructions d'installation 19 Préparation des ouvertures dans - Whirlpool DU018DWTB | Installation Instructions - Page 16
vacuation et les câbles électriques soient dans la zone marquée en gris dans la section "Dimensions de l'emplacement d'installation". Conseil utile : Si le plancher de l'espace d'installation n'est pas parfaitement horizontal et plat (exemple : garnissage de carrelage sur une partie seulement), on - Whirlpool DU018DWTB | Installation Instructions - Page 17
44,5 cm) min. 18" (45,7 cm) max. Dimensions de la cavité d' 18" (45,7 cm) max. *Du bas du plan de travail au plancher Pour le passage des canalisations et du câble, percer les trous nécessaires dans la zone marquée en gris sur le plancher et les parois de la cavité. Note : Pour l'installation - Whirlpool DU018DWTB | Installation Instructions - Page 18
d'évacuation est connecté à la canalisation d'égout de la maison à moins de 18" (45,7 cm) au-dessus du plancher. brise-siphon • Utiliser des raccords bague de protection n° 302797 Pour l'installation du cordon d'alimentation, procéder conformément aux instructions fournies avec l'ensemble. • La fiche - Whirlpool DU018DWTB | Installation Instructions - Page 19
ne sont pas suffisamment longs, procéder conformément aux instructions de la section "Préparation de l'emplacement d'installation entre les placards lorsque les canalisations et câbles n'ont pas été installés" Installation du tuyau d'évacuation IMPORTANT : On doit toujours utiliser un tuyau - Whirlpool DU018DWTB | Installation Instructions - Page 20
5 cm). Ce raccordement doit être réalisé en amont du siphon du circuit d'évacuation et à au moins 20" (50,8 cm) au-dessus du plancher de l'espace d'installation du lave-vaisselle. On recommande de lover le tuyau d'évacuation et de le fixer solidement sur la face inférieure du plan de travail. tuyau - Whirlpool DU018DWTB | Installation Instructions - Page 21
la canalisation d'eau Conseil utile : Le raccordement au lave-vaisselle sera plus facile si on achemine la canalisation d'eau par le côté gauche de l'espace d'installation. 1. Percer un trou de diamètre 1/2" (1,3 cm) ou plus dans la paroi du placard, le mur arrière ou le plancher. Les emplacements - Whirlpool DU018DWTB | Installation Instructions - Page 22
des blessures graves ou des coupures. AVERTISSEMENT Risque du poids excessif Utiliser deux personnes ou plus pour déplacer et installer le lave-vaisselle. Le non-respect de cette instruction peut causer une blessure au dos ou d'autre blessure. 1. Saisir les côtés du cadre de porte du lave-vaisselle - Whirlpool DU018DWTB | Installation Instructions - Page 23
du lave-vaisselle au plan de travail AVERTISSEMENT Risque du poids excessif Utiliser deux personnes ou plus pour déplacer et installer le lave-vaisselle. Le non-respect de cette instruction peut causer une blessure au dos ou d'autre blessure. Faire intervenir deux personnes ou plus - placer le lave - Whirlpool DU018DWTB | Installation Instructions - Page 24
. Conseil utile : Lorsque le lave-vaisselle est à sa position de service, il peut être nécessaire de soutenir l'avant - soulever/abaisser ou de rallonge. Le non-respect de ces instructions peut causer un décès, un incendie ou un choc électrique. 1. Installer le câble d'alimentation de telle mani - Whirlpool DU018DWTB | Installation Instructions - Page 25
un câble de rallonge. Le non-respect de ces instructions peut causer un décès, un incendie ou un choc électrique. Le cordon d'alimentation utilisé et les connexions doivent être conformes aux prescriptions du Code national des installations électriques, section 422 et/ou aux prescriptions des codes - Whirlpool DU018DWTB | Installation Instructions - Page 26
18 mm) ou 1" (25,4 mm) sur le brise-vide, raccord de canalisation d'évacuation ou broyeur à déchets; couper sur la ligne marquée appropriée selon la configuration de l'installation soit complètement installé. Ne pas appuyer sur la porte ouverte. Le non-respect de ces instructions peut causer des - Whirlpool DU018DWTB | Installation Instructions - Page 27
plus. Utiliser les deux sections du panneau de plinthe pour toute hauteur d'installation. Utiliser les 4 trous de vis du haut Ajuster la position vers . Ne pas utiliser un câble de rallonge. Le non-respect de ces instructions peut causer un décès, un incendie ou un choc électrique. 5. Rebrancher l' - Whirlpool DU018DWTB | Installation Instructions - Page 28
Si le lave-vaisselle ne fonctionne pas correctement Essayer d'abord les solutions suggérées ici pour éviter une coûteuse intervention de dépannage. • Disjoncteur ouvert ou fusible grillé? • Porte bien fermée et verrouillée? • Sélection correcte du programme sur l'appareil? • Arrivée d'eau ouverte?
-
 1
1 -
 2
2 -
 3
3 -
 4
4 -
 5
5 -
 6
6 -
 7
7 -
8
-
9
-
10
-
11
-
12
-
13
-
14
-
15
-
16
-
17
-
18
-
19
-
20
-
21
-
22
-
23
-
24
-
25
-
26
-
27
-
28
 |
 |
Installation Instructions
Undercounter Dishwasher
W10102500A
Instructions d'installation
Lave-vaisselle encastré
Table of Contents
.............................................................................
2
Table des matières
.........................................................................
15