Whirlpool EED4100WQ Installation Instructions
Whirlpool EED4100WQ Manual
 |
View all Whirlpool EED4100WQ manuals
Add to My Manuals
Save this manual to your list of manuals |
Whirlpool EED4100WQ manual content summary:
- Whirlpool EED4100WQ | Installation Instructions - Page 1
Electric Dryer Installation Instructions 29" Wide Models - U.S.A. Only Para obtener acceso al manual de uso y cuidado en español, o para obtener información adicional acerca de su producto, visite: www.whirlpool.com Tenga listo su número de modelo completo. Puede encontrar el número de modelo y de - Whirlpool EED4100WQ | Installation Instructions - Page 2
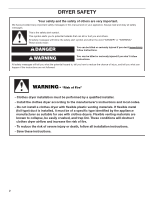
DRYER SAFETY Your safety and the safety of others are very important. We have provided many important safety messages in this manual and if you don't immediately follow instructions. WARNING You can be killed or seriously injured if you don't follow instructions. All safety messages will tell - Whirlpool EED4100WQ | Installation Instructions - Page 3
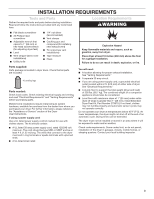
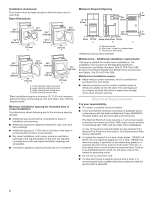
Requirements" before purchasing parts. Mobile home installations require metal exhaust system hardware, available for purchase from the dealer from whom you purchased your dryer. For further information, please reference the "Assistance or Service" section of the Dryer User Instructions. If using - Whirlpool EED4100WQ | Installation Instructions - Page 4
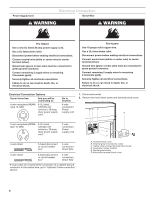
should be considered for ease of installation and servicing. ■■ Additional clearances might be required for Part 3280 (formerly the Federal Standard for Mobile Home Construction and Safety, Title 24, HUD Part Electrical Code requires a 4-wire power supply connection for homes built after 1996, dryer - Whirlpool EED4100WQ | Installation Instructions - Page 5
supply connection. The neutral ground wire is permanently connected to the neutral conductor (white wire) within the dryer. If the dryer is installed with a 4-wire electrical supply connection, the neutral ground wire must be removed from the external ground connector screw (green screw), and - Whirlpool EED4100WQ | Installation Instructions - Page 6
ul listed strain relief. Disconnect power before making electrical connections. Connect neutral wire (white or center wire) to center terminal (silver). type 10-30R) A UL listed, 120/240-volt minimum, 30-amp, dryer power supply cord* 3-wire connection: Power supply cord 4-wire direct A fused - Whirlpool EED4100WQ | Installation Instructions - Page 7
. The strain relief should have a tight fit with the dryer cabinet and be in a horizontal position. Do not further tighten strain relief screws at this point. 4. Now complete installation following instructions for your type of electrical connection: 4-wire (recommended) 3-wire (if 4-wire is not - Whirlpool EED4100WQ | Installation Instructions - Page 8
supply cord wires to outer terminal block screws. 2. Connect neutral wire (C) (white or center wire) of power supply cord to the center, silver-colored terminal block cover into slot of dryer rear panel. Secure cover with hold-down screw. 8. You have completed your electrical connection. Now go to - Whirlpool EED4100WQ | Installation Instructions - Page 9
block cover into slot of dryer rear panel. Secure cover with hold-down screw. 6. You have completed your electrical connection. Now go to (E) and place the hooked end (hook facing right) of the neutral wire (C) (white or center wire) of direct wire cable under the center screw of the terminal block - Whirlpool EED4100WQ | Installation Instructions - Page 10
terminal block cover into slot of dryer rear panel. Secure cover with hold-down screw. 6. You have completed your electrical connection. Now go to "Venting A B B E 2. Place the hooked end of the neutral wire (C) (white or center wire) of direct wire cable under the center, silver-colored terminal - Whirlpool EED4100WQ | Installation Instructions - Page 11
Replace any plastic or metal foil vent with rigid heavy metal vent or flexible metal vent. ■■ Review Dryer User Instructions. For more information, see the "Assistance or Service" section of the Dryer User Instructions vent must be fully extended and supported when the dryer is in its final location. - Whirlpool EED4100WQ | Installation Instructions - Page 12
are available for purchase. Please see the "Assistance or Service" section of the Dryer User Instructions. ■■ Over-the-Top Installation: Part Number 4396028 ■■ Periscope Installation (For use with dryer vent to wall vent mismatch): Part Number 4396037 - 0" (0 mm) to 18" (460 mm) mismatch - Whirlpool EED4100WQ | Installation Instructions - Page 13
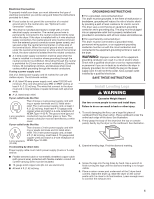
m) Vent System Chart (Long Vent Models Only) Number 90° turns or elbows parts are now installed. If there is an extra part dryer. 8. Wipe the dryer drum interior thoroughly with a damp cloth to remove any dust. 9. Read "Dryer Use" in the Dryer User Instructions. 10. Set the dryer on a full heat - Whirlpool EED4100WQ | Installation Instructions - Page 14
no heat, contact a qualified technician. NOTE: You may notice an odor when the dryer is first heated. This odor is common when the heating element is top screws in cabinet are in large part of hinge slot. Pull door forward off screws. Set door on top of dryer. Remove top screws from cabinet. 4. - Whirlpool EED4100WQ | Installation Instructions - Page 15
over screws. Slide door up so screws are in bottom of slots. Tighten screws. Insert and tighten top screws in hinges. 7. Attach door hinges to dryer door so that the larger hole is at the bottom of the hinge. 8. Remove door strike (E) from cabinet. Use a small, flat-blade screwdriver to gently - Whirlpool EED4100WQ | Installation Instructions - Page 16
W10300459A W10296137A-SP 1©62009 All rights reserved 12/09 Printed in U.S.A.
-
 1
1 -
 2
2 -
 3
3 -
 4
4 -
 5
5 -
 6
6 -
 7
7 -
8
-
9
-
10
-
11
-
12
-
13
-
14
-
15
-
16
 |
 |

W10300459A
W10296137A-SP
DRYER SAFETY
.........................................................................
2
INSTALLATION REQUIREMENTS
.............................................
3
Tools and Parts
......................................................................
3
Location Requirements
.........................................................
3
Electrical Requirements
........................................................
4
Install Leveling Legs
..............................................................
5
Electrical Connection
............................................................
6
Venting Requirements
.........................................................
11
Plan Vent System
.................................................................
12
Install Vent System
..............................................................
13
Level Dryer
...........................................................................
14
Connect Vent
........................................................................
14
Complete Installation
..........................................................
14
Reverse Door Swing (Optional)
..........................................
14
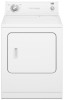
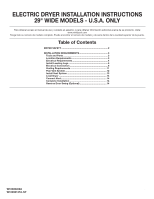
ELECTRIC DRYER INSTALLATION INSTRUCTIONS
29" WIDE MODELS - U.S.A. ONLY
Para obtener acceso al manual de uso y cuidado en español, o para obtener información adicional acerca de su producto, visite:
www.whirlpool.com
Tenga listo su número de modelo completo. Puede encontrar el número de modelo y de serie dentro de la cavidad superior de la puerta.
Table of Contents