Whirlpool GEW9250PT Use and Care Guide
Whirlpool GEW9250PT Manual
 |
View all Whirlpool GEW9250PT manuals
Add to My Manuals
Save this manual to your list of manuals |
Whirlpool GEW9250PT manual content summary:
- Whirlpool GEW9250PT | Use and Care Guide - Page 1
8530051 ® ® ELECTRONIC ELECTRIC DRYER Use & Care Guide For questions about features, operation/performance, parts, accessories or service call: 1-800-253-1301 or visit our website at... www.whirlpool.com Table of Contents 2 - Whirlpool GEW9250PT | Use and Care Guide - Page 2
Additional Features 19 Drying Rack 20 DRYER CARE 21 Cleaning the Dryer Location 21 Cleaning the Lint Screen 21 Cleaning the Dryer Interior 21 Removing Accumulated Lint 21 Vacation and Moving Care 21 Changing the Drum Light 22 TROUBLESHOOTING 22 ASSISTANCE OR SERVICE 23 WARRANTY 24 ® 2 - Whirlpool GEW9250PT | Use and Care Guide - Page 3
weather. s Do not tamper with controls. s Do not repair or replace any part of the dryer or attempt any servicing unless specifically recommended in this Use and Care Guide or in published user-repair instructions that you understand and have the skills to carry out. s Do not use fabric softeners - Whirlpool GEW9250PT | Use and Care Guide - Page 4
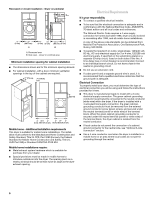
manual. Optional pedestal To order, call the dealer from whom you purchased your dryer or refer to the "Assistance or Service" section of this manual. Ask for Part Number LAB2700MQ (White), LAB2700MT (Biscuit) or LAB2700ML (Pewter). Stack Kit Are you planning to stack your DUET® washer and dryer - Whirlpool GEW9250PT | Use and Care Guide - Page 5
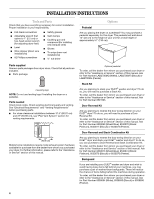
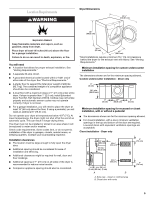
electrical outlet located within 2 ft (61 cm) of either side of the dryer. See "Electrical Requirements." s A sturdy floor to support the total dryer dryer door. s Additional spacing should be considered for ease of installation and servicing , with or without a pedestal s The dimensions shown are - Whirlpool GEW9250PT | Use and Care Guide - Page 6
Recessed or closet installation - Dryer on pedestal 14" max. (35.6 cm) 18" min. (45.72 cm) 0" (0 cm) 27" (68.6 Electrical Connection To properly install your dryer, you must determine the type of electrical connection you will be using and follow the instructions provided for it here. s This dryer - Whirlpool GEW9250PT | Use and Care Guide - Page 7
looks like this: GROUNDING INSTRUCTIONS s For a grounded, cord-connected dryer: This dryer must be grounded. In the event of malfunction or breakdown, grounding will reduce the risk of electric shock by providing a path of least resistance for electric current. This dryer uses a cord having an - Whirlpool GEW9250PT | Use and Care Guide - Page 8
dryer cabinet and be in a horizontal position. A A. Neutral grounding wire (green/yellow) B. External ground conductor screw C. Center, silver-colored terminal block screw D. Terminal block cover and hold-down screw 4. Now complete installation following instructions for your type of electrical - Whirlpool GEW9250PT | Use and Care Guide - Page 9
Electrical Connection Options If your home has: And you will be connecting to: Go to Section 4-wire receptacle (NEMA Type 14-30R) A UL listed, 120/240 volt minimum, 30 amp, dryer power supply cord* 4-wire connection: Power supply cord 4-wire direct 5" (12.7 cm) A fused disconnect or circuit - Whirlpool GEW9250PT | Use and Care Guide - Page 10
of 3-wire connections. Direct wire cable must have 5 ft (1.52 m) of extra length so dryer can be moved if needed. Strip 5" (12.7 cm) of outer covering from end of cable screws. 7. Insert tab of terminal block cover into slot of dryer rear panel. Secure cover with hold-down screw. 3-wire connection: - Whirlpool GEW9250PT | Use and Care Guide - Page 11
wire Use where local codes permit connecting cabinet-ground conductor to neutral wire. Direct wire cable must have 5 ft (1.52 m) of extra length so dryer can be moved if needed. Strip 3¹⁄₂" (8.9 cm) of outer covering from end of cable. Strip insulation back 1" (2.5 cm). If using 3-wire cable with - Whirlpool GEW9250PT | Use and Care Guide - Page 12
are recommended. DURASAFE™ vent products can be purchased from your dealer or by calling Whirlpool Parts and Accessories. For more information, see the "Assistance or Service" section of this manual. s The dryer exhaust must not be connected into any gas vent, chimney, wall, ceiling, or a concealed - Whirlpool GEW9250PT | Use and Care Guide - Page 13
Not an option with pedestal installations.) Alternate installations for are shown. Refer to the manufacturer's instructions. better good 2. Determine vent length. Service" section of this manual to order. s Over the top Installation: Part Number 4396028 s Periscope Installation (For use with dryer - Whirlpool GEW9250PT | Use and Care Guide - Page 14
to finish turning the legs until the diamond marking is no longer visible. 5. Place a carton corner post under each of the 2 dryer back corners. Stand the dryer up. Slide the dryer on the corner posts until it is close to its final location. Leave enough room to connect the exhaust vent. 6. Once - Whirlpool GEW9250PT | Use and Care Guide - Page 15
an air cycle) for 20 minutes and start the dryer. If the dryer will not start, check the following: s Controls are set in a running or "On" position. s Start button has been pushed firmly. s Dryer is plugged into a grounded outlet. s Electrical supply is connected. s House fuse is intact and tight - Whirlpool GEW9250PT | Use and Care Guide - Page 16
had anything flammable on it (even after washing). Failure to follow these instructions can result in death, explosion, or fire. The following is a guide to starting your dryer. Please refer to specific sections of this manual for more detailed information. 1. Clean lint screen before or after each - Whirlpool GEW9250PT | Use and Care Guide - Page 17
: The More Time or Less Time feature can be used only with Manual Cycles. s Press TEMPERATURE until the desired temperature glows. NOTE: Pressing If desired, add a fabric softener sheet. Follow package instructions. s Remove the load from the dryer as soon as tumbling stops to reduce wrinkling. This - Whirlpool GEW9250PT | Use and Care Guide - Page 18
. s Refer to the Automatic or Manual Preset Cycle Settings chart (in the "Cycles" section) for a guide to drying various loads. s Drying within 10 minutes, the Sensing light will turn off and the dryer will shut down. s In a Manual Cycle, if a wet item is not detected after 10 minutes the - Whirlpool GEW9250PT | Use and Care Guide - Page 19
select the Normal cycle.) NOTE: If you do not select the WRINKLE SHIELD™ feature, the dryer stops after the cool down period. Temperature Temperature settings are used with the Manual Cycles. Press TEMPERATURE until the desired temperature setting glows. Temperature settings cannot be used with the - Whirlpool GEW9250PT | Use and Care Guide - Page 20
dry (for example, sweaters). To use the drying rack Do not remove the lint screen. 1. Open dryer door. A A. Front edge 2. Place drying rack inside dryer drum, positioning the back wire on the ledge of the inner dryer back panel. Push down on front edge of drying rack to secure over the lint screen - Whirlpool GEW9250PT | Use and Care Guide - Page 21
detergent. Scrub lint screen with the brush to remove residue buildup. Explosion Hazard Keep flammable materials and vapors, such as gasoline, away from dryer. Place dryer at least 18 inches (46 cm) above the floor for a garage installation. Failure to do so can result in death, explosion, or fire - Whirlpool GEW9250PT | Use and Care Guide - Page 22
dryer or reconnect power. TROUBLESHOOTING First try the solutions suggested here and possibly avoid the cost of a service call... Dryer displaying code message s Is the dryer . See "Installation Instructions." Has a fuse blown, or has a circuit breaker tripped? Electric dryers use 2 household - Whirlpool GEW9250PT | Use and Care Guide - Page 23
the dryer being used for the first time? The new electric heating instructions followed? Were items damaged before drying? ASSISTANCE OR SERVICE Before calling for assistance or service, please check "Troubleshooting." It may save you the cost of a service call the Whirlpool Customer Interaction - Whirlpool GEW9250PT | Use and Care Guide - Page 24
workmanship. Whirlpool Corporation will not pay for: 1. Service calls to correct the installation of your dryer, including venting. Heavy 4" (10.2 cm) metal exhaust vent must be used. Refer to the venting section of this manual and your Installation Instructions. 2. Service calls to instruct you how
-
 1
1 -
 2
2 -
 3
3 -
 4
4 -
 5
5 -
 6
6 -
 7
7 -
8
-
9
-
10
-
11
-
12
-
13
-
14
-
15
-
16
-
17
-
18
-
19
-
20
-
21
-
22
-
23
-
24
 |
 |
ELECTRONIC
ELECTRIC DRYER
Use & Care Guide
For questions about features, operation/performance, parts,
accessories or service call:
1-800-253-1301
or visit our website at...
www.whirlpool.com
Table of Contents
................................................
2
8530051
®
®