Whirlpool GY397LXUS Installation Instructions - Page 8
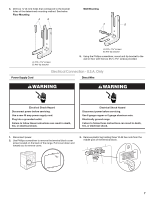
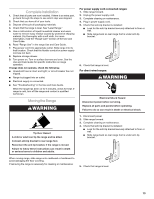
Style 1: Power supply cord strain relief, Style 2: Direct wire strain relief
 |
UPC - 883049127705
View all Whirlpool GY397LXUS manuals
Add to My Manuals
Save this manual to your list of manuals |
Page 8 highlights
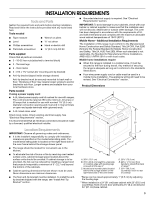
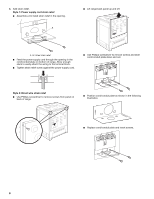
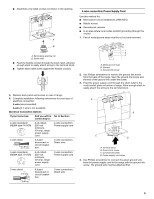
4. Add strain relief. Style 1: Power supply cord strain relief ■ Assemble a UL listed strain relief in the opening. A ■ Lift range back panel up and off. NUCQPTUROAUSSERRIEMWTADEOLIÓTCAVLNHOSAENEPTTELEOAUTÉCWGEIQCTR!EATUUCRRRESAICTCEESAOLORD A. UL listed strain relief ■ Feed the power supply cord through the opening in the cord/conduit plate on bottom of range. Allow enough slack to easily attach the wiring to the terminal block. ■ Tighten strain relief screw against the power supply cord. ■ Use Phillips screwdriver to remove screws and slide cord/conduit plate down and out. Style 2: Direct wire strain relief ■ Use Phillips screwdriver to remove screws from panel on back of range. ■ Position cord/conduit plate as shown in the following illustration. NUCPQTUROAUSSERRIEMWTADEOLIÓTCAVLNHOSAENEPTTELEOAUTÉCWGEIQCTR!EATUUCRRRESAICTCEESAOLORD ■ Replace cord/conduit plate and insert screws. 8
-
 1
1 -
2
-
 3
3 -
 4
4 -
 5
5 -
 6
6 -
 7
7 -
 8
8 -
 9
9 -
 10
10 -
 11
11 -
 12
12 -
 13
13 -
14
-
15
-
16
-
17
-
18
-
19
-
20
 |
 |