Whirlpool MH2175XST Use and Care Manual - Page 5
Andfeatures - parts
 |
View all Whirlpool MH2175XST manuals
Add to My Manuals
Save this manual to your list of manuals |
Page 5 highlights
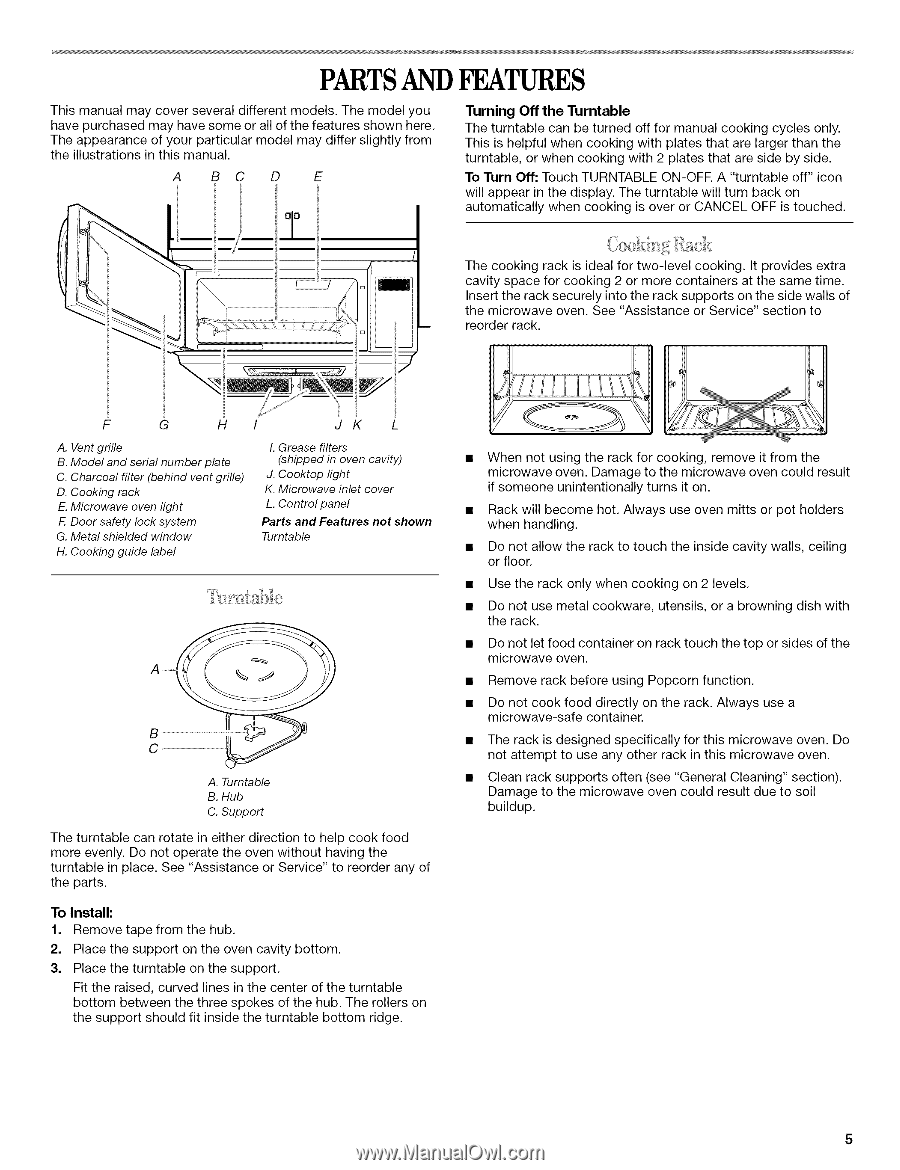
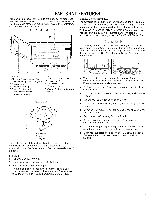
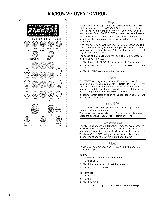
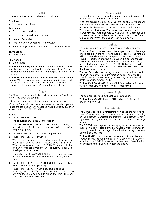
PARTSANDFEATURES This manual may cover several different models. The model you have purchased may have some or all of the features shown here. The appearance of your particular model may differ slightly from the illustrations in this manual. A BC D E Turning Off the Turntable The turntable can be turned off for manual cooking cycles only. This is helpful when cooking with plates that are larger than the turntable, or when cooking with 2 plates that are side by side. To Turn Off: Touch TURNTABLE ON-OFE A "turntable off" icon will appear in the display. The turntable will turn back on automatically when cooking is over or CANCEL OFF is touched. The cooking rack is ideal for two-level cooking. It provides extra cavity space for cooking 2 or more containers at the same time. Insert the rack securely into the rack supports on the side walls of the microwave oven. See "Assistance or Service" section to reorder rack. F G HI JK L A. Vent grille B. Model and serial number plate C. Charcoal filter (behind vent grille) D. Cooking rack E. Microwave oven light F. Door safety lock system G. Metal shielded window H. Cooking guide label I. Grease filters (shipped in oven cavity) J. Cooktop light K. Microwave inlet cover L. Control panel Parts and Features not shown Turntable A. Turntable B. Hub C. Support The turntable can rotate in either direction to help cook food more evenly. Do not operate the oven without having the turntable in place. See "Assistance or Service" to reorder any of the parts. To Install: 1. Remove tape from the hub. 2. Place the support on the oven cavity bottom. 3. Place the turntable on the support. Fit the raised, curved lines in the center of the turntable bottom between the three spokes of the hub. The rollers on the support should fit inside the turntable bottom ridge. When not using the rack for cooking, remove it from the microwave oven. Damage to the microwave oven could result if someone unintentionally turns it on. Rack will become hot. Always use oven mitts or pot holders when handling. Do not allow the rack to touch the inside cavity walls, ceiling or floor. Use the rack only when cooking on 2 levels. Do not use metal cookware, utensils, or a browning dish with the rack. Do not let food container on rack touch the top or sides of the microwave oven. Remove rack before using Popcorn function. Do not cook food directly on the rack. Always use a microwave-safe container. The rack is designed specifically for this microwave oven. Do not attempt to use any other rack in this microwave oven. Clean rack supports often (see "General Cleaning" section). Damage to the microwave oven could result due to soil buildup.
-
 1
1 -
 2
2 -
 3
3 -
 4
4 -
 5
5 -
 6
6 -
 7
7 -
 8
8 -
 9
9 -
 10
10 -
 11
11 -
12
-
13
-
14
-
15
-
16
-
17
-
18
-
19
-
20
 |
 |