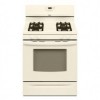
Whirlpool SF265LXTT Installation Instructions
Whirlpool SF265LXTT - Gas Range Manual
 |
UPC - 883049054919
View all Whirlpool SF265LXTT manuals
Add to My Manuals
Save this manual to your list of manuals |
Whirlpool SF265LXTT manual content summary:
- Whirlpool SF265LXTT | Installation Instructions - Page 1
or Warming Drawer ... 14 Complete Installation 14 ANTI-TIP BRACKET TEMPLATE 16 RANGE SAFETY Your safety and the safety of others are very important. We have provided many important safety messages in this manual and on your appliance. Always read and obey all safety messages. This is the safety - Whirlpool SF265LXTT | Installation Instructions - Page 2
in the vicinity of this or any other appliance, - WHAT TO DO IF YOU SMELL GAS: • Do not try to light any appliance, • Do not touch any electrical switch Gather the required tools and parts before starting installation. Read and follow the instructions provided with any tools listed - Whirlpool SF265LXTT | Installation Instructions - Page 3
pad or 1/4"(0.64 cm) plywood under range if installing range over carpeting. Mobile Home - Additional Installation Requirements The installation of this range must conform to the Manufactured Home Construction and Safety Standard, Title 24 CFR, Part 3280 (formerly the Federal Standard for Mobile - Whirlpool SF265LXTT | Installation Instructions - Page 4
the top of the cooking platform and the bottom of an unprotected wood or metal cabinet. If installing a hood above the range, follow the instructions for dimensional clearances above the cooktop surface. IMPORTANT: Some cabinet and building materials are not designed to withstand the heat produced - Whirlpool SF265LXTT | Installation Instructions - Page 5
Conversion must be done by a qualified service technician. No attempt shall be made to convert the appliance from the gas specified on the model line must be equipped with a manual shutoff valve. This valve should be located in the same room but external to the range. It should be in a location - Whirlpool SF265LXTT | Installation Instructions - Page 6
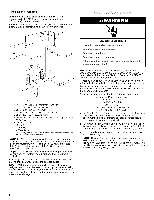
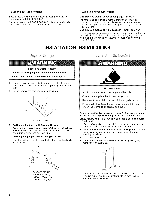
and parts package from inside oven. 2. Do not remove the shipping base at this time. I] I H i/ Tip Over Hazard A child or adu{t can tip the range and be kil}ed. Connect anti-tip bracket to rear range foot. Reconnect the anti-tip bracket, if the range is moved. Fai{ure to follow these instructions - Whirlpool SF265LXTT | Installation Instructions - Page 7
in a mobile home, you must secure the range to the floor. Any method of securing the range is adequate as long as it conforms to the standards in the "Location Requirements" section. 11. Continue installing your range using the following installation instructions. Place rack in oven. Place level on - Whirlpool SF265LXTT | Installation Instructions - Page 8
range, valveisopenwhenthehandleisparalletol thegaspipe. / A F ?E ii' A. Gas pressure regulator B. 90 ° elbow (must have Yp" male pipe thread) C. Nipple D. Union E. Black iron pipe f H G F Manual grates from parts package. Burner . Failure to follow these instructions can resumt in death, - Whirlpool SF265LXTT | Installation Instructions - Page 9
to the "OFF" position. • Check that the range is plugged in. Check that the circuit breaker has point, contact your dealer or authorized service company for assistance. Adjust Flame Height and broil burners. Refer to the Use and Care Guide for proper operation of the oven controls. Adjust Oven - Whirlpool SF265LXTT | Installation Instructions - Page 10
Use and Care Guide for specific instruction on range operation. If range does not operate, check the following: • Household fuse is intact and tight; or circuit breaker has not tripped. • Range is plugged into a grounded 3 prong outlet. • Electrical supplyis connected. • See "Troubleshooting" in the - Whirlpool SF265LXTT | Installation Instructions - Page 11
gas company personnel, and author}zed service personnel Failure to do so can range foot, Reconnect the anti-tip bracket, if the range is moved, Failure to follow these instructions can result in death or serious burns to chimdren and adumte, To Convert Gas Pressure Regulator 1. Turn the manual - Whirlpool SF265LXTT | Installation Instructions - Page 12
Flame" section. A A. Orifice spud B. Orifice spud holder C. Screw D. Spark electrode 4= Remove the cardboard orifice spud holder located on the back of the range near the gas inlet. Gas orifice spuds are stamped with a number, marked with 1 color dot, and have a groove in the hex area. Replace the - Whirlpool SF265LXTT | Installation Instructions - Page 13
, if the range is moved, Failure to felmow these instructions can result in death or serious burns to cbimdren and adumte, C Side view after A. Plastic cover B. Gas pressure regulator cap with hollow end facing out C. Gas pressure regulator cap with solid end facing out D. Washer E. Gas pressure - Whirlpool SF265LXTT | Installation Instructions - Page 14
base. NOTE: Reinstall one of the screws through the range cooktop to hold the orifice spud holder in place while burner location. 5. Place LP gas orifice spuds in plastic parts bag for future use and keep with literature package. 6. Instructions" section of this manual to complete this procedure. - Whirlpool SF265LXTT | Installation Instructions - Page 15
15 - Whirlpool SF265LXTT | Installation Instructions - Page 16
ANTI-TIP BRACKETTEMPLATE Cut on dotted lines and place the left edge against the left side cabinet and the top edge against the rear wall, Top edge Use this template to anchor the left rear leg of range, .4 9762998 © 2005. All rights reserved. 12/0 5 Printed in U.S.A.
-
 1
1 -
 2
2 -
 3
3 -
 4
4 -
 5
5 -
 6
6 -
 7
7 -
8
-
9
-
10
-
11
-
12
-
13
-
14
-
15
-
16
 |
 |

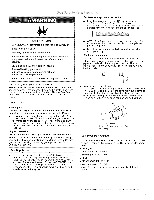
INSTALLATIONINSTRUCTIONS
30"(76 CM) FREESTANDINGGAS RANGES
Table of
Contents
RANGE SAFETY
..................................................................
1
INSTALLATION
REQUIREMENTS
....................................
2
Tools and Parts
................................................................
2
Location
Requirements
....................................................
3
Electrical
Requirements
...................................................
4
Gas Supply
Requirements
...............................................
5
INSTALLATION
INSTRUCTIONS
......................................
6
Unpack
Range
.................................................................
6
Install Anti-Tip
Bracket
.....................................................
6
Verify Anti-Tip
Bracket
Location
......................................
7
Level Range
.....................................................................
7
Make Gas Connection
.....................................................
7
Electronic
Ignition
System
...................................................
8
Replace
Oven
Racks and Storage
or Warming
Drawer ... 10
Complete
Installation
.........................................................
10
GAS CONVERSIONS
............................................................
11
Conver_ from Natural
Gas to LP Gas
................................
11
Replace
Oven
Racks and Storage
or Warming
Drawer ... 13
Complete
Installation
.........................................................
13
Conver_ from LP Gas to Natural Gas
................................
13
Replace
Oven
Racks and Storage
or Warming
Drawer ... 14
Complete
Installation
.........................................................
14
ANTI-TIP
BRACKET
TEMPLATE
.......................................
16
RANGE
SAFETY
Your
safety
and
the
safety
of others
are very
important.
We have provided
many important
safety messages
in this manual and on your appliance.
Always
read and obey all safety
messages.
This is the safety alert symbol.
This symbol alerts you to potential
hazards that can kill or hurt you and others.
All safety messages
will follow the safety alert symbol and either the word "DANGER"
or "WARNING."
These words mean:
You can be killed or seriously
injured if you don't immediately
follow
instructions.
You can be killed or seriously
injured
if you don't
follow
instructions.
All safety messages
will tell you what the potential
hazard is, tell you how to reduce the chance
of injury, and tell you what can
happen
if the instructions
are not followed.
Tip Over
Hazard
A child
or adult
can tip the range
and be killed.
Connect
anti=tip
bracket
to rear range foot.
Reconnect
the antFtip
bracket,
if the
range
is moved.
Failure
to follow
these
instructions
can
result
in death
or serious
burns
to children
and adults.
_MPORTANT:
_nstal_er:
Leave installation
instructions
with the homeowner.
Homeowner:
Keep installation
instructions
for future reference.
Save installation
instructions
for local electrical
inspector's
use.
9762998