Whirlpool SF265LXTT Installation Instructions - Page 2
Installationrequirements - parts
 |
UPC - 883049054919
View all Whirlpool SF265LXTT manuals
Add to My Manuals
Save this manual to your list of manuals |
Page 2 highlights
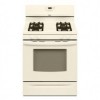
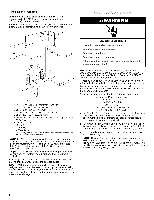
I I WmaAyRNrIeNsGu:lt cIaf uthseinginfoprrmopaetirotny dianmthagise, mapneursaol naisl niontjufroylloowredeatehx,actly, a fire or explosion II - Do not store or use gasoline or other flammable vapors and liquids in the vicinity of this or any other appliance, - WHAT TO DO IF YOU SMELL GAS: • Do not try to light any appliance, • Do not touch any electrical switch, • Do not use any phone in your building, • Immediately call your gas supplier from a neighbor's phone, Follow the gas supplier's instructions, • If you cannot reach your gas supplier, call the fire department, - Installation and service must be performed by a qualified installer, service agency or the gas supplier, In the State of Massachusetts, the following installation instructions apply: = Installations and repairs must be performed by a qualified or licensed contractor, plumber, or gasfitter qualified or licensed by the State of Massachusetts. = If using a ball valve, it shall be a T-handle type. = A flexible gas connector, when used, must not exceed 3 feet. INSTALLATIONREQUIREMENTS Gather the required tools and parts before starting installation. Read and follow the instructions provided with any tools listed here. Tools needed • Tape measure • Flat-blade screwdriver • Phillips screwdriver • Level • Hand or electric drill • Hammer • Channel lock pliers • Pipe wrench • 1%6"combination wrench • 3/8"drive ratchet • 3/8"nut driver • 1/8"(3.2 ram) drill bit (for wood floors) • Marker or pencil • Masking tape • Pipe-joint compound resistant to LP gas • 3_6" (4.8 mm) carbide-tipped masonry drill bit (for concrete/ceramic floors) • Noncorrosiveleak-detection solution For LP/Natural Gas Conversions • 1/2"combination wrench • %" combination wrench • %6" nut driver • Phillips screwdriver Parts supplied Check that all parts are included. C A. Anti-tip bracket B. Plastic anchors (2) C. #10x W' screws (2) Brackets must be securely mounted to subfloor. Thickness of flooring may require longer screws to anchor bracket to subfloor. Longer screws are available from your local hardware store. Parts needed Check local codes and consult gas supplier. Check existing gas supply and electrical supply. See "Electrical Requirements" and "Gas Supply Requirements" sections.
-
 1
1 -
 2
2 -
 3
3 -
 4
4 -
 5
5 -
 6
6 -
 7
7 -
 8
8 -
9
-
10
-
11
-
12
-
13
-
14
-
15
-
16
 |
 |