Whirlpool URB551WNGZ Use & Care Guide - Page 10
Install Door Handles - bottom freezer refrigerator
 |
View all Whirlpool URB551WNGZ manuals
Add to My Manuals
Save this manual to your list of manuals |
Page 10 highlights
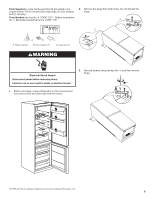
Install Door Handles (on some models) A. Hinge plug Final Steps 1. Check all holes to make sure that hole plugs and screws are in place and are fully tightened. WARNING On some models the door handles are factory-installed. If your refrigerator does not have factory-installed handles, see the following instructions. IMPORTANT: If you want to reverse the direction of the door swing, so that the freezer and refrigerator doors open from the opposite side, see "Reverse Door Swing" before installing the door handles. Parts Supplied: The door handles are packed inside the freezer compartment, and the Reversibility kit containing the screws and hole plugs is in the crisper drawer in the refrigerator compartment. Parts Location n Door handles (2) Freezer compartment n Handle screws (4) Crisper drawer n Handle plugs (4) Crisper drawer Gather the required tools. Tools Needed: Phillips screwdriver Electrical Shock Hazard Plug into a grounded 3 prong outlet. Do not remove ground prong. Do not use an adapter. Do not use an extension cord. Failure to follow these instructions can result in death, fire, or electrical shock. Install Handles 1. Remove the door handles from the packaging. Remove the screws and hole plugs from the Reversibility Kit. 2. Using the screws, fasten the handles to the doors. 3. Insert the handle plugs to cover the screws. 2. Plug into a grounded 3 prong outlet. NOTE: Allow refrigerator to stand upright at least 2 hours before plugging in. 3. Return all removable door parts to door and food to refrigerator. NOTE: Wait at least 24 hours for your refrigerator to cool completely before adding food. If you add food before the refrigerator has cooled completely, your food may spoil. 10
-
 1
1 -
2
-
3
-
4
-
 5
5 -
 6
6 -
 7
7 -
 8
8 -
 9
9 -
 10
10 -
 11
11 -
 12
12 -
 13
13 -
 14
14 -
 15
15 -
16
-
17
-
18
-
19
-
20
-
21
-
22
-
23
-
24
-
25
-
26
-
27
-
28
-
29
-
30
-
31
-
32
-
33
-
34
-
35
-
36
-
37
-
38
-
39
-
40
-
41
-
42
-
43
-
44
-
45
-
46
-
47
-
48
-
49
-
50
-
51
-
52
-
53
-
54
-
55
-
56
 |
 |
