Whirlpool WCG52424AS Installation Guide - Page 6
Install Cooktop
 |
View all Whirlpool WCG52424AS manuals
Add to My Manuals
Save this manual to your list of manuals |
Page 6 highlights
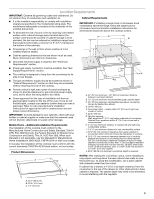
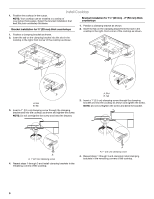
Install Cooktop 1. Position the cooktop in the cutout. NOTE: Your cooktop can be installed in a variety of countertop thicknesses. Select the bracket installation that best fits your countertop thickness. Bracket installation for 1¹⁄₈" (30 mm) - 2" (50 mm) thick countertops 1. Position a clamping bracket as shown. Bracket installation for ³⁄₄" (20 mm) thick countertops 2. Insert the tab on the clamping bracket into the slot in the cooktop in the right, front corner of the cooktop as shown. 1. Position a clamping bracket as shown. 2. Insert the tab on the clamping bracket into the slot in the cooktop in the right, front corner of the cooktop as shown. A A B B A. Slot B. Tab 3. Insert a 1" (2.5 cm) clamping screw through the clamping bracket and into the cooktop as shown and tighten the screw. NOTE: Do not overtighten the screw and bend the bracket. A. Slot B. Tab 3. Insert a 1" (2.5 cm) clamping screw through the clamping bracket and into the cooktop as shown and tighten the screw. NOTE: Do not overtighten the screw and bend the bracket. A A. 1" (2.5 cm) clamping screw 4. Repeat steps 1 through 3 and install clamping brackets in the remaining corners of the cooktop. A A. 1" (2.5 cm) clamping screw 4. Repeat steps 1 through 3 and clamping install clamping brackets in the remaining corners of the cooktop. 6
-
 1
1 -
 2
2 -
 3
3 -
 4
4 -
 5
5 -
 6
6 -
 7
7 -
 8
8 -
 9
9 -
 10
10 -
 11
11 -
 12
12 -
13
-
14
-
15
-
16
-
17
-
18
-
19
-
20
 |
 |
