Whirlpool WDF550SAAS Installation Guide - Page 2
Dishwasher Safety, Installation Requirements
 |
View all Whirlpool WDF550SAAS manuals
Add to My Manuals
Save this manual to your list of manuals |
Page 2 highlights
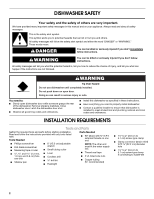
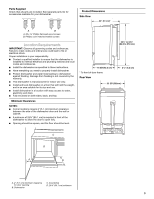
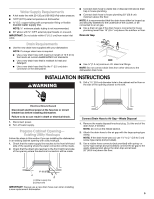
DISHWASHER SAFETY Your safety and the safety of others are very important. We have provided many important safety messages in this manual and on your appliance. Always read and obey all safety messages. This is the safety alert symbol. This symbol alerts you to potential hazards that can kill or hurt you and others. All safety messages will follow the safety alert symbol and either the word "DANGER" or "WARNING." These words mean: DANGER You can be killed or seriously injured if you don't immediately follow instructions. WARNING You can be killed or seriously injured if you don't follow instructions. All safety messages will tell you what the potential hazard is, tell you how to reduce the chance of injury, and tell you what can happen if the instructions are not followed. WARNING Tip Over Hazard Do not use dishwasher until completely installed. Do not push down on open door. Doing so can result in serious injury or cuts. You need to: ■ Slowly open dishwasher door while someone grasps the rear of the dishwasher. Remove shipping materials. Close dishwasher door. Latch the dishwasher door shut. ■ Observe all governing codes and ordinances. ■ Install this dishwasher as specified in these instructions. ■ Have everything you need to properly install dishwasher. ■ Contact a qualified installer to ensure that dishwasher is installed to meet all electrical and plumbing national and local codes and ordinances. INSTALLATION REQUIREMENTS Tools and Parts Gather the required tools and parts before starting installation. Read and follow the instructions provided with any tools listed here. Tools Needed Parts Needed ■ 90º elbow with ³⁄₈" N.P.T. external threads on one end ■ Phillips screwdriver ■ Flat-blade screwdriver ■ Measuring tape or ruler and 1½" (1.3 mm, 1.9 mm and 3.8 cm) hole saw bits ■ Shallow pan ■ 6" (15.2 cm) adjustable wrench ■ Small tubing cutter ■ Level ■ Cordless drill drill bit ■ Flashlight NOTE: The other end must fit the water supply line. ■ Thread seal tape ■ 3 UL listed wire nuts ■ Copper tubing (³⁄₈" recommended) ■ 1¹⁄₂" to 2" (3.8 cm to 5.1 cm) screw-type clamp ■ Clamp connector (strain relief) to fit 22.2 cm) diameter hole ■ 1¹⁄₂" to 2" (3.8 cm to 5.1 cm) screw-type clamp if connecting to waste-tee 2
-
 1
1 -
 2
2 -
 3
3 -
 4
4 -
 5
5 -
 6
6 -
 7
7 -
 8
8 -
9
-
10
-
11
-
12
-
13
-
14
-
15
-
16
-
17
-
18
-
19
-
20
-
21
-
22
-
23
-
24
-
25
-
26
-
27
-
28
-
29
 |
 |
