Whirlpool WMT50011KS Owners Manual
Whirlpool WMT50011KS Manual
 |
View all Whirlpool WMT50011KS manuals
Add to My Manuals
Save this manual to your list of manuals |
Whirlpool WMT50011KS manual content summary:
- Whirlpool WMT50011KS | Owners Manual - Page 1
Foil and Metal 8 Microwave Cooking Power 8 Popcorn 9 Reheat 9 Frozen Entree 9 Defrost 9 Cook 10 MICROWAVE OVEN CARE 11 General Cleaning 11 Replacing The Cavity Light 12 TROUBLESHOOTING 14 ACCESSORIES 14 W11416163C - Whirlpool WMT50011KS | Owners Manual - Page 2
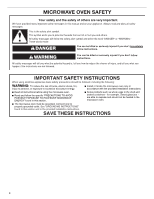
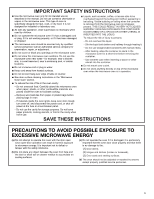
, or exposure to excessive microwave energy: I Install or locate the microwave oven only in accordance with the provided Installation Instructions. I Read all instructions before using the microwave oven. I Read and follow the specific "PRECAUTIONS TO AVOID POSSIBLE EXPOSURE TO EXCESSIVE MICROWAVE - Whirlpool WMT50011KS | Owners Manual - Page 3
IMPORTANT SAFETY INSTRUCTIONS I Use the microwave oven only for its intended use as described in the manual. Do been damaged or dropped. I The microwave oven should be serviced only by qualified service personnel. Call an authorized service company for examination, repair, or adjustment. I Do not - Whirlpool WMT50011KS | Owners Manual - Page 4
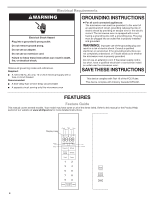
electrician or serviceman install an outlet near the microwave oven. SAVE THESE INSTRUCTIONS This device complies with Part 18 of the FCC Rules. This device complies with Industry Canada ICES-001. FEATURES Feature Guide This manual covers several models. Your model may have some or all of the - Whirlpool WMT50011KS | Owners Manual - Page 5
, similar to a stop watch. To set the kitchen timer, follow the instructions below: 1. Press TIMER button, the icon will appear on the display. : Open the door, repeat the above steps to reset the timer. To run manual cooking mode: Press POWER button to set the power level, and press POWER button - Whirlpool WMT50011KS | Owners Manual - Page 6
a food category. See the REHEAT section in this guide for the food category or reference the sticker on the To use the auto cook presets, follow the instructions below: 1. Press COOK. The icon will show will sound. Set Manual Cooking Time and Power Press POWER to set manual power and cooking time - Whirlpool WMT50011KS | Owners Manual - Page 7
Standby Mode When no functions are being used, the microwave oven will switch to Standby Power mode and slightly dim the display brightness after about 2 minutes. Touch any key or open/close the door, and the display will return to the normal brightness. Demo Mode Demo mode allows user to interact - Whirlpool WMT50011KS | Owners Manual - Page 8
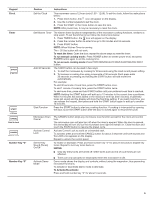
specify which cooking power to use by percent, name, or number. For example, 70%=Medium-High=7. Use the following chart as a general guide for the suggested cooking power of specific foods. MICROWAVE COOKING POWER CHART Percent/ Number Use Name 100%, High (default setting) 10 Quick-heating - Whirlpool WMT50011KS | Owners Manual - Page 9
food should not be defrosted using the Defrost feature but should be defrosted manually. ■ Use small pieces of aluminum foil to shield parts of food the "Defrost" section for cuts, sizes, and instructions. Use the following chart as a guide when defrosting meat, poultry, or fish. DEFROST PREPARATION - Whirlpool WMT50011KS | Owners Manual - Page 10
Cook Item Food Category Quantity 1 Bacon 1-6 slices Average thickness: Follow directions on package. For best results, place bacon on microwave-safe bacon rack. 2 Canned Vegetable 1, 2, 3 or 4 cups Place in microwave-safe (250, 500, 750 mL or 1 L) container. Cover with plastic wrap, and - Whirlpool WMT50011KS | Owners Manual - Page 11
controls are off and the microwave oven is cool. Always follow label instructions on cleaning products. Soap, water, and a soft cloth or steel models, rub in direction of grain to avoid damaging the unit. TURNTABLE SUPPORT AND ROLLERS, HUB ■ Mild soap and water or dishwasher NONSTICK CAVITY COATING - Whirlpool WMT50011KS | Owners Manual - Page 12
Use a Phillips head screwdriver to remove the 4 wood screws C securing the trim kit frame to the cabinet. A. Trim kit frame B. Mounting hole guide C. #7-16x15/16" flat head wood screw (4) D. Cutout ceiling WARNING Excessive Weight Hazard Use two or more people to move and install microwave oven - Whirlpool WMT50011KS | Owners Manual - Page 13
Plug into a grounded 3 prong outlet. Do not remove ground prong. Do not use an adapter. Do not use an extension cord. Failure to follow these instructions can result in death, fire, or electrical shock. 14. Slide the microwave oven back to the cabinet. Plug in the microwave oven. 15. Reattach the - Whirlpool WMT50011KS | Owners Manual - Page 14
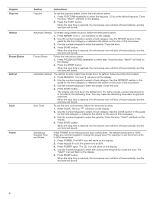
service call, please visit the "Troubleshooting" section at https://www.whirlpool.com/owners for Troubleshooting or reset the circuit breaker. If the problem continues, call an electrician. ■ Magnetron: cavity walls, microwave inlet cover, cooking rack supports, and area where the door touches the - Whirlpool WMT50011KS | Owners Manual - Page 15
21 Mode Demo (démonstration 21 Control Lock (verrouillage des commandes 21 UTILISATION DU FOUR À MICRO-ONDES 21 Caractéristiques des aliments 21 Guide de cuisson 21 Ustensiles de cuisson et vaisselle 22 Papier d'aluminium et métal 22 Puissance de cuisson au four à micro‑ondes 22 Popcorn - Whirlpool WMT50011KS | Owners Manual - Page 16
et vous disent comment réduire le risque de blessure et ce qui peut se produire en cas de non-respect des instructions. IMPORTANTES INSTRUCTIONS DE SÉCURITÉ Lors de l'utilisation de tout appareil ménager électrique on doit observer certaines précautions de sécurité fondamentales, dont les - Whirlpool WMT50011KS | Owners Manual - Page 17
pendre sur le bord d'une table ou d'un comptoir. I Voir les instructions de nettoyage de la surface de la porte à la section "Entretien du I Veiller à ne rien remiser directement sur le four lorsqu'il est en service. - Ne pas faire cuire les aliments excessivement. Surveiller attentivement le four à - Whirlpool WMT50011KS | Owners Manual - Page 18
Ne pas utiliser un câble de rallonge. Le non-respect de ces instructions peut causer un décès, un incendie ou un choc électrique. observer les dispositions est conforme à la norme ICES-001 d'Industrie Canada. CARACTÉRISTIQUES Guide des caractéristiques Le présent manuel couvre plusieurs modèles. Ce - Whirlpool WMT50011KS | Owners Manual - Page 19
des fonctions de cuisson du four à micro-ondes. Elle fonctionne comme un chronomètre. Pour régler la minuterie de cuisine, suivre les instructions suivantes : 1. Appuyer sur le bouton TIMER (minuterie), l'icône apparaît sur l'afficheur. 2. Appuyer sur les boutons numériques pour saisir une dur - Whirlpool WMT50011KS | Owners Manual - Page 20
éclaté Pour utiliser le préréglage de maïs à éclater, suivre les instructions suivantes : 1. Appuyer plusieurs fois sur POPCORN (maïs à éclater) pour sélectionner gorie d'aliments. Consulter la section DEFROST (décongélation) de ce guide pour connaître les catégories d'aliments ou l'étiquette sur - Whirlpool WMT50011KS | Owners Manual - Page 21
de terre, demandent un temps de cuisson plus long que les aliments de même taille, mais plus légers et poreux, comme les gâteaux. Guide de cuisson Recouvrement Recouvrir les aliments aide à retenir l'humidité, réduire le temps de cuisson et limiter les éclaboussures. Utiliser le couvercle fourni - Whirlpool WMT50011KS | Owners Manual - Page 22
pas utiliser des ustensiles de cuisson ou de la vaisselle avec garniture en or ou en argent. Utiliser le tableau suivant comme guide, ensuite faire un test avant utilisation. Matériau Papier d'aluminium, métal Plat brunisseur Vitrocéramique, verre Porcelaine, terre cuite Mélamine Papier : Chiffons - Whirlpool WMT50011KS | Owners Manual - Page 23
*Consulter le tableau de préparation de décongélation à la fin de la section « Décongélation » pour obtenir des instructions sur les coupes et tailles. Utiliser le tableau suivant comme guide lors de la décongélation de la viande, de la volaille ou du poisson. TABLEAU DE PRÉPARATION DE DÉCONGÉLATION - Whirlpool WMT50011KS | Owners Manual - Page 24
Cook (Cuisson) Article Catégories d'aliment Quantité 1 Bacon 1 à 6 tranches Épaisseur moyenne : Suivre les instructions figurant sur l'emballage. Pour des résultats optimaux, mettre le bacon sur une grille à bacon allant au micro-ondes. 2 Légumes en conserve 1, 2, 3 ou 4 tasses Placer dans - Whirlpool WMT50011KS | Owners Manual - Page 25
es et que le four à micro-ondes est froid. Toujours suivre les instructions figurant sur les étiquettes des produits de nettoyage. L'usage de savon, inoxydable, frotter dans le sens du grain pour éviter d'endommager l'appareil. SUPPORT DU PLATEAU ROTATIF ET ROULETTES, AXE ■ Savon doux et eau ou - Whirlpool WMT50011KS | Owners Manual - Page 26
Risque du poids excessif Utiliser deux ou plus de personnes pour déplacer et installer le four à micro-ondes. Le non-respect de cette instruction peut causer une blessure au dos ou d'autre blessure. 2. À l'aide d'au moins 2 personnes, glisser le four à micro-ondes hors de l'ouverture d'encastrement - Whirlpool WMT50011KS | Owners Manual - Page 27
enlever la broche de liaison à la terre. Ne pas utiliser un adaptateur. Ne pas utiliser un câble de rallonge. Le non-respect de ces instructions peut causer un décès, un incendie ou un choc électrique. 14. Réinsérer le four à micro-ondes dans l'ouverture d'encastrement de l'armoire. Brancher le four - Whirlpool WMT50011KS | Owners Manual - Page 28
. Si le four à micro-ondes ne fonctionne toujours pas, faire un appel de service. ■ Porte : Bien fermer la porte. Sur certains modèles, si une cale és sur les parois de la cavité, l'orifice d'introduction des micro-ondes, les supports de la grille de cuisson et la zone de contact entre le cadre et la - Whirlpool WMT50011KS | Owners Manual - Page 29
Au Canada, consulter notre site Web au https://www.whirlpool.ca/owner ou nous contacter au 1 800 807-6777. Accessoires de nettoyage ■ Support du plateau rotatif ■ Nettoyant en mousse pour acier inoxydable affresh® (Commander la pièce nº W11443144) ■ Éclaircissant nettoyant pour acier inoxydable - Whirlpool WMT50011KS | Owners Manual - Page 30
Remarques 30 - Whirlpool WMT50011KS | Owners Manual - Page 31
Remarques 31 - Whirlpool WMT50011KS | Owners Manual - Page 32
W11416163C ®/™ ©2020 All rights reserved. Tous droits réservés. 06/20
-
 1
1 -
 2
2 -
 3
3 -
 4
4 -
 5
5 -
 6
6 -
 7
7 -
8
-
9
-
10
-
11
-
12
-
13
-
14
-
15
-
16
-
17
-
18
-
19
-
20
-
21
-
22
-
23
-
24
-
25
-
26
-
27
-
28
-
29
-
30
-
31
-
32
 |
 |
THANK YOU for purchasing this high-quality product. Register your microwave oven at
www.whirlpool.ca
.
For future reference, please make a note of your product model and serial numbers. These can be found on the label located on the
microwave oven frame behind the top right side of the microwave oven door.
Model Number __________________________________________
Serial Number ___________________________________________
Table of Contents
W11416163C
MICROWAVE OVEN SAFETY
........................................................
2
Electrical Requirements
...............................................................
4
FEATURES
......................................................................................
4
Standby Mode
..............................................................................
7
Demo Mode
..................................................................................
7
Control Lock
.................................................................................
7
MICROWAVE OVEN USE
...............................................................
7
Food Characteristics
....................................................................
7
Cooking Guidelines
......................................................................
7
Cookware and Dinnerware
...........................................................
8
Aluminum Foil and Metal
.............................................................
8
Microwave Cooking Power
..........................................................
8
Popcorn
........................................................................................
9
Reheat
..........................................................................................
9
Frozen Entree
...............................................................................
9
Defrost
..........................................................................................
9
Cook
...........................................................................................
10
MICROWAVE OVEN CARE
..........................................................
11
General Cleaning
........................................................................
11
Replacing The Cavity Light
........................................................
12
TROUBLESHOOTING
..................................................................
14
ACCESSORIES
.............................................................................
14
BUILT-IN MICROWAVE WITH TRIM KIT