Whirlpool WRS537SIAB Use & Care Guide - Page 11
Caution: Irritant, First Aid Treatment
 |
View all Whirlpool WRS537SIAB manuals
Add to My Manuals
Save this manual to your list of manuals |
Page 11 highlights
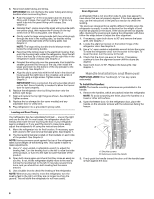
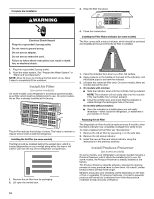
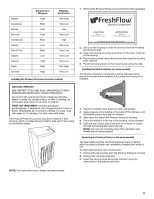
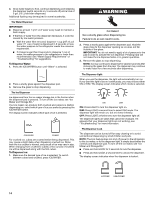
Apples Asparagus Berries Broccoli Cantaloupe Carrots Citrus Fruit Grapes Lettuce Pears Spinach Sensitivity to Ethylene High Med. Low High Med. Low Med. Low High High High Ethylene Production Very High Very Low Low Very Low High Very Low Very Low Very Low Very Low Very High Very Low Installing the Produce Preserver (on some models) 1. Remove the Produce Preserver pouches from their packaging. CAUTION IRRITANT Read cautions on back. ATTENTION IRRITANT Lire les mises en garde au dos. Whirlpool Corporation, Benton Harbor MI 49022 2. Lift up on the housing in order to remove it from its mounting tab along the wall. 3. Open the housing by pulling up and out on the back of the top of the housing. 4. Place both pouches inside the housing, then snap the housing back together. 5. Place the housing back on the mounting tab along the wall. Installing the Status Indicator (on some models) The Produce Preserver comes with a status indicator, which should be activated and installed at the same time the pouch is installed. CAUTION: IRRITANT MAY IRRITATE EYES AND SKIN. DANGEROUS FUMES FORM WHEN MIXED WITH OTHER PRODUCTS. Do not mix with cleaning products containing ammonia, bleach or acids. Do not get in eyes, on skin or clothing. Do not breathe dust. Keep out of reach of children. FIRST AID TREATMENT: Contains potassium permanganate. If swallowed, call a Poison Control Center or doctor immediately. Do not induce vomiting. If in eyes, rinse with water for 15 minutes. If on skin, rinse with water. The Produce Preserver pouches should be installed in their housing, which is located along an interior side wall of the crisper or convertible drawer. CAUTION IRRITANT Read cautions on back. ATTENTION IRRITANT Lisez des prudences sur le revers. REPLACE MONTHS 1. Place the indicator face-down on a firm, flat surface. 2. Apply pressure to the bubble on the back of the indicator, until the bubble pops to activate the indicator. 3. Slide open the cap on the Produce Preserver housing. 4. Place the indicator in the top of the housing, facing outward. 5. Slide the cap closed, and check that the indicator is visible through the rectangular hole in the cap. NOTE: The cap will not easily close if the indicator's rear bubble has not been popped. Replacing the Produce Preserver (on some models) The disposable pouches should be replaced every 6 months, when the status indicator has completely changed from white to red. To order replacements, see "Accessories." 1. Remove the old pouches from the Produce Preserver housing. 2. Remove the old status indicator. 3. Install the new pouches and status indicator using the instructions in the previous sections. NOTE: For best performance, always use two pouches. 11
-
 1
1 -
2
-
3
-
4
-
5
-
 6
6 -
 7
7 -
 8
8 -
 9
9 -
 10
10 -
 11
11 -
 12
12 -
 13
13 -
 14
14 -
 15
15 -
 16
16 -
17
-
18
-
19
-
20
-
21
-
22
-
23
-
24
-
25
-
26
-
27
-
28
-
29
-
30
-
31
-
32
-
33
-
34
-
35
-
36
-
37
-
38
-
39
-
40
-
41
-
42
-
43
-
44
-
45
-
46
-
47
-
48
-
49
-
50
-
51
-
52
-
53
-
54
-
55
-
56
-
57
-
58
-
59
-
60
-
61
-
62
-
63
-
64
-
65
-
66
 |
 |
