Whirlpool WVU37UC4F Installation Instructions
Whirlpool WVU37UC4F Manual
 |
View all Whirlpool WVU37UC4F manuals
Add to My Manuals
Save this manual to your list of manuals |
Whirlpool WVU37UC4F manual content summary:
- Whirlpool WVU37UC4F | Installation Instructions - Page 1
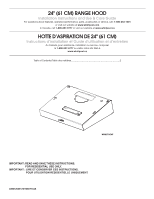
24" (61 CM) RANGE HOOD Installation Instructions and Use & Care Guide For questions about features, operation/performance, parts, accessories or service, call: 1-800-253-1301 or visit our website at www.whirlpool.com In Canada, call 1-800-807-6777 or visit our website at www.whirlpool.ca HOTTE D' - Whirlpool WVU37UC4F | Installation Instructions - Page 2
Requirements 7 INSTALLATION INSTRUCTIONS 8 Prepare Location 8 Prepare Range Hood 10 Install Range Hood 12 Make Electrical Connection 13 Complete Installation 14 RANGE HOOD USE 14 Range Hood Controls 14 RANGE HOOD CARE 15 Cleaning 15 WIRING DIAGRAM 16 ASSISTANCE OR SERVICE 17 In - Whirlpool WVU37UC4F | Installation Instructions - Page 3
RANGE HOOD SAFETY Your safety and the safety of others are very important. We have provided many important safety messages in this manual and the chance of injury, and tell you what can happen if the instructions are not followed. State of California Proposition 65 Warnings: WARNING: This product - Whirlpool WVU37UC4F | Installation Instructions - Page 4
IMPORTANT SAFETY INSTRUCTIONS READ AND SAVE THESE INSTRUCTIONS 4 - Whirlpool WVU37UC4F | Installation Instructions - Page 5
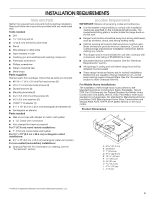
Cabinet opening dimensions that are shown must be used. Given dimensions provide minimum clearance. Consult the cooktop/range manufacturer installation instructions before making any cutouts. ■■ This range hood is recommended for use with cooktops with a maximum total rating of 55,000 BTUs or less - Whirlpool WVU37UC4F | Installation Instructions - Page 6
. If roof or wall cap has a damper, do not use damper supplied with the range hood. ■■ Use caulking to seal exterior wall or roof opening around the cap. Cold Weather Installations An additional backdraft damper should be installed to minimize backward cold air flow and a thermal break should be - Whirlpool WVU37UC4F | Installation Instructions - Page 7
of 3¹⁄4" x 10" (8.3 cm x 25.4 cm) = 13.0 ft (3.9 m) system Electrical Requirements Observe all governing codes and ordinances. Ensure that the electrical installation is adequate and in conformance with National Electrical Code, ANSI/NFPA 70 (latest edition), or CSA Standards C22.1-94, Canadian - Whirlpool WVU37UC4F | Installation Instructions - Page 8
the range hood. ■■ Wire sizes must conform to the requirements of the National Electrical Code, ANSI/NFPA 70 (latest edition), or CSA Standards C22. 1-94, Canadian Electrical Code, Part 1 and C22.2 No. 0-M91 (latest edition) and all local codes and ordinances. INSTALLATION INSTRUCTIONS Prepare - Whirlpool WVU37UC4F | Installation Instructions - Page 9
Style 1 - Cut Openings for 3¼" x 10" (8.3 cm x 25.4 cm) Rectangular Vent System Roof Venting To make a 4¹⁄4" x 10½" (10.8 cm x 26.7 cm) rectangular cutout on the underside of cabinet top and bottom: 1. Mark lines ¹⁄2" (1.3 cm) and 4³⁄4" (12.1 cm) from the back wall on the centerline of the underside - Whirlpool WVU37UC4F | Installation Instructions - Page 10
7" (17.8 cm) round vent mounting plate or 3¹⁄4" x 10" (8.3 cm x 25.4 cm) vent damper, depending on your vent system installation. Attach to range hood with 3.5 x 9.5 mm screws provided and remove the tape from the damper flap. NOTE: An optional 7" (17.8 cm) round damper is also available as an - Whirlpool WVU37UC4F | Installation Instructions - Page 11
3. Slide the venting lever down as shown in the following image. A 6. Bend spring clips away from metal grease filter. 7. Place charcoal filter into top side of metal filter. A. Lever on No Vented option 4. Replace the venting method screw on the No Vented (recirculating) option. A 8. Bend spring - Whirlpool WVU37UC4F | Installation Instructions - Page 12
upper cabinet. With a pencil, mark the upper holes on the brackets. 5. Lift the range hood into place, positioning the rear slots over the mounting brackets. 6. Mount a round washer and a 4.5 x 13 mm screw to install the mounting brackets on the front of the cabinet. A. Cabinet front face edge - Whirlpool WVU37UC4F | Installation Instructions - Page 13
" section), follow the instructions in the "Make Electrical Connections" section. NOTES: ■■ Use only with range hood cord connection kits that have been investigated and found acceptable for use with this model range hood. ■■ Do not reconnect power until the installation is complete. 2. Remove - Whirlpool WVU37UC4F | Installation Instructions - Page 14
Option 2 - Power Cord Kit Installations For optional power cord kit installations, follow the instructions supplied with the power cord kit. See the "Accessories" section for information on ordering. NOTE: Use only with range hood cord connection kits that have been investigated and found acceptable - Whirlpool WVU37UC4F | Installation Instructions - Page 15
RANGE HOOD CARE Cleaning IMPORTANT: Clean the hood and grease filters frequently according to the following instructions. Replace grease filter before operating hood. Exterior Surfaces IMPORTANT: Do not use soap-filled scouring pads, abrasive cleaners, cooktop polishing creme, steel wool, gritty - Whirlpool WVU37UC4F | Installation Instructions - Page 16
WIRING DIAGRAM GN RD WH BK YL RD BK Mechanical Push Buttons (4 button 3 Speeds) LED LED BU BK YL BK BU BK W H YL BU 10uF LED DRIVER BU YL B R GN RD W H YL/GN W H BK YL/GN M N L GND SEL0120629 OUTPUT:700mA (2-15 VDC) +INPUT: 120 VAC PUSH BUTTON SWITCH OPERATION FUNCTION POSITION - Whirlpool WVU37UC4F | Installation Instructions - Page 17
ASSISTANCE OR SERVICE If you need service Please refer to the warranty page in this manual. In service, anywhere in Canada. For further assistance If you need further assistance, you can write to Whirlpool Canada LP with any questions or concerns at: ■■ Referrals to local dealers. ■■ Installation - Whirlpool WVU37UC4F | Installation Instructions - Page 18
few minutes to review the Troubleshooting or Problem Solver section of the Use and Care Guide, scan the QR code on the right to access additional resources, or visit www.whirlpool.com/product_help. 2. All warranty service is provided exclusively by our authorized Whirlpool Service Providers. In the - Whirlpool WVU37UC4F | Installation Instructions - Page 19
le danger potentiel et vous disent comment réduire le risque de blessure et ce qui peut se produire en cas de non-respect des instructions. Avertissements de la proposition 65 de l'État de Californie : AVERTISSEMENT : Ce produit contient au moins un produit chimique connu par l'État de Californie - Whirlpool WVU37UC4F | Installation Instructions - Page 20
LA CUISINIÈRE : CORPORELS, RESPECTER LES INSTRUCTIONS SUIVANTES : I Ne jamais laisser un tablissement de l'alimentation. I Tout travail d'installation ou câblage électrique doit être ré le ventilateur ou le retourner à un centre de service agréé pour examen et/ou réparation. DOMMAGES CORPORELS - Whirlpool WVU37UC4F | Installation Instructions - Page 21
indiquées pour les ouvertures à découper dans les meubles. Ces dimensions représentent les valeurs minimales des dégagements. Consulter les instructions d'installation du fabricant de la table de cuisson/ du four avant d'effectuer des coupes. ■■ Il est recommandé d'utiliser cette hotte avec - Whirlpool WVU37UC4F | Installation Instructions - Page 22
charbon. Voir la section "Accessoires " pour savoir comment commander. ■■ Le système de ventilation doit évacuer vers l'extérieur, sauf pour les installations sans ventilation (recyclage). ■■ Ne pas terminer le circuit d'évacuation dans un grenier ou dans un autre espace clos. ■■ Ne pas utiliser une - Whirlpool WVU37UC4F | Installation Instructions - Page 23
pi (2,4 m) = 0,0 pi (0,0 m) = 13,0 pi (3,9 m) Spécifications électriques Observer les dispositions de tous les codes et règlements en vigueur. S'assurer que l'installation électrique est appropriée et conforme au National Electrical Code, à la norme ANSI/NFPA 70 (plus récente édition) ou à la norme - Whirlpool WVU37UC4F | Installation Instructions - Page 24
dition la plus récente) et de tous les codes et règlements en vigueur. INSTRUCTIONS D'INSTALLATION Préparation de l'emplacement REMARQUE : On recommande d'installer le circuit d'évacuation avant d'entreprendre l'installation de la hotte. Avant d'effectuer des découpes, s'assurer que l'espace est - Whirlpool WVU37UC4F | Installation Instructions - Page 25
Style 1 - Découpages d'ouverture pour un système d'évacuation rectangulaire de 3¼" x 10" (8,3 cm x 25,4 cm) Évacuation à travers le toit Découpage d'une ouverture rectangulaire de 4¹⁄4" x 10½" (10,8 cm x 26,7 cm) sur la face inférieure du sommet et du bas du placard : 1. Tracer des lignes à ¹⁄2" - Whirlpool WVU37UC4F | Installation Instructions - Page 26
le mur ou le toit). Préparation de la hotte Seulement pour les options d'évacuation par le haut/mur : 1. Selon la configuration d'installation, ôter les opercules amovibles du conduit d'évacuation. A B E A. Clapet anti-reflux circulaire de 7" (17,8 cm) (Voir la section "Accessoires") B. Vis 3,5 mm - Whirlpool WVU37UC4F | Installation Instructions - Page 27
ventilation (recyclage). A 8. Déplier les attaches à ressort pour les remettre en place afin de fixer le filtre à charbon au filtre métallique. A. Vis de méthode sans ventilation 9. Réinstaller le filtre à graisse métallique. 27 - Whirlpool WVU37UC4F | Installation Instructions - Page 28
la hotte de ventilation (selon l'emplacement du point d'entrée du câble d'alimentation du domicile) et installer un serre-câbles de ¹⁄2" homologué UL ou CSA. A 4. À l'aide d'une vis de 4,5 x 13 mm, fixer deux supports sur la partie intérieure avant ou sur le côté du cabinet, en affleurement avec le - Whirlpool WVU37UC4F | Installation Instructions - Page 29
ée à la terre dans la boîte de la borne. Le non-respect de ces instructions peut causer un décès, un incendie ou un choc électrique. 4. Connecter le conducteur de la terre dans la boîte de connexion et bien serrer. 5. Installer le couvercle du boîtier de connexion. 6. Rétablir l'alimentation é - Whirlpool WVU37UC4F | Installation Instructions - Page 30
avec l'ensemble du cordon d'alimentation Pour les installations avec l'ensemble du cordon d'alimentation facultatif, suivre les instructions fournies avec l'ensemble du cordon d'alimentation. Consulter la section "Accessoires" pour connaître le processus de commande. REMARQUE : Utiliser - Whirlpool WVU37UC4F | Installation Instructions - Page 31
instructions suivantes. Replacer le filtre à graisse avant d'utiliser à nouveau la hotte. Surfaces extérieures 2. Laver les filtres métalliques selon le besoin au lave-vaisselle ou dans une solution de détergent chaude. 3. Réinstaller Voir la section "Assistance ou service" pour commander. ■■ Dé - Whirlpool WVU37UC4F | Installation Instructions - Page 32
SCHÉMA DE CÂBLAGE Boutons-poussoirs mécaniques (4 boutons, 3 vitesses) Voyant DEL Voyant DEL VE R BL N JA R N 10uF M B L BU N N JA BU N JA BU NEU L TERRE PILOTE DEL SORTIE : 700mA (2-15 V CC) +ENTRÉE : 120 V CA BOUTON-POUSSOIR COMMUTATEUR POUSSOIR FONCTION POSTE ARRÊT PAS DE - Whirlpool WVU37UC4F | Installation Instructions - Page 33
un service après la garantie, partout au Canada. Pour de l'aide supplémentaire Si vous avez besoin de plus d'assistance, vous pouvez écrire à Whirlpool Canada LP en soumettant toute question ou tout problème à : ■■ Références aux revendeurs locaux. ■■ Renseignements sur l'installation. ■■ Proc - Whirlpool WVU37UC4F | Installation Instructions - Page 34
avec le produit, Whirlpool Corporation ou Whirlpool Canada, LP (ci-après désignées "Whirlpool") décidera à sa seule discrétion de 2. Visite d'instruction à domicile pour montrer à l'utilisateur comment utiliser l'appareil. 3. Visites de service pour rectifier une installation ou un entretien - Whirlpool WVU37UC4F | Installation Instructions - Page 35
également jouir d'autres droits qui peuvent varier d'une juridiction à l'autre. EXONÉRATION DE RESPONSABILITÉ DANS LES DOMAINES NON COUVERTS PAR LA GARANTIE Whirlpool décline toute responsabilité au titre de la qualité, de la durabilité ou en cas de dépannage ou de réparation nécessaire sur ce gros - Whirlpool WVU37UC4F | Installation Instructions - Page 36
W10907133A ®/™ ©2016 Whirlpool. Used under license in Canada. All rights reserved. Utilisé sous licence au Canada. Tous droits réservés. 10/16
-
 1
1 -
 2
2 -
 3
3 -
 4
4 -
 5
5 -
 6
6 -
 7
7 -
8
-
9
-
10
-
11
-
12
-
13
-
14
-
15
-
16
-
17
-
18
-
19
-
20
-
21
-
22
-
23
-
24
-
25
-
26
-
27
-
28
-
29
-
30
-
31
-
32
-
33
-
34
-
35
-
36
 |
 |

24" (61 CM) RANGE HOOD
Installation Instructions and Use & Care Guide
For questions about features, operation/performance, parts, accessories or service, call:
1-800-253-1301
or visit our website at
www.whirlpool.com
In Canada, call
1-800-807-6777
or visit our website at
www.whirlpool.ca
HOTTE D’ASPIRATION DE 24" (61 CM)
Instructions d’installation et Guide d’utilisation et d’entretien
Au Canada, pour assistance, installation ou service, composer
le
1-800-807-6777
ou visiter notre site Web à
www.whirlpool.ca
Table of Contents/Table des matières
.............................................................................
2
LIB0120491/W10907133A
IMPORTANT: READ AND SAVE THESE INSTRUCTIONS.
FOR RESIDENTIAL USE ONLY.
IMPORTANT : LIRE ET CONSERVER CES INSTRUCTIONS.
POUR UTILISATION RÉSIDENTIELLE UNIQUEMENT.
WVU37UC4F