Whirlpool WVU37UC4F Installation Instructions - Page 11
A. Non-vented recirculating vent cover, A. Lever on No Vented option, A. No Vented method screw
 |
View all Whirlpool WVU37UC4F manuals
Add to My Manuals
Save this manual to your list of manuals |
Page 11 highlights
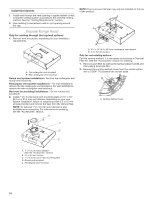
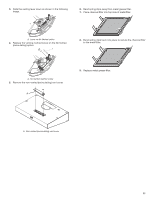
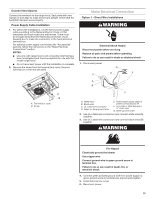
3. Slide the venting lever down as shown in the following image. A 6. Bend spring clips away from metal grease filter. 7. Place charcoal filter into top side of metal filter. A. Lever on No Vented option 4. Replace the venting method screw on the No Vented (recirculating) option. A 8. Bend spring clips back into place to secure the charcoal filter to the metal filter. A. No Vented method screw 5. Remove the non-vented (recirculating) vent cover. A 9. Replace metal grease filter. A. Non-vented (recirculating) vent cover 11
-
 1
1 -
2
-
3
-
4
-
5
-
 6
6 -
 7
7 -
 8
8 -
 9
9 -
 10
10 -
 11
11 -
 12
12 -
 13
13 -
 14
14 -
 15
15 -
 16
16 -
17
-
18
-
19
-
20
-
21
-
22
-
23
-
24
-
25
-
26
-
27
-
28
-
29
-
30
-
31
-
32
-
33
-
34
-
35
-
36
 |
 |

11
3.
Slide the venting lever down as shown in the following
image.
4.
Replace the venting method screw on the No Vented
(recirculating) option.
5.
Remove the non-vented (recirculating) vent cover.
A. Non-vented (recirculating) vent cover
6.
Bend spring clips away from metal grease filter.
7.
Place charcoal filter into top side of metal filter.
8.
Bend spring clips back into place to secure the charcoal filter
to the metal filter.
9.
Replace metal grease filter.
A
A
A
A. Lever on No Vented option
A. No Vented method screw