Xerox 6180N Disk Overwrite Installation and Usage - Page 5
Saved Jobs Only, Saved Jobs and User-Added Resources - nuvera
 |
UPC - 095205425307
View all Xerox 6180N manuals
Add to My Manuals
Save this manual to your list of manuals |
Page 5 highlights
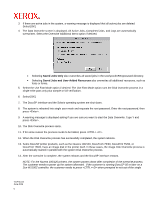
3. If there are active jobs in the system, a warning message is displayed that all active jobs are deleted. Select [OK]. 4. The Data Overwrite screen is displayed. All Active Jobs, Completed Jobs, and Logs are automatically overwritten. Select the Overwrite Additional Items option if desired. • Selecting Saved Jobs Only also overwrites all saved jobs in the /var/spool/XRXnps/saved directory. • Selecting Saved Jobs and User-Added Resources also overwrites all additional resources, such as fonts or forms. 5. Select the Use Fast Mode option if desired. The Use Fast Mode option runs the Disk Overwrite process in a single write pass only plus sample or full verification. 6. Select [OK]. 7. The DocuSP interface and the Solaris operating system are shut down. 8. The system is rebooted into single user mode and requests the root password. Enter the root password, then press . 9. A warning message is displayed asking if you are sure you want to start the Data Overwrite. Type Y and press . 10. The Disk Overwrite process starts. 11. If for some reason the process needs to be halted, press . 12. When the Disk Overwrite process has successfully completed, the system reboots. 13. Some DocuSP printer products, such as the Nuvera 100/120, DocuTech 75/90, DocuPrint 75/90, or DocuPrint 75MX, have an image disk in the printer itself. In these cases, the image Disk Overwrite process is automatically started in parallel with the system Disk Overwrite process. 14. After the overwrite is complete, the system reboots and the DocuSP interface restarts. NOTE: For the Nuvera 100/120 printers, the system powers down after completion of the overwrite process. The customer needs to power up the system afterward. If the customer is running DocuSP 50 or later on a Sun W1100Z controller, the customer needs to press when prompted to exit out of the single 701P45144 June 2006 5
-
 1
1 -
 2
2 -
 3
3 -
 4
4 -
 5
5 -
 6
6 -
 7
7 -
 8
8
 |
 |
