Xerox 6505/N User Guide - Page 206
Clearing Jams at the Manual Feed Slot, Remove any jammed or damaged paper in the tray
 |
View all Xerox 6505/N manuals
Add to My Manuals
Save this manual to your list of manuals |
Page 206 highlights
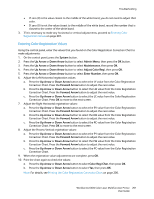
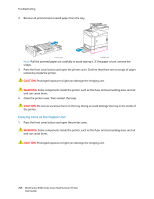
Troubleshooting 4. Carefully remove any jammed paper in the printer. Confirm that there are no scraps of paper left inside. CAUTION: Prolonged exposure to light can damage the imaging unit. Do not leave the cover open for more than five minutes at a time. wc6505_023 5. Close the front cover. 6. Remove the tray from the printer, then carefully pull out any jammed paper remaining inside the printer. 7. Reinsert the tray into the printer. wc6505_025 CAUTION: Do not use excessive force on the tray; doing so could damage the tray or the inside of the printer. Clearing Jams at the Manual Feed Slot 1. Pull Tray 1 out of the printer. 2. Remove any jammed or damaged paper in the tray, then close the tray. 3. Press the front cover button to open the cover. 4. Carefully remove any jammed paper in the printer. Make sure that there are no torn pieces of paper inside the printer. 206 WorkCentre 6505 Color Laser Multifunction Printer User Guide
-
 1
1 -
2
-
3
-
4
-
5
-
6
-
7
-
8
-
9
-
10
-
11
-
12
-
13
-
14
-
15
-
16
-
17
-
18
-
19
-
20
-
21
-
22
-
23
-
24
-
25
-
26
-
27
-
28
-
29
-
30
-
31
-
32
-
33
-
34
-
35
-
36
-
37
-
38
-
39
-
40
-
41
-
42
-
43
-
44
-
45
-
46
-
47
-
48
-
49
-
50
-
51
-
52
-
53
-
54
-
55
-
56
-
57
-
58
-
59
-
60
-
61
-
62
-
63
-
64
-
65
-
66
-
67
-
68
-
69
-
70
-
71
-
72
-
73
-
74
-
75
-
76
-
77
-
78
-
79
-
80
-
81
-
82
-
83
-
84
-
85
-
86
-
87
-
88
-
89
-
90
-
91
-
92
-
93
-
94
-
95
-
96
-
97
-
98
-
99
-
100
-
101
-
102
-
103
-
104
-
105
-
106
-
107
-
108
-
109
-
110
-
111
-
112
-
113
-
114
-
115
-
116
-
117
-
118
-
119
-
120
-
121
-
122
-
123
-
124
-
125
-
126
-
127
-
128
-
129
-
130
-
131
-
132
-
133
-
134
-
135
-
136
-
137
-
138
-
139
-
140
-
141
-
142
-
143
-
144
-
145
-
146
-
147
-
148
-
149
-
150
-
151
-
152
-
153
-
154
-
155
-
156
-
157
-
158
-
159
-
160
-
161
-
162
-
163
-
164
-
165
-
166
-
167
-
168
-
169
-
170
-
171
-
172
-
173
-
174
-
175
-
176
-
177
-
178
-
179
-
180
-
181
-
182
-
183
-
184
-
185
-
186
-
187
-
188
-
189
-
190
-
191
-
192
-
193
-
194
-
195
-
196
-
197
-
198
-
199
-
200
-
 201
201 -
 202
202 -
 203
203 -
 204
204 -
 205
205 -
 206
206 -
 207
207 -
 208
208 -
 209
209 -
 210
210 -
 211
211 -
212
-
213
-
214
-
215
-
216
-
217
-
218
-
219
-
220
-
221
-
222
-
223
-
224
-
225
-
226
-
227
-
228
-
229
-
230
-
231
-
232
 |
 |
