Yamaha AX-396 Owner's Manual - Page 9
English, CD/DVD DIRECT AMP and indicator
 |
View all Yamaha AX-396 manuals
Add to My Manuals
Save this manual to your list of manuals |
Page 9 highlights
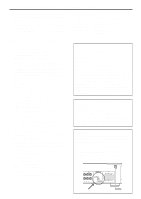
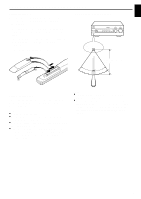
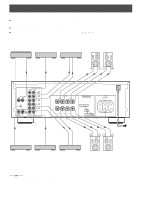
English 1 POWER Press this switch inward (ON) to use this unit. In this state, you can turn on this unit or turn this unit in the standby mode by pressing STANDBY/ON. Press this switch to release it outward (OFF) to completely cut off this unit's power supply from the AC line. 2 STANDBY indicator Lights up only while this unit is in the standby mode. 3 STANDBY/ON Press this switch to turn on the power. Press again to set this unit in the standby mode. * This switch can be used only when POWER is set in the ON position. Standby mode This unit is still using a small amount of power in this mode in order to be ready to receive infrared-signals from the remote control. 4 Input source indicators The indicator of the currently selected input source lights up. 5 PURE DIRECT and indicator AX-496 only Press this switch, and the indicator above it lights up. You can listen to a source in the purest sound with this function. (Refer to page 12 for details.) Press this switch again to cancel this function. 6 TAPE MONITOR and indicator AX-396 only Press this switch to turn on the indicator above it. You can listen to the sound played on the tape deck connected to the TAPE terminals on the rear of this unit. When the tape deck is used for recording, you can also monitor the sound being recorded. * To listen to the source selected with the INPUT selector, press this switch again to turn off the indicator. * When this function is on (the indicator is illuminated), the tape deck (TAPE) cannot be selected with the INPUT selector. * When the tape deck (TAPE) is selected with the INPUT selector, this function will not turn on even if TAPE MONITOR is pressed. 7 CD/DVD DIRECT AMP and indicator Press this switch, and the indicator above it lights up. You can listen to a CD or DVD source in the purest sound with this function. (Refer to page 12 for details.) Press this switch again to cancel this function. 8 Remote control sensor Receives signals from the remote control. 9 PHONES jack When you listen with headphones, connect the headphones to the PHONES jack and set both SPEAKERS A and B switches to the OFF position. PHONES PHONES 0 SPEAKERS Press the switch A or B (or both) inward (ON) for the speakers you will use. Press and release the switch outward (OFF) for the speakers you do not use. A Tone controls BASS Rotate this knob to increase or decrease the low frequency response. The 0 position produces a flat response. TREBLE Rotate this knob to increase or decrease the high frequency response. The 0 position produces a flat response. B BALANCE The balance of the output volume to the left and right speakers can be adjusted to compensate for sound imbalances caused by the speaker location or listening room conditions. C LOUDNESS Used to compensate for the human ears' loss of sensitivity to high and low-frequency ranges at low volume. (Refer to page 12 for details.) D REC OUT selector AX-496 only Rotate this knob to select the source for recording to an MD recorder or tape deck. This setting is independent of the INPUT selector setting, so this function allows you to record the selected source while listening to another source. E Front cover Refer to inside of the front cover on how to open and close the front cover. F INPUT selector Turn this knob to select the input source. The selected source will be shown by the lighting of corresponding input source indicator. G VOLUME Turn this knob to raise or lower the volume level. (The REC OUT level is not affected.) E-7
-
 1
1 -
2
-
3
-
 4
4 -
 5
5 -
 6
6 -
 7
7 -
 8
8 -
 9
9 -
 10
10 -
 11
11 -
 12
12 -
 13
13 -
 14
14 -
15
-
16
-
17
 |
 |
