Yamaha AX-9 Owner's Manual - Page 8
Controls And Their Functions, Front Panel - ax 9
 |
View all Yamaha AX-9 manuals
Add to My Manuals
Save this manual to your list of manuals |
Page 8 highlights
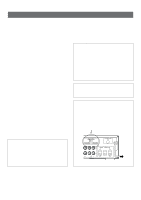
CONTROLS AND THEIR FUNCTIONS FRONT PANEL 1 2 3 45 6 7 l NATURAL SOUND STEREO AMPLIFIER AX 9 STANDBY/ON PURE TAPE DIRECT MONITOR AUX TAPE MD CD TUNER PHONO SLEEP PHONES SPEAKERS A B ON ON OFF OFF PURE DIRECT TAPE MONITOR INPUT 8 VOLUME BASS 0 TREBLE 0 0 l0 BALANCE - + - + LR 90 A BC DE 1 Power indicator Lights up while the power to this unit is on. 2 STANDBY/ON switch Press this switch to turn the power to this unit on. Press it again to turn this unit into the standby mode. Standby mode In this state, this unit consumes a very small quantity of power to receive infrared-signals from the remote control transmitter. 3 Remote control sensor Receives signals from the remote control transmitter. 4 SLEEP indicator Lights up while the built-in SLEEP timer is functioning. 5 PURE DIRECT indicator Lights up while the PURE DIRECT switch is on. 6 TAPE MONITOR indicator Lights up while the TAPE MONITOR switch is on. * When the tape deck (TAPE) is selected as the input source, this indicator will not light up even if the TAPE MONITOR switch is on. 7 INPUT selector and indicators When turned, selects a program source to listen to. The indicator for the currently selected source lights up. 8 VOLUME control Used to raise or lower the volume level. 9 Control door See page 12 for how to open and close the control door. 8 0 PHONES jack When you listen with headphones, connect the headphones to the PHONES jack. When listening with headphones privately, set both the SPEAKERS A and B switches to the OFF position. PHONES A SPEAKERS switches Set the switch A or B (or both A and B) for the speaker system (connected to this unit) you will use to the ON position. Set the switch for the speaker system you will not use to the OFF position. B PURE DIRECT switch You can enjoy the purest possible sound from your audio sources by pressing this switch so that the PURE DIRECT indicator lights up. By doing so, the audio signal bypasses the BASS, TREBLE and BALANCE controls, eliminating any alterations to the audio signal. C TAPE MONITOR switch When the tape deck connected to the TAPE terminals on the rear of this unit is used for recording, you can monitor the sounds being recorded by pressing TAPE MONITOR so that TAPE MONITOR indicator lights up. D Tone controls BASS Used to increase or decrease the low frequency response. The 0 position produces flat response. TREBLE Used to increase or decrease the high frequency response. The 0 position produces flat response. E BALANCE control Adjusts the balance of the output volume to the left and right speakers to compensate for sound imbalance caused by speaker location or listening room conditions.
-
 1
1 -
2
-
 3
3 -
 4
4 -
 5
5 -
 6
6 -
 7
7 -
 8
8 -
 9
9 -
 10
10 -
 11
11 -
 12
12 -
 13
13 -
14
-
15
 |
 |
