Yamaha BBT500-110 Owner's Manual - Page 17
Sending/Receiving MIDI Data Between, About MIDI Control Changes
 |
View all Yamaha BBT500-110 manuals
Add to My Manuals
Save this manual to your list of manuals |
Page 17 highlights
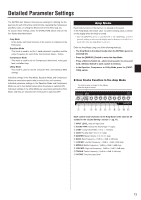
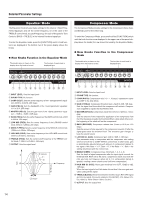
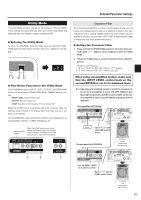
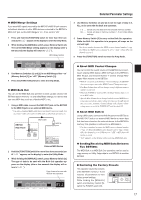
Detailed Parameter Settings ● MIDI Merge Settings If you want MIDI signals received by the BBT500's MIDI IN jack transmitted without alteration to other MIDI devices connected to the BBT500's MIDI OUT jack, set the MIDI Merge to "on", if not, set it to "oFF". 1 Press and hold the [FUNCTION] switch for more than three seconds (until "utL" appears on the display) to enter the Utility Mode. 2 While holding the [MANUAL] switch, press Memory Switch [4]. The current MIDI Merge setting appears on the display (after a few seconds the display will return to "utL"). MIDI Merge Setting 4 Use Memory Switches [1] and [2] to set the type of data (1-5, ALL) to be sent with the Bulk Out operation. 1-5 ...... Sends only the data from the selected memory number. ALL ..... Sends all data in memory numbers 1-5 and Utility Mode settings. 5 Press Memory Switch [5] to carry out the Bulk Out operation. While the Bulk Out operation is in progress, all lamps on the unit will light. * The device number becomes the MIDI receive channel number (→ pg. 16). When the MIDI receive channel is set to "ALL" (Omni ON), the channel is set to 1. 6 Press the [FUNCTION] switch to enter the Amp Mode. 3 Use Memory Switches [1] and [2] to set MIDI Merge either "on" (Memory Switch [2]) or "oFF" (Memory Switch [1]). 4 Press the [FUNCTION] switch to enter the Amp Mode. ● MIDI Bulk Out You can use the MIDI Bulk Out operation to back up data saved in the BBT500 (data in memory 1-5 and Utility Mode settings) to a device that can save MIDI data (such as a Yamaha MDF3, etc.). 1 Using a MIDI cable, connect the MIDI OUT jack on the BBT500 to the MIDI IN jack on an external MIDI device. * Use only a standard MIDI cable that is less than 15 meters in length. Use of a longer cable can result in trouble such as abnormal operation, etc. BBT500 Rear Panel MIDI Cable MIDI OUT MIDI IN External MIDI Device 2 Hold the [FUNCTION] switch for more than three seconds (until "utL" appears on the display) to enter the Utility Mode. 3 While holding the [MANUAL] switch, press Memory Switch [5]. The type of data to be sent with the Bulk Out operation appears on the display (after a few seconds the display will return to "utL"). Type of data to be sent with the Bulk Out operation. ● About MIDI Control Changes You can control the overall volume of the BBT500 by connecting an external MIDI device's MIDI OUT jack to the BBT500's MIDI IN jack, and transmit Number 7 Control Change Messages (Main Volume) to the BBT500. * With the exception of the Number 7 Control Change, the BBT500 does not recognize any other MIDI Control Change messages. * The Main Volume data will not change, even if a different memory number is selected. * When the POWER is switched ON, the Main Volume data is set to its MAX value. * After the Main Volume data is changed, and the external MIDI device is disconnected, the pre-amp's volume level may not be sufficient. If this case occurs, transmit a Control Change with a higher volume setting again, or switch the POWER OFF and then back ON. ● About MIDI Bulk In Using a MIDI cable, connect the MIDI IN jack on the BBT500 to the MIDI OUT jack on an external MIDI device to return data that has been stored on the external device, to the BBT500's memory. This operation is referred to as MIDI Bulk In. * The device number becomes the MIDI receive channel number (→ pg. 15). When the MIDI receive channel is set to "ALL" (Omni ON), the channel is set to 1. When set to "oFF" (OFF) data will not be received. * "Ld" appears on the display while receiving MIDI Bulk data. ● Sending/Receiving MIDI Data Between Two BBT500s The MIDI Bulk In or MIDI Bulk Out operations can be used to copy memory or Utility Setup data in one BBT500 to another BBT500. ● Restoring the Factory Presets This operation clears the contents of the BBT500's memory 1-5 and restores all parameters to their factory preset settings. While holding the [MANUAL] switch and Memory Switch [5], switch the POWER switch ON. 17
-
 1
1 -
2
-
3
-
4
-
5
-
6
-
7
-
8
-
9
-
10
-
11
-
 12
12 -
 13
13 -
 14
14 -
 15
15 -
 16
16 -
 17
17 -
 18
18 -
 19
19 -
 20
20 -
 21
21
 |
 |
