Yamaha CLP-311 Owner's Manual
Yamaha CLP-311 Manual
 |
View all Yamaha CLP-311 manuals
Add to My Manuals
Save this manual to your list of manuals |
Yamaha CLP-311 manual content summary:
- Yamaha CLP-311 | Owner's Manual - Page 1
keyboard unit near the power cord . Make sure that the voltage selector is set for the voltage in your area. The voltage selector is set at 240V when the unit is initially shipped. To change the setting use 240 V au départ d'usine. Pour modifier 240V cuando la unidad sale de fábrica. Para - Yamaha CLP-311 | Owner's Manual - Page 2
indicated in the safety instruction section. CAUTION RISK OF ELECTRIC SHOCK DO NOT OPEN CAUTION: TO REDUCE THE RISK OF ELECTRIC SHOCK. DO NOT REMOVE COVER (OR BACK). NO USER-SERVICEABLE PARTS INSIDE. REFER SERVICING TO QUALIFIED SERVICE PERSONNEL. See bottom of Keyboard enclosure for graphic symbol - Yamaha CLP-311 | Owner's Manual - Page 3
. Do NOT connect this type of product to any power supply or adapter other than one described in the owners manual, on the name plate, or specifically recommended by Yamaha. 5. WARNING: Do not place this product or any other objects on the power cord or place it in a position where anyone could walk - Yamaha CLP-311 | Owner's Manual - Page 4
Yamaha CLP-311 Clavinova. Your Clavinova is a fine musical instrument that employs advanced Yamaha music technology. With the proper care, your Clavinova will give you many years of musical pleasure. q Yamaha's AWM (Advanced Wave Memory) tone generator system offers rich, realistic voices. q Piano - Yamaha CLP-311 | Owner's Manual - Page 5
Owner's Manual CLP-311 English Bedienungsanleitung Deutsch Mode d'emploi Français Manual de instrucciones Español - Yamaha CLP-311 | Owner's Manual - Page 6
15 q Program Change ON/OFF 15 q Control Change ON/OFF 15 q The Multi-Timbre Mode 16 q The MIDI Split & Left Local OFF Mode 16 q Bulk Data Dump 16 Troubleshooting 17 Options & Expander Modules 17 Keyboard Stand Assembly i MIDI Data Format v Specifications v MIDI Implementation Chart vi 1 - Yamaha CLP-311 | Owner's Manual - Page 7
] button allows access to the Clavinova's TRANSPOSE function (to shift the pitch of the entire keyboard up or down) and MIDI functions. For details refer to "TRANSPOSITION" on page 8, and "MIDI FUNCTIONS" on page 13, respectively. 4 Voice Selectors The CLP-311 has five voice selectors. Simply - Yamaha CLP-311 | Owner's Manual - Page 8
for details. 9 Pedals The CLP-311's soft/sostenuto (left) and damper (right) pedals provide a range of expressive control capabilities similar to the pedal functions on an acoustic piano. See page 8 for details. q The Music Stand If you will be using sheet music with your Clavinova, raise the music - Yamaha CLP-311 | Owner's Manual - Page 9
a monaural sound system, use only the L/L+R jack. When a plug is inserted into the L/L+R jack only, the left- and rightchannel signals are combined and delivered via the L/L+R jack so you don't lose any of the Clavinova's sound. q The Internal Amplifier & Speaker System The CLP-311 features a high - Yamaha CLP-311 | Owner's Manual - Page 10
MAX PIANO CLAVI. TONE E. PIANO HARPSICHORD PIPE ORGAN Turn Power On After making sure that the Clavinova's AC cord is properly plugged into the Clavinova itself and plugged into a convenient AC wall outlet, press the [POWER] switch located to the left of the keyboard to turn the power ON - Yamaha CLP-311 | Owner's Manual - Page 11
CLP-311 includes five demo tunes that effectively demonstrate its sound capabilities. Here's how you can select and play the demo tunes: DEMO PIANO CLAVI. TONE E. PIANO PIANO] button Mazurka op. 7-1 Bb major" by F. F. Chopin • [CLAVINOVA 1996 by YAMAHA CORPORATION). Set the Volume Use the [ - Yamaha CLP-311 | Owner's Manual - Page 12
manually by using the C2 through C4 keys on the keyboard CLAVINOVA TONE/PIPE ORGAN .......... F2 E. PIANO/PIPE ORGAN E2 HARPSICHORD/PIPE ORGAN G2 * All other voice combinations are set to C3 (equal balance). Shifting a Dual-Mode Voice Up One Octave Depending on which voices you combine using - Yamaha CLP-311 | Owner's Manual - Page 13
The Pedals The CLP-311 has two foot pedals that produce a range of expressive effects similar to those produced by the pedals on an acoustic piano. Soft/Sostenuto pedal Damper pedal Soft/Sostenuto (Left) Pedal When the power is turned on the left pedal is set for soft pedal operation. Pressing - Yamaha CLP-311 | Owner's Manual - Page 14
pitch over a range of approximately a semitone. Pitch control is useful for tuning the Clavinova to match other instruments or recorded music. A-1 B-1 C3 B3 * Standard pitch (A3 = 440 Hz) is set when the [POWER] switch is initially turned ON. NOTE • The PITCH CONTROL function has no effect when LOCAL - Yamaha CLP-311 | Owner's Manual - Page 15
CLP-311 built-in metronome is a convenient feature for practice, and it can also provide a solid rhythmic guide when recording using the [METRONOME] button, as follows: [METRONOME] + [PIANO] [METRONOME] + [CLAVI. TONE] [METRONOME] + [E. PIANO] [METRONOME] + [HARPSICHORD] [METRONOME] + [PIPE ORGAN - Yamaha CLP-311 | Owner's Manual - Page 16
the Recorder The CLP-311 recorder lets you record what you play on the keyboard and then play it back. This is a useful adjunct to any keyboard study program, q Damper pedal q Left pedal q Tempo (Initial setting only.) RECORDER START/ STOP REC PIANO CLAVI. TONE E. PIANO HARPSICHORD PIPE - Yamaha CLP-311 | Owner's Manual - Page 17
not to press the [START/STOP] button or a key on the keyboard, either of which will start recording and erase all previous recorded data. the CLP-311 power is turned off. It is possible to store recorded data to an external MIDI storage device such as the Yamaha DOU-10 Disk Orchestra Unit by using - Yamaha CLP-311 | Owner's Manual - Page 18
of the pedals is used. The Clavinova also receives and responds to the appropriate control change data. See "Control Change ON/OFF" on page 15 for information on turning control change number reception and transmission ON or OFF. q Program Change Numbers The CLP-311 transmits a MIDI program change - Yamaha CLP-311 | Owner's Manual - Page 19
voice selector. Full details are given in the following pages. MIDI FUNCTION CHART Function Local Control ON/OFF Program Change ON/OFF Control Change ON/OFF Multi-Timbre Mode MIDI Split & Left Local OFF CLP-311 Voice Selector [PIANO] [CLAVI. TONE] [E. PIANO] [HARPSICHORD] [PIPE ORGAN] 14 - Yamaha CLP-311 | Owner's Manual - Page 20
/OFF ... Normally the Clavinova will respond to MIDI control change data received from an external MIDI device or keyboard, causing the selected Clavinova voice to be affected by pedal and other "control" settings received from the controlling device. The Clavinova also transmits MIDI control change - Yamaha CLP-311 | Owner's Manual - Page 21
Split & Left Local OFF Mode ... In the MIDI split mode one section of the Clavinova keyboard is used to play a Clavinova voice in the normal way, while the remaining section is used to play a second MIDI keyboard or tone generator such as the Yamaha DOU-10 Disk Orchestra Unit. In this mode the right - Yamaha CLP-311 | Owner's Manual - Page 22
is not pressed, make sure that the pedal cord is properly plugged into the main unit (page iii). 3. The Clavinova Reproduces Radio or TV Sound This can occur if there is a high-power transmitter in your vicinity. Contact your Yamaha dealer. 4. Intermittent Static Noise This is usually due to turning - Yamaha CLP-311 | Owner's Manual - Page 23
dalier enroulé à l'intérieur Cable de pedales enrollado en el interior q AC power cord q Netzkabel q Cordon d'alimentation q Cable Keyboard Stand Assembly NOTE • We do not recommend attempting to assemble the Clavinova alone. The job can be easily accomplished, however, with only two people. • Use - Yamaha CLP-311 | Owner's Manual - Page 24
du support de clavier REMARQUE • Nous ne vous conseillons pas d'essayer d'assembler le Clavinova pedales, desate y enderezca el cable plegado unido a la parte inferior de la caja de pedales. No tire la abrazadera de vinilo, porque la necesitará en el paso B de más adelante. Ponga la caja de pedales - Yamaha CLP-311 | Owner's Manual - Page 25
goes in one way (the lug on the connector should face the keyboard-side of the main unit, as shown in the illustration) - don't try to force it in the wrong way around. N Voltage Selector Before connecting the AC power cord, check the setting of the voltage selector which is provided in some - Yamaha CLP-311 | Owner's Manual - Page 26
fil excédentaire du cordon de pédalier. q Emplee la Cord holder Kabelhalter Support de cordon Soporte del cable abrazadera de vinilo que se sacó del cale plegado de los 7 pedales en el paso X para fijar el cable de pedales sobrante. 110 q A voltage selector is A provided in some areas - Yamaha CLP-311 | Owner's Manual - Page 27
SUM (1byte)] = 0-sum (BULK DATA) F7H Specifications/Technische Daten/ Caractéristiques techniques/Especificaciones CLP-311 KEYBOARD POLYPHONY VOICE SELECTORS RECORDER PEDAL CONTROLS 88 KEYS (A-1 ~ C7) 28 NOTES MAX. PIANO, CLAVINOVA TONE, E. PIANO, HARPSICHORD, PIPE ORGAN START/STOP, REC SOFT - Yamaha CLP-311 | Owner's Manual - Page 28
. Follow all installation instructions. Failure to follow instructions could void your FCC authorization to use this product in the USA. 3. NOTE: This product has been tested and found to comply with the requirements listed in FCC Regulations, Part 15 for Class "B" digital devices. Compliance with
-
 1
1 -
 2
2 -
 3
3 -
 4
4 -
 5
5 -
 6
6 -
 7
7 -
8
-
9
-
10
-
11
-
12
-
13
-
14
-
15
-
16
-
17
-
18
-
19
-
20
-
21
-
22
-
23
-
24
-
25
-
26
-
27
-
28
 |
 |
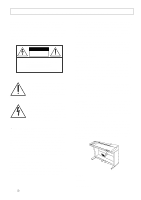
IMPORTANT
Check your power supply
Make sure that your local AC mains voltage matches the
voltage specified on the name plate on the bottom panel. In
some areas a voltage selector may be provided on the bottom
panel of the main keyboard unit near the power cord. Make
sure that the voltage selector is set for the voltage in your area.
The voltage selector is set at 240V when the unit is initially
shipped. To change the setting use a “minus” screwdriver to
rotate the selector dial so that the correct voltage appears next
to the pointer on the panel.
WICHTIG
Überprüfung der Stromversorgung
Vergewissern Sie sich vor dem Anschließen an das Stromnetz,
daß die örtliche Netzspannung den Betriebsspannungswerten
auf dem Typenschild an der Unterseite des Instruments
entspricht. In bestimmten Verkaufsgebieten ist das Instrument
mit einem Spannungswähler an der Unterseite neben der
Netzkabeldurchführung ausgestattet. Falls vorhanden, muß der
Spannungswähler auf die örtliche Netzspannung eingestellt
werden. Der Spannungswähler wurde werkseitig auf 240 V
voreingestellt. Zum Verstellen drehen Sie den Spannungsregler
mit einem Schlitzschraubendreher, bis der Zeiger auf den
korrekten Spannungswert weist
IMPORTANT
Contrôler la source d’alimentation
Vérifiez que la tension spécifiée sur le panneau arrière
correspond à la tension du secteur.
Dans certaines régions,
l’instrument peut être équipé d’un sélecteur de tension situé sur
le panneau inférieur du clavier à proximité du cordon d’alimen-
tation.
Vérifiez que ce sélecteur est bien réglé en fonction de
la tension secteur de votre région. Le sélecteur de tension est
réglé sur 240 V au départ d’usine.
Pour modifier ce réglage,
utilisez un tournevis à lame plate pour tourner le sélecteur afin
de mettre l’indication correspondant à la tension de votre
région vis à vis du repère triangulaire situé sur le panneau.
IMPORTANTE
Verifique la alimentación de corriente
Asegúrese de que tensión de alimentación de CA de su área
corresponde con la tensión especificada en la placa de
características del panel inferior de la unidad del teclado
principal, cerca del cable de alimentación.
Asegúrese de que
el selector de tensión esté ajustado a la tensión de su área.
El
selector de tensión se ajusta a 240V cuando la unidad sale de
fábrica.
Para cambiar el ajuste, emplee un destornillador de
cabeza “recta” para girar el selector de modo que aparezca la
tensión correcta al lado del indicador del panel.