Yamaha CLP-320 Owner's Manual
Yamaha CLP-320 Manual
 |
View all Yamaha CLP-320 manuals
Add to My Manuals
Save this manual to your list of manuals |
Yamaha CLP-320 manual content summary:
- Yamaha CLP-320 | Owner's Manual - Page 1
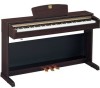
is set at 240V when the unit is initially shipped. To change the setting use a "minus" screwdriver to rotate the selector dial so that the correct voltage appears next to the pointer on the panel. For information on assembling the keyboard stand, refer to the instructions at the end of this manual - Yamaha CLP-320 | Owner's Manual - Page 2
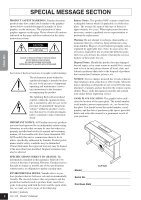
operating and maintenance (servicing) instructions in the literature obligation to update existing units. ENVIRONMENTAL ISSUES: Yamaha strives to date of purchase in the spaces provided below and retain this manual as a permanent record of your purchase. Model Serial No. Purchase Date CLP-320 - Yamaha CLP-320 | Owner's Manual - Page 3
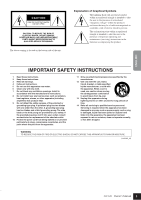
(servicing) instructions in the literature accompanying the product. IMPORTANT SAFETY INSTRUCTIONS 1 Read these instructions. 2 Keep these instructions. 3 Heed all warnings. 4 Follow all instructions. SHOCK, DO NOT EXPOSE THIS APPARATUS TO RAIN OR MOISTURE. (UL60065_03) CLP-320 Owner's Manual 3 - Yamaha CLP-320 | Owner's Manual - Page 4
instrument inspected by qualified Yamaha service personnel. CAUTION Always follow the basic precautions listed below to avoid the possibility When setting up the product, make sure that the AC outlet you are using is easily accessible. If some trouble or CLP-320 Owner's Manual (1)B-12 1/2 - Yamaha CLP-320 | Owner's Manual - Page 5
and gradually raise the volume controls while playing the instrument to set the desired listening level. Maintenance • In the case of the AC outlet. Then have the instrument inspected by qualified Yamaha service personnel. • Do not place vinyl, plastic or rubber objects on CLP-320 Owner's Manual 5 - Yamaha CLP-320 | Owner's Manual - Page 6
and keyboard. Data List You can download various MIDI-related reference materials, such as the MIDI Data Format and MIDI Implementation Chart, from the Yamaha Manual Library. Connect to the Internet, visit the following website, type the model name of your instrument (such as "CLP-320") in the Model - Yamaha CLP-320 | Owner's Manual - Page 7
Manual (this book) • Quick Operation Guide (separate sheet) • "50 Greats for the Piano" (Music Book) • AC Power cord • Bench* * Included or optional depending on locale. Tuning Unlike an acoustic piano Do not subject the instrument to excessive vibration or shock. 5 ENGLISH CLP-320 Owner's Manual 7 - Yamaha CLP-320 | Owner's Manual - Page 8
ENGLISH Features Features AWM Dynamic Stereo Sampling The Yamaha Clavinova CLP-320 digital piano offers a rich and versatile range of sounds, which are created using Yamaha's proprietary sampling tone-generation system, "AWM Dynamic Stereo Sampling." The AWM (Advanced Wave Memory) is a sampling - Yamaha CLP-320 | Owner's Manual - Page 9
31 Loading Song Data from a Computer to the Clavinova 31 Transmitting Song Data from the Clavinova to a Computer 32 Backing up Data and Initializing the Settings . 32 Troubleshooting 33 Options 33 Keyboard Stand Assembly 34 Index 38 Appendix Specifications 40 CLP-320 Owner's Manual 9 - Yamaha CLP-320 | Owner's Manual - Page 10
[+]/[-] These buttons enable you to select a song to play back from voice demo songs or from "50 Greats for the Piano." (pages 15, 16) They also enable you to change the voice or tempo. (pages 18, 23) [MASTER VOLUME] Adjust the volume level using this control (page 14). 8 10 CLP-320 Owner's Manual - Yamaha CLP-320 | Owner's Manual - Page 11
various MIDI functions. (Connecting MIDI Instruments-page 27) Shows the MIDI [IN/OUT] and [PEDAL] jacks as seen when viewed from the rear of the instrument. Pedals Use these pedals when you want notes to sustain longer or to sound softer and round. (Using the Pedals-page 19) CLP-320 Owner's Manual - Yamaha CLP-320 | Owner's Manual - Page 12
. Then have the instrument inspected by qualified Yamaha service personnel. Music Rest To raise the music rest: as it will go. 2. Raise the two metal supports (at the rear of the music rest). 3. Gently release your hands from the music rest until it is all the way down. 12 CLP-320 Owner's Manual 10 - Yamaha CLP-320 | Owner's Manual - Page 13
ENGLISH Before Using Connecting the Power Cord Read the instructions Clavinova is rated for the AC voltage supplied in the area in which the piano to be replaced, contact your Yamaha dealer. The use of an the left end of the keyboard lights up. [POWER] Power indicator CLP-320 Owner's Manual 13 - Yamaha CLP-320 | Owner's Manual - Page 14
of headphones to one of the [PHONES] jacks. Two [PHONES] jacks are provided. You can connect two sets of standard stereo headphones. (If you are using only one pair of headphones, you can plug them into either hanger may be damaged. Standard stereo phone plug PHONES 12 14 CLP-320 Owner's Manual - Yamaha CLP-320 | Owner's Manual - Page 15
) The demo songs will not be transmitted via MIDI. You can also change to the next or listed below are re-arranged excerpts from the original compositions. The other demo songs are Yamaha's original pieces (©2008 Yamaha Corporation). Key Voice Name C1 GRAND PIANO . CLP-320 Owner's Manual 15 - Yamaha CLP-320 | Owner's Manual - Page 16
. (page 23) When you select a different song (or a different song is selected during chained playback), an appropriate reverb type will be selected accordingly. The 50 piano preset songs will not be transmitted via MIDI. 14 16 CLP-320 Owner's Manual - Yamaha CLP-320 | Owner's Manual - Page 17
a song loaded from the computer uses a voice that is not supported by this instrument, the originally-assigned voice may not be reproduced accurately PIANO/ VOICE] button simultaneously, press the B6 key. All channels 1 through 16 will produce the sound. B6 The highest key CLP-320 Owner's Manual 17 - Yamaha CLP-320 | Owner's Manual - Page 18
On this instrument, a voice means a "tone" or "tonal color." Selecting a voice automatically engages the best-suited reverb type and depth (page 20) for that particular voice. Key C1 C1 D1 D1 E1 scale string ensemble. Try combining this voice with piano in DUAL mode. 16 18 CLP-320 Owner's Manual - Yamaha CLP-320 | Owner's Manual - Page 19
on an acoustic piano. When the damper pedal is pressed, notes sustain longer. Releasing the pedal release the pedal half way to subdue the sustain (murkiness). Organ and string voices will continue to sound for as long as the sostenuto pedal is depressed. 17 ENGLISH CLP-320 Owner's Manual - Yamaha CLP-320 | Owner's Manual - Page 20
holding down the [PIANO/VOICE] button, press the A4 key to set the reverb to the depth most suitable for the selected voice. The default reverb type (including OFF) and depth settings are different for each voice. depth 0: no effect depth 20: maximum reverb depth 18 20 CLP-320 Owner's Manual - Yamaha CLP-320 | Owner's Manual - Page 21
1, and settings above "0" increases the volume of Voice 1 in relation to Voice 2. F 5 C6 F 6 -6 -4 -2 +1 +3 +6 -5 -3 -1 0 +2 +4 +5 The highest key 2. Exit Dual mode and return to normal play mode. While holding down the [PIANO/VOICE] button, press one of the C1-A1 keys. CLP-320 Owner's Manual 21 - Yamaha CLP-320 | Owner's Manual - Page 22
semitone. [DEMO/SONG] + [PIANO/VOICE] + B 2 key (the first black key to the left of C3): Transposes the pitch down a whole tone (two semitones). [DEMO/SONG] + [PIANO/VOICE] + F 2 key wave vibrates in a second. 20 Setting range: 427.0-453.0 Hz Standard pitch: 440.0 Hz 22 CLP-320 Owner's Manual - Yamaha CLP-320 | Owner's Manual - Page 23
C4-A4 keys to specify a three-digit number. Select a number starting from the left-most digit. For example, to set the tempo "95," press the C4 reset the tempo to default value of 120 while the metronome is stopped, press the [METRONOME], [+] and [-] buttons simultaneously. CLP-320 Owner's Manual - Yamaha CLP-320 | Owner's Manual - Page 24
soft or hard. B6 Medium This is the standard piano touch response. (This is the default setting.) C7 Hard The volume level changes very widely from holding down the [PIANO/VOICE] button, press one of the A6-C7 keys to select the desired touch sensitivity. A6 C7 22 24 CLP-320 Owner's Manual - Yamaha CLP-320 | Owner's Manual - Page 25
on this instrument, the [PLAY] button indicator lights up. When this indicator remains on, recording another performance will erase the recorded data. 23 ENGLISH Procedure 1. Select a voice and other settings for the recording. While holding down the [PIANO/VOICE] button, press one of the C1-A1 - Yamaha CLP-320 | Owner's Manual - Page 26
cancel the erase operation, press the [REC] button again. Please note that even after you cancel the erase operation, the user song settings, including the voice selection, will automatically return to the status obtained at the time you engaged Record mode. (page 25) 24 26 CLP-320 Owner's Manual - Yamaha CLP-320 | Owner's Manual - Page 27
MIDI data to and from a computer USB port Computer UX16 (optional) OUT MIDI IN connector MIDI OUT IN connector For more information on the transmission and reception of song data, refer to "Transmitting Song Data between the Computer and the Clavinova" on page 31. POWER CLP-320 Owner's Manual - Yamaha CLP-320 | Owner's Manual - Page 28
MIDI data to or from the computer. For more information on connecting the UX16, refer to the user's manual that came with the UX16. You must install a software application on the computer to be able to transfer MIDI data between this instrument and a computer. 26 OUT IN 28 CLP-320 Owner's Manual - Yamaha CLP-320 | Owner's Manual - Page 29
OFF, the keyboard of this instrument does not play the internal voices. Procedure While holding down the [DEMO/SONG] and [PIANO/VOICE] buttons simultaneously, press the C6 key. Pressing the C6 key repeatedly toggles between Local Control On and Off. C6 The highest key CLP-320 Owner's Manual 29 - Yamaha CLP-320 | Owner's Manual - Page 30
MIDI Data Format on the web (please refer to "Data List" on page 6). Procedure While holding down the [DEMO/SONG] and [PIANO/VOICE] buttons simultaneously, press the D6 key. Pressing the D6 key repeatedly toggles between Control Change On and Off. D6 The highest key 28 30 CLP-320 Owner's Manual - Yamaha CLP-320 | Owner's Manual - Page 31
a computer or User song data will be saved in the internal flash memory. While Musicsoft Downloader is operating, the [REC] and [PLAY] button indicators on the piano light up. Before you use this instrument, close the Musicsoft Downloader window and quit the application. CLP-320 Owner's Manual 31 - Yamaha CLP-320 | Owner's Manual - Page 32
ENGLISH Transmitting Song Data between the Computer and the Clavinova Transmitting Song Data from the Clavinova to a Computer Musicsoft Downloader enables you to transfer the user song in this instrument to while the [REC] and [PLAY] button indicators are flashing). 30 32 CLP-320 Owner's Manual - Yamaha CLP-320 | Owner's Manual - Page 33
Troubleshooting Troubleshooting Problem This instrument does not turn on. Noise from the speakers or headphones is ] jack (page 36). Options BC-100 Bench A comfortable bench styled to match your Yamaha Clavinova. UX16 USB-MIDI interface HPE-160 Headphones 31 ENGLISH CLP-320 Owner's Manual 33 - Yamaha CLP-320 | Owner's Manual - Page 34
ENGLISH Keyboard Stand Assembly Keyboard Stand Assembly CAUTION • Be careful not to each end of C. 1-3 Attach D and E to C by finger-tightening the long screws 1 (6 × 20mm). E 1-2 C 1-3 D 1-1 L Headphone hanger set 4 × 10 mm thin screws ×2 5 Headphone hanger 32 34 CLP-320 Owner's Manual - Yamaha CLP-320 | Owner's Manual - Page 35
33 ENGLISH L R R 2. Attach B. Depending on the model of Clavinova you purchased, the surface color of one side of B may be different from the seen from the front. 5-2 Secure A by tightening the short screws 2 (6 × 16mm) from the front. 5-1 A Projection of A B C 3 A 5-2 CLP-320 Owner's Manual 35 - Yamaha CLP-320 | Owner's Manual - Page 36
that the correct voltage for your region appears next to the pointer on the panel. The voltage selector is set at 240V when the unit is initially shipped. After the proper voltage has been selected, connect the AC the pin configuration of the AC wall outlets in your area. 36 CLP-320 Owner's Manual - Yamaha CLP-320 | Owner's Manual - Page 37
following. • Are there any parts left over? → Review the assembly procedure and correct any errors. • Is give way when you step on the pedals? → Turn the adjuster so that it is set firmly against the floor. • Are the pedal and power cords inserted securely into the ENGLISH CLP-320 Owner's Manual 37 - Yamaha CLP-320 | Owner's Manual - Page 38
Initializing the Settings 32 K Keyboard Piano Preset Songs 16 Program Change 30 R REC 10, 25 Recording your Performance 25 Reverb 20 Right Pedal 19 S SMF 31 Soft Pedal 19 Song 16 Song Playback Channel 17 Sostenute Pedal 19 Stand 34-36 Standard MIDI File 31 36 38 CLP-320 Owner's Manual - Yamaha CLP-320 | Owner's Manual - Page 39
Start/Stop playback 50 Piano Preset Songs 16 Demo Songs 15 T Tempo 23 Touch Sensitivity 24 Transmitting Song Data 31 Transporting 7 Transposition 22 Troubleshooting 33 U User Song 25 V Voice 18 Index 37 ENGLISH CLP-320 Owner's Manual 39 - Yamaha CLP-320 | Owner's Manual - Page 40
Dimensions (W × D × H) [For models with polished finish] Dimensions (W × D × H) With music rest [For models with polished finish] Weight [For models with polished finish] Accessories CLP-320 Manual, "50 greats for the Piano" (Music Book), Quick Operation Guide, Yamaha. 40 CLP-320 Owner's Manual 146 - Yamaha CLP-320 | Owner's Manual - Page 41
MEMO CLP-320 Owner's Manual 41 147 - Yamaha CLP-320 | Owner's Manual - Page 42
. Follow all installation instructions. Failure to follow instructions could void your FCC authorization to use this product in the USA. 3. NOTE: This product has been tested and found to comply with the requirements listed in FCC Regulations, Part 15 for Class "B" digital devices. Compliance with - Yamaha CLP-320 | Owner's Manual - Page 43
Yamaha representative or the authorized distributor listed below. Pour plus de détails sur les produits, veuillez-vous adresser à Yamaha ou au distributeur le plus proche de vous figurant dans la liste Yamaha Yamaha Yamaha Yamaha av Yamaha Scandinavia Yamaha Music CHINA Yamaha Music Yamaha Yamaha Yamaha - Yamaha CLP-320 | Owner's Manual - Page 44
Clavinova Web site http://music.yamaha.com/homekeyboard Yamaha Manual Library http://www.yamaha.co.jp/manual/ U.R.G., Pro Audio & Digital Musical Instrument Division, Yamaha Corporation © 2008 Yamaha Corporation WM81140 804YCPA*.*-01A1 Printed in Indonesia
-
 1
1 -
 2
2 -
 3
3 -
 4
4 -
 5
5 -
 6
6 -
 7
7 -
8
-
9
-
10
-
11
-
12
-
13
-
14
-
15
-
16
-
17
-
18
-
19
-
20
-
21
-
22
-
23
-
24
-
25
-
26
-
27
-
28
-
29
-
30
-
31
-
32
-
33
-
34
-
35
-
36
-
37
-
38
-
39
-
40
-
41
-
42
-
43
-
44
 |
 |

EN
CLP-320
OWNER’S MANUAL
IMPORTANT
—Check your power supply—
Make sure that your local AC mains voltage matches the voltage specified on the name plate on the bottom panel. In some areas a voltage selector may
be provided on the bottom panel of the main keyboard unit near the power cord. Make sure that the voltage selector is set for the voltage in your area.
The voltage selector is set at 240V when the unit is initially shipped. To change the setting use a "minus" screwdriver to rotate the selector dial so that the
correct voltage appears next to the pointer on the panel.
For information on assembling the keyboard stand, refer to the instructions at the end of this manual.