Yamaha CVP-92 Owner's Manual - Page 122
Disk, Format (FORMAT) Display — Execute the format operation.
 |
View all Yamaha CVP-92 manuals
Add to My Manuals
Save this manual to your list of manuals |
Page 122 highlights
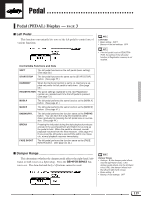
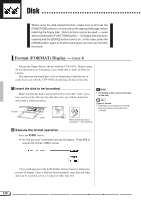
Disk When using the disk-related function, make sure to first set the [FUNCTION] button to on and call up the appropriate page before inserting the floppy disk. Disk functions cannot be used - even when pressing the [FUNCTION] button - if a floppy disk has been inserted and the [SONG] button is set to on. In this case, press the [SONG] button again so that the lamp goes out, then use the Disk functions. Format (FORMAT) Display - PAGE 4 Format the floppy disk for the use with the CVP-94/92. Refer to page 94 for information on formatting a new, blank disk or disks of different formats. The operation explained here is for re-formatting a disk that has already been used with the CVP-94/92 and deleting all data on the disk. ZInsert the disk to be formatted Make sure that the disk's write protect tab is set to the "write" position, and insert the disk into the disk drive face up with the shutter forward until it clicks into place. DISK IN USE Shutter • Formatting a disk erases all the data on the disk. Types of Format • 2DD disks are formatted into 720 KB, while 2HD disks are formatted into 1.44 MB. Label Write protect tab closed (unlocked - write enabled) XExecute the format operation Press the START button. ➔ An "Are you sure" confirmation prompt will appear. Press YES to execute the format or NO to cancel. A bar graph appears in the LCD display during format to indiate the process of format. Once a disk has been formatted, song data and other data can be recorded, saved, or copied or other data to it. 120
-
 1
1 -
2
-
3
-
4
-
5
-
6
-
7
-
8
-
9
-
10
-
11
-
12
-
13
-
14
-
15
-
16
-
17
-
18
-
19
-
20
-
21
-
22
-
23
-
24
-
25
-
26
-
27
-
28
-
29
-
30
-
31
-
32
-
33
-
34
-
35
-
36
-
37
-
38
-
39
-
40
-
41
-
42
-
43
-
44
-
45
-
46
-
47
-
48
-
49
-
50
-
51
-
52
-
53
-
54
-
55
-
56
-
57
-
58
-
59
-
60
-
61
-
62
-
63
-
64
-
65
-
66
-
67
-
68
-
69
-
70
-
71
-
72
-
73
-
74
-
75
-
76
-
77
-
78
-
79
-
80
-
81
-
82
-
83
-
84
-
85
-
86
-
87
-
88
-
89
-
90
-
91
-
92
-
93
-
94
-
95
-
96
-
97
-
98
-
99
-
100
-
101
-
102
-
103
-
104
-
105
-
106
-
107
-
108
-
109
-
110
-
111
-
112
-
113
-
114
-
115
-
116
-
 117
117 -
 118
118 -
 119
119 -
 120
120 -
 121
121 -
 122
122 -
 123
123 -
 124
124 -
 125
125 -
 126
126 -
 127
127 -
128
-
129
-
130
-
131
-
132
-
133
-
134
-
135
-
136
-
137
-
138
-
139
-
140
-
141
-
142
-
143
-
144
-
145
-
146
-
147
-
148
 |
 |
