Yamaha KX-10 Owner's Manual - Page 5
Playback
 |
View all Yamaha KX-10 manuals
Add to My Manuals
Save this manual to your list of manuals |
Page 5 highlights
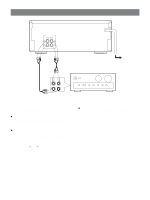
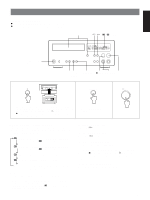
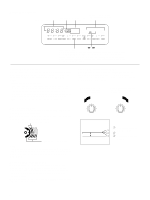
ENGLISH PLAYBACK Preparation for playback ¶ Press the STANDBY/ON switch to turn on the power. ¶ Set your amplifier to cassette deck function mode. 1 ! ⁄ B/ C indicators SOURCE REC I/NORM II/HIGH IV/METAL TAPE TAPE TUNING Ÿ B C MPX FILTER L dB 30 20 15 10 8 6 4 R Ÿ0 2 4 6 STANDBY/ON switch 2 3 COUNTER MONITOR 7 STOP PLAY TRIM RESET 1 ) 2 DOLBY NR OFF/ŸB/ ŸC/MPX Place the cassette on the cassette tray with the exposed tape side facing back side of the unit and the side to be played facing up. To load the cassette tray, press the ) button. ¶ Make sure that the tape is wound to the right-hand reel with the cassette placed on the tray. Refer to "DOLBY NR button setting". 3 ‹ PLAY DOLBY NR button setting (in step 2) Be sure to set the DOLBY NR button according to the system used for recording. Each time this button is pressed, Dolby NR switches as follows: 3 B (MPX off) For a tape recorded with DOLBY B NR Only the B indicator lights. 3 C (MPX off) For a tape recorded with DOLBY C NR Only the C indicator lights. 3 33 B MPX on (available only for recording) C MPX on (available only for recording) OFF For a tape recorded with DOLBY NR OFF No indicator lights. Note: The MPX filter settings are explained on page 8. * Dolby noise reduction manufactured under license from Dolby Laboratories Licensing Corporation. "DOLBY" and the double-D symbol are trademarks of Dolby Laboratories Licensing Corporation. To fast forward the tape Press the ⁄ button. To fast rewind the tape Press the ! button. To adjust the volume level Use the volume control of the amplifier. To stop playback and remove the cassette tape Press the 7 STOP button and then the ) button. The cassette tray comes out and you can remove the cassette tape. To enter the standby mode Press the STANDBY/ON switch again. 5
-
 1
1 -
 2
2 -
 3
3 -
 4
4 -
 5
5 -
 6
6 -
 7
7 -
 8
8 -
 9
9 -
 10
10 -
 11
11 -
12
-
13
-
14
-
15
-
16
 |
 |
