Yamaha KX-10 Owner's Manual - Page 9
ENGLISH, Linear time tape counter
 |
View all Yamaha KX-10 manuals
Add to My Manuals
Save this manual to your list of manuals |
Page 9 highlights
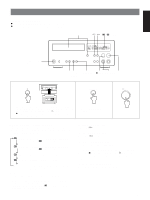
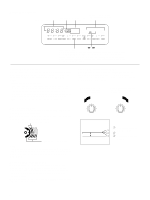
ENGLISH Display during recording Tape remain indicator Lights during rec pause mode or recording. Blinks while the sound muted section is recorded. When a tape is loaded, the corresponding tape type indicator lights. SOURCE REC I/NORM II/HIGH IV/METAL TAPE TAPE TUNING Ÿ B C MPX FILTER L dB -30 20 15 10 8 6 4 R Ÿ 0 2 4 6+ Peak level meters SOURCE/TAPE indicators B/ C/MPX FILTER indicators Linear time tape counter TAPE TUNING indicator Setting the recording level (in step 3) Play the loudest passage of the source to be recorded and watch the meter readings. When using Normal position tapes (type I/NORM) or High position tapes (type II/HIGH (CrO2)), adjust the REC LEVEL control so that the highest peak is +4 dB. When using Metal position tapes (type IV/ METAL), adjust the REC LEVEL control so that the highest peak is +6 dB. (Refer to the figure below.) Highest peak for Normal or High position tapes L dB -30 20 15 10 8 6 4 R Ÿ 0 2 4 6+ Highest peak for Metal position tapes L dB -30 20 15 10 8 6 4 R Ÿ 0 2 4 6+ Linear time tape counter Use the linear time tape counter as an aid in locating a point on a tape (-99 min. 59 sec. to 99 min. 59 sec.). To set the counter reading to "0:00", press the COUNTER RESET button. Note: Precision of counter The tape counter is not a clock, and so there will be some errors in the time display compared to the actual recording time (this cannot be avoided, as a suitable method is adopted to provide a time display not only during recording and playback, but also during fast forward and rewind). The error depends on the type of tape being used. Tape remain indicator The tape remain indicator shows the remaining length of the loaded tape to be recorded. When the recording reaches the end of the tape, the leftmost digit of the tape remain indicator blinks. Indicates the remaining tape length. Note: The tape remain indicator may differ depending on the tape length, tape type or the size of hub. So, use this indicator as an aid to recognize the remaining length of the tape to be played back. To stop recording temporarily Press the REC/PAUSE button. To resume recording, press the 3 PLAY button. To stop recording and remove the cassette tape Press the 7 STOP button and then the ) button. The cassette tray comes out and you can remove the cassette tape. To enter the standby mode Press the STANDBY/ON switch again. Three head system The three-head system allows the just-recorded sound to be monitored while recording. You can compare the difference between the recorded sound and the source sound by switching the monitor mode (SOURCE or TAPE) with the MONITOR button, so you can try to obtain a recording sound identical to the source sound. To monitor the just recorded sound MONITOR SOURCE TAPE To monitor the sound to be recorded MONITOR SOURCE TAPE Lights when a tape is loaded. 9
-
 1
1 -
2
-
3
-
 4
4 -
 5
5 -
 6
6 -
 7
7 -
 8
8 -
 9
9 -
 10
10 -
 11
11 -
 12
12 -
 13
13 -
 14
14 -
15
-
16
 |
 |
