Yamaha KX-10 Owner's Manual - Page 8
RECORDING, Preparation for recording, DOLBY NR button setting in step 2
 |
View all Yamaha KX-10 manuals
Add to My Manuals
Save this manual to your list of manuals |
Page 8 highlights
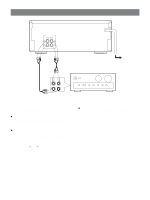
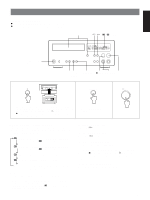
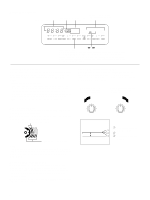
RECORDING Preparation for recording ¶ Press the STANDBY/ON switch to turn on the power. ¶ Set your amplifier to cassette deck function mode. 1 REC indicator B/ C/MPX FILTER indicators Peak level meters SOURCE REC I/NORM II/HIGH IV/METAL TAPE TAPE TUNING Ÿ B C MPX FILTER L dB 30 20 15 10 8 6 4 R Ÿ0 2 4 6 STANDBY/ON switch 2 AUTO TAPE TUNING MONITOR 3 4 1 ) Place the cassette on the cassette tray with the exposed tape side facing back side of the unit and the side to be recorded facing up. To load the cassette tray, press the ) button. ¶ Make sure that the tape is wound to the right-hand reel with the cassette placed on the tray. 2 DOLBY NR OFF/ŸB/ ŸC/MPX Refer to "DOLBY NR button setting". 3 REC/ PAUSE 4 ‹ PLAY REC LEVEL Play the program source to be REC ] recorded and adjust the recording level. See "Setting the recording level". 0 10 DOLBY NR button setting (in step 2) Dolby noise reduction is an extremely effective method of reducing undesirable background hiss on tapes. This unit incorporates both Dolby B NR and the newer Dolby C NR system. Dolby C NR is approximately twice as effective as the earlier Dolby B NR. Each time this button is pressed, Dolby NR switches as follows: 3 B (MPX off) Recording with DOLBY B NR Only the B indicator lights. 3 C (MPX off) Recording with DOLBY C NR Only the C indicator lights. 3 B MPX on Recording an FM broadcast with DOLBY B NR B and MPX FILTER indicators light. 3 C MPX on Recording an FM broadcast with DOLBY C NR C and MPX FILTER indicators light. 3 OFF 8 Recording with no noise reduction No indicator lights. MPX filter FM stations transmit a 19 kHz pilot signal in addition to the broadcast program. Sometimes this pilot signal may leak into the audio output depending on the tuner and broadcast conditions. This signal can cause improper operation of the Dolby NR systems. Activating the MPX filter (B TYPE/C TYPE MPX ON settings) will effectively remove the signal.
-
 1
1 -
2
-
 3
3 -
 4
4 -
 5
5 -
 6
6 -
 7
7 -
 8
8 -
 9
9 -
 10
10 -
 11
11 -
 12
12 -
 13
13 -
14
-
15
-
16
 |
 |
