Yamaha KX-493 Owner's Manual - Page 10
Dolby Nr Off, C/mpx Button, Mpx Filter, Play/trim, Adjust, Auto Tape Tuning, Bias Adjust, Auto Tape
 |
View all Yamaha KX-493 manuals
Add to My Manuals
Save this manual to your list of manuals |
Page 10 highlights
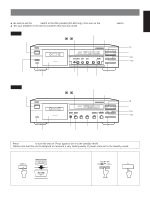
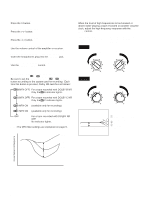
DOLBY NR button setting (in step 2) DOLBY NR (OFF/ B/ C/MPX) button Each time this button is pressed, Dolby NR switches as follows: 3 B(MPX OFF) Recording with DOLBY B NR Only the B indicator lights. ∞ C(MPX OFF) Recording with DOLBY C NR Only the C indicator lights. ∞ B MPX ON Recording an FM broadcast with DOLBY B NR B and MPX FILTER indicators light. ∞ C MPX ON Recording an FM broadcast with DOLBY C NR C and MPX FILTER indicators light. ∞ OFF Recording with no noise reduction No indicator lights. ÷ MPX filter: FM stations transmit a 19 kHz pilot signal in addition to the broadcast program. Sometimes this pilot signal may leak into the audio output depending on the tuner and broadcast conditions. This signal can cause improper operation of the Dolby NR systems. Activating the MPX filter (B TYPE/C TYPE MPX ON settings) will effectively remove the signal. AUTO TAPE TUNING button (in step 4) Pressing this button during the REC/PAUSE mode will activate the Auto Tape Tuning that makes it possible to internally determine the optimum recording characteristics (bias and recording sensitivity) according to the loaded cassette tape in about 20 seconds. To perform the Auto Tape Tuning, send the tape leader part forward and set the PLAY/TRIM control and the BIAS ADJUST control to the center position before pressing the AUTO TAPE TUNING button. When the Auto Tape Tuning is completed, the TAPE TUNING indicator lights. After completion of Auto Tape Tuning, the tape automatically rewinds to the point where the Auto Tape Tuning began and the REC/PAUSE mode is engaged. The bias adjustment with the BIAS ADJUST control is possible even after this tuning. Output Level (dB) To clear Auto Tape Tuning setting, press the AUTO TAPE TUNING button once again, or load any cassette tape of different type. * When recording on the other side of the tape, another Auto Tape Tuning is unnecessary. When recording on the same type cassette tape of a different brand, another Auto Tape Tuning is advisable for much more accurate setting of the recording characteristics. AUTO TAPE TUNING The Auto Tape Tuning function improves the quality of your recording, permitting critical adjustment of the deck's recording bias and sensitivity for best results with every tape you use. With the Auto Tape Tuning function, the recording characteristics (recording bias and sensitivity) are automatically adjusted while recording and playback operations in about 20 seconds, to accurately match the characteristics of loaded tape. For example, the recorded (output) level (A in the figure) may differ from recording (input) level (B in the figure), due to widely varying characteristics of cassette tapes between brands. Using the Auto Tape Tuning function, these differences are effectively eliminated by adjusting the recording bias (for high frequencies) and sensitivity (for overall frequencies) according to the loaded cassette tape, making a significant contribution to overall recording quality (C in the figure). B Input Level C A Frequency (Hz) 10
-
 1
1 -
2
-
3
-
4
-
 5
5 -
 6
6 -
 7
7 -
 8
8 -
 9
9 -
 10
10 -
 11
11 -
 12
12 -
 13
13 -
 14
14 -
 15
15 -
16
-
17
-
18
 |
 |
