Yamaha KX-493 Owner's Manual - Page 4

English, Features, Connections, Rear Panel Connections - remote

Page 4 highlights

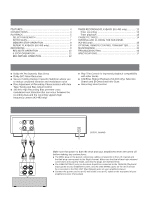
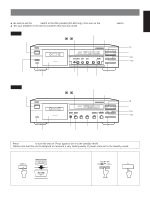
This owner's manual covers YAMAHA cassette deck models KX-493 and KX-393. Please check which model you have purchased and read the sections that apply to your particular model. There may be some unnecessary items, so please skip them accordingly. TABLE OF CONTENTS FEATURES 4 CONNECTIONS 4 PLAYBACK 5 SELECTION SEARCH 7 INTRO SCAN 7 MEMORY STOP OPERATION 8 REPEAT PLAYBACK (KX-493 only 8 RECORDING 9 REC MUTE OPERATION 12 0-STOP OPERATION 12 REC RETURN OPERATION 12 TIMER RECORDING/PLAYBACK (KX-493 only 13 Timer recording 13 Timer playback 13 CASSETTE TAPES 14 OPENING AND CLOSING THE SUB PANEL (KX-493 only 15 OPTIONAL REMOTE CONTROL TRANSMITTER 15 MAINTENANCE 15 TROUBLESHOOTING 16 SPECIFICATIONS 17 FEATURES ÷ Dolby HX Pro Dynamic Bias Servo ÷ Dolby B/C Noise Reduction ÷ Secure Holding Damper Cassette Stabilizer allows you to reduce unwanted vibration and modulation noise ÷ Fine Adjustment of Recording Characteristics with Auto Tape Tuning and Bias Adjust Control ÷ 160 kHz High Recording Bias prevents cross modulation beat distortion that can occur between the recording bias and the recording signal's high frequency content (KX-493 only) ÷ Play Trim Control for improved playback compatibility with other decks ÷ 0-M/FULL Repeat Playback (KX-493 only), Selection Search and Bi-Directional Intro Scan ÷ Recording Mute function CONNECTIONS L R LINE IN REC LINE OUT PLAY REC OUT TAPE PB L R Amplifier or receiver 4 (U.S.A. model) To an AC outlet REAR PANEL CONNECTIONS Make sure that power to both the deck and your amplifier/receiver are turned off before making any connections. ÷ The White plug on the paired connecting cables corresponds to the Left channel and the Red plug corresponds to the Right channel. Make sure that the left and right channel connections are properly made, and that the plugs are inserted firmly. ÷ The LINE OUT/PLAY jacks on the deck should be connected to the TAPE PB (Playback/ Input) jacks on your amplifier/receiver, and the LINE IN/REC jacks on the deck should be connected to the REC OUT (Rec/Output) jacks on your amplifier/receiver. ÷ Connect the power cord to an AC wall outlet or to an AC outlet on the rear panel of your amplifier/receiver (if provided).

  • 1
  • 2
  • 3
  • 4
  • 5
  • 6
  • 7
  • 8
  • 9
  • 10
  • 11
  • 12
  • 13
  • 14
  • 15
  • 16
  • 17
  • 18

4
This owner’s manual covers YAMAHA cassette deck models KX-493 and KX-393. Please check which model
you have purchased and read the sections that apply to your particular model. There may be some
unnecessary items, so please skip them accordingly.
FEATURES
..........................................................................
4
CONNECTIONS
..................................................................
4
PLAYBACK
.........................................................................
5
SELECTION SEARCH
.....................................................
7
INTRO SCAN
...................................................................
7
MEMORY STOP OPERATION
.........................................
8
REPEAT PLAYBACK (KX-493 only)
................................
8
RECORDING
......................................................................
9
REC MUTE OPERATION
..............................................
12
0-STOP OPERATION
....................................................
12
REC RETURN OPERATION
..........................................
12
TIMER RECORDING/PLAYBACK (KX-493 only)
.............
13
Timer recording
............................................................
13
Timer playback
.............................................................
13
CASSETTE TAPES
............................................................
14
OPENING AND CLOSING THE SUB PANEL
(KX-493 only)
....................................................................
15
OPTIONAL REMOTE CONTROL TRANSMITTER
............
15
MAINTENANCE
................................................................
15
TROUBLESHOOTING
......................................................
16
SPECIFICATIONS
.............................................................
17
÷
Dolby HX Pro Dynamic Bias Servo
÷
Dolby B/C Noise Reduction
÷
Secure Holding Damper Cassette Stabilizer allows you
to reduce unwanted vibration and modulation noise
÷
Fine Adjustment of Recording Characteristics with Auto
Tape Tuning and Bias Adjust Control
÷
160 kHz High Recording Bias prevents cross
modulation beat distortion that can occur between the
recording bias and the recording signal’s high
frequency content (KX-493 only)
FEATURES
TABLE OF CONTENTS
÷
Play Trim Control for improved playback compatibility
with other decks
÷
0-M/FULL Repeat Playback (KX-493 only), Selection
Search and Bi-Directional Intro Scan
÷
Recording Mute function
CONNECTIONS
TAPE PB
REC OUT
L
R
LINE OUT
PLAY
LINE IN
REC
L
R
To an AC outlet
Amplifier or receiver
(U.S.A. model)
REAR PANEL CONNECTIONS
Make sure that power to both the deck and your amplifier/receiver are turned off
before making any connections.
÷
The White plug on the paired connecting cables corresponds to the Left channel and
the Red plug corresponds to the Right channel. Make sure that the left and right channel
connections are properly made, and that the plugs are inserted firmly.
÷
The LINE OUT/PLAY jacks on the deck should be connected to the TAPE PB (Playback/
Input) jacks on your amplifier/receiver, and the LINE IN/REC jacks on the deck should
be connected to the REC OUT (Rec/Output) jacks on your amplifier/receiver.
÷
Connect the power cord to an AC wall outlet or to an AC outlet on the rear panel of your
amplifier/receiver (if provided).