Yamaha P-95S Owner's Manual - Page 8
Panel Controls and Terminals - p 95 sustain pedal
 |
View all Yamaha P-95S manuals
Add to My Manuals
Save this manual to your list of manuals |
Page 8 highlights
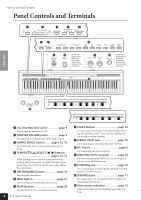
Panel Controls and Terminals Panel Controls and Terminals 1 2 3 4 5 67 8 9 ) Shows the ! jacks and ter- minals as seen when viewed from the rear of the instrument. $ @ Shows the jacks and ter- minals as seen when viewed from the rear of the instrument. ENGLISH # 1 [ ] (Standby/On) switch page 9 For turning the power on or off. 2 [MASTER VOLUME] slider page 9 For adjusting the volume level of the entire sound. 3 [DEMO/SONG] button .........pages 12, 13 For playing the demo songs and the piano preset songs. 4 TEMPO [g] [h]/SELECT [Q] [W] buttons pages 12, 13 While playing a voice demo or piano preset song, pressing these buttons lets you select the next or previous song. These buttons can also be used to change the song tempo. 5 [METRONOME] button page 14 For using the metronome. 6 [REC] button page 21 For recording your keyboard performance. 7 [PLAY] button page 22 For playing back the recorded performance. 8 P-95 Owner's Manual 8 VOICE buttons page 16 For selecting voices from 10 internal sounds including Grand Piano 1 and 2. You can also combine two voices and use them together. 9 [PEDAL UNIT] jack page 10 For connecting an optional pedal unit (LP-5A). ) DC IN jack page 9 For connecting the power adaptor. ! MIDI [IN] [OUT] terminals ...........page 24 For connecting external MIDI devices, allowing the use of various MIDI functions. @ [SUSTAIN] jack page 10 For connecting an included pedal, optional FC3 foot pedal or FC4 foot switch. # [PHONES] jack page 11 For connecting a set of standard stereo headphones, allowing private practice. $ Metronome indication page 14 Indicates the keys used for making metronome settings. 6
-
 1
1 -
2
-
 3
3 -
 4
4 -
 5
5 -
 6
6 -
 7
7 -
 8
8 -
 9
9 -
 10
10 -
 11
11 -
 12
12 -
 13
13 -
14
-
15
-
16
-
17
-
18
-
19
-
20
-
21
-
22
-
23
-
24
-
25
-
26
-
27
-
28
-
29
-
30
-
31
-
32
-
33
-
34
-
35
-
36
 |
 |
