Yamaha PM5000 Owner's Manual - Page 54
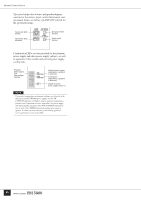
Fade Time, seconds, in 0.2-second increments from 10
 |
View all Yamaha PM5000 manuals
Add to My Manuals
Save this manual to your list of manuals |
Page 54 highlights
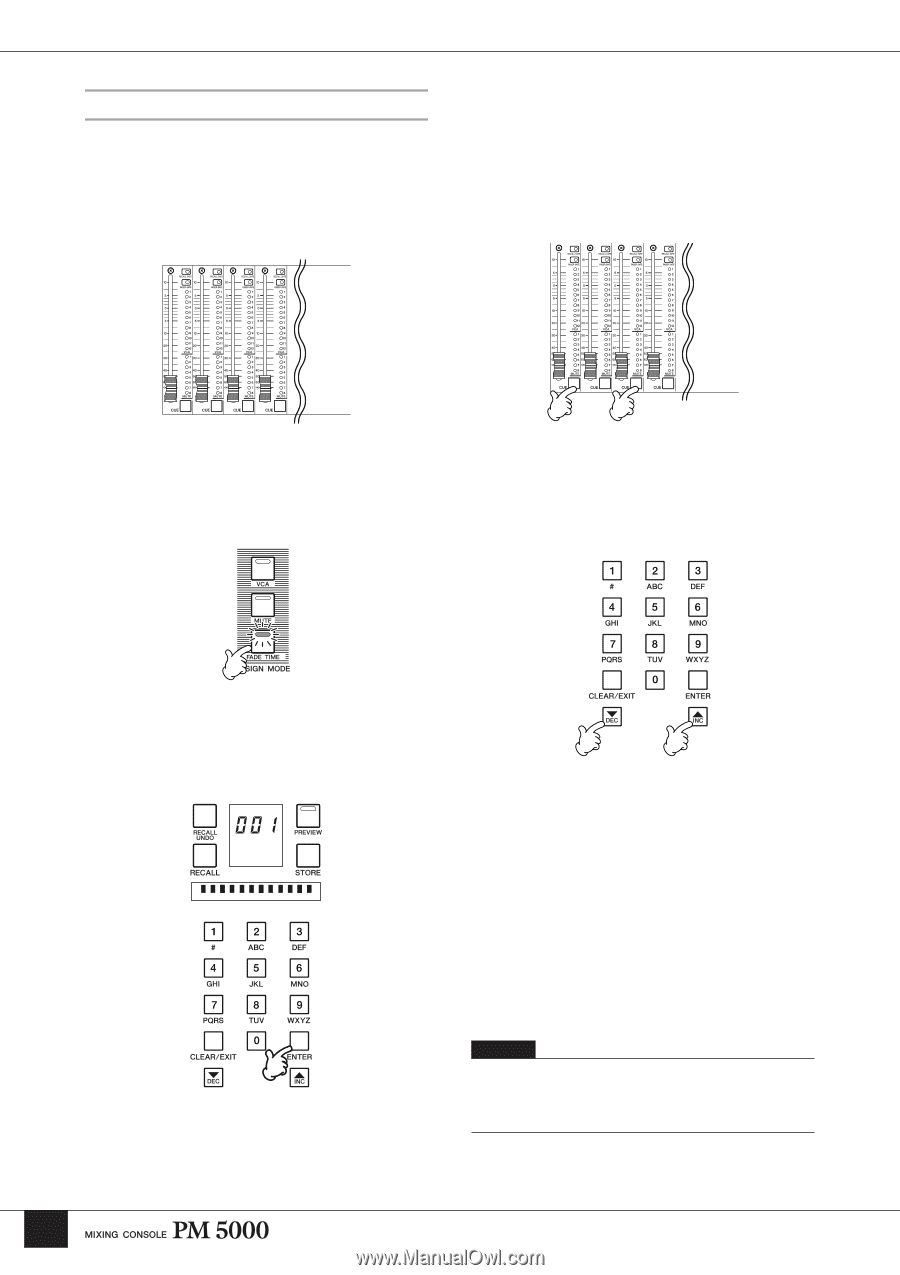
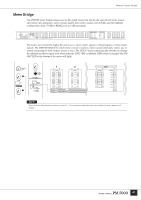
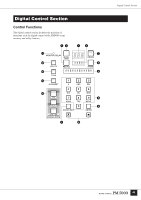
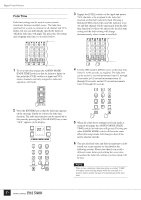
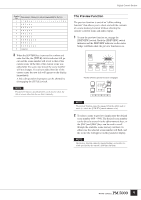
Digital Control Section Fade Time Fade time settings can be used to create smooth transitions between recalled scenes. The fade time specified for a scene is common to all channel and VCA faders, but you can individually specify the faders to which the fade time will apply. The procedure for setting and assigning fade times is described below. 3 Engage the [CUE] switches of the input and master VCA channels to be assigned to the fade time function so that their indicators flash. Pressing a flashing [CUE] switch will cause the indicator to go out and that channel will be unassigned from the fade time function (it will not be affected by the fade time setting and the fader setting will change instantaneously when a scene is recalled). 1 To set a fade time engage the ASSIGN MODE [FADE TIME] switch so that its indicator lights (at this point the [CUE] switches of input and VCA master channels currently assigned to fade time operation will flash). 4 Use the [INC] and/or [DEC] keys to set the fade time from 0.1 to 60 seconds, as required. The fade time can be set in 0.1-second increments from 0.1 through 10 seconds, in 0.2-second increments from 10 through 20 seconds, and in 0.5-second increments from 20 through 60 seconds. 2 Press the [ENTER] key so that the fade time appears on the message display to activate the fade time function. The fade time function can be turned off at this point by pressing the [CLEAR/EXIT] key so that "OFF" appears on the display. 10.0 5 When all of the above settings have been made as required disengage the ASSIGN MODE [FADE TIME] switch (its indicator will go out). Pressing any other ASSIGN MODE switch will have the same effect (the assign mode will change to that of the newly selected switch). 6 The specified fade time and fader assignments can be stored in a scene memory as described in the following section. Please note that if you recall a different scene before performing the scene store procedure the fade time settings you have made will be lost. NOTE When a scene containing a fade time setting is recalled, "FADE" will appear on the message display while the scene fade is in progress (unless another message is being displayed at the same time). 52
-
 1
1 -
2
-
3
-
4
-
5
-
6
-
7
-
8
-
9
-
10
-
11
-
12
-
13
-
14
-
15
-
16
-
17
-
18
-
19
-
20
-
21
-
22
-
23
-
24
-
25
-
26
-
27
-
28
-
29
-
30
-
31
-
32
-
33
-
34
-
35
-
36
-
37
-
38
-
39
-
40
-
41
-
42
-
43
-
44
-
45
-
46
-
47
-
48
-
 49
49 -
 50
50 -
 51
51 -
 52
52 -
 53
53 -
 54
54 -
 55
55 -
 56
56 -
 57
57 -
 58
58 -
 59
59 -
60
-
61
-
62
-
63
-
64
-
65
-
66
-
67
-
68
-
69
-
70
-
71
-
72
-
73
-
74
-
75
-
76
-
77
-
78
-
79
-
80
-
81
-
82
-
83
-
84
-
85
-
86
-
87
-
88
-
89
-
90
-
91
-
92
-
93
-
94
-
95
-
96
-
97
-
98
-
99
-
100
-
101
-
102
-
103
-
104
-
105
-
106
 |
 |