Yamaha PM5D Studio Manager Installation Guide - Page 5
Installing Studio Manager
 |
View all Yamaha PM5D manuals
Add to My Manuals
Save this manual to your list of manuals |
Page 5 highlights
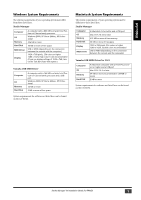
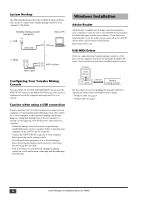
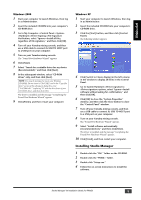
ENGLISH Windows 2000 1 Start your computer to launch Windows, then log in as Administrator. 2 Insert the included CD-ROM into your computer's CD-ROM drive. 3 Go to My Computer->Control Panel->System- >Hardware->Driver Signing->File Signature Verification, select "Ignore-Install all files, regardless of file signature," and then click [OK]. 4 Turn off your Yamaha mixing console, and then use a USB cable to connect its USB TO HOST port to a USB port on your computer. 5 Turn on your Yamaha mixing console. The "Found New Hardware Wizard" appears. 6 Click [Next]. 7 Select "Search for a suitable driver for my device (Recommended)," and then click [Next]. 8 In the subsequent window, select "CD-ROM drives" only, and then click [Next]. NOTE: You may be prompted to insert your Windows CD-ROM. Do not insert it! Click [OK], and in the "Copy files from" section of the subsequent dialog box, enter "D:\USBdrv2k_" (replacing "D" with the drive letter of your CD-ROM drive), and then click [OK]. The driver is installed, and the message "Completing the Found New Hardware Wizard" appears. 9 Click [Finish], and then restart your computer. Windows XP 1 Start your computer to launch Windows, then log in as Administrator. 2 Insert the included CD-ROM into your computer's CD-ROM drive. 3 Click the [Start] button, and then click [Control Panel]. The following window appears. 4 Click [Switch to Classic display] in the left column in the window to display all items in the Control Panel. 5 Go to System Hardware->Driver signatures- >Driver signature options, select "Ignore-Install software without asking for confirmation," and then click [OK]. 6 Click [OK] to close the "System Properties" window, and then click the Close button to close the "Control Panel" window. 7 Turn off your Yamaha mixing console, and then use a USB cable to connect its USB TO HOST port to a USB port on your computer. 8 Turn on your Yamaha mixing console. The "Found New Hardware Wizard" appears. 9 Select "Install software automatically (recommended) (I)," and then click [Next]. The driver is installed, and the message "Completing the Found New Hardware Wizard" appears. 10 Click [Finish], and then restart your computer. Installing Studio Manager 1 Double-click the "SM_" folder on the CD-ROM. 2 Double-click the "PM5D_" folder. 3 Double-click "Setup.exe." 4 Follow the on-screen instructions to install the software. Studio Manager V2 Installation Guide (for PM5D) 5
-
 1
1 -
 2
2 -
 3
3 -
 4
4 -
 5
5 -
 6
6 -
 7
7 -
 8
8 -
 9
9 -
 10
10 -
 11
11
 |
 |
