Yamaha YM-2000 Owner's Manual - Page 2
Precautions, Specifications, Features Of The Ym-2000, The Hard Case, Components, Operation, Battery - parts
 |
View all Yamaha YM-2000 manuals
Add to My Manuals
Save this manual to your list of manuals |
Page 2 highlights
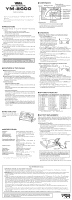
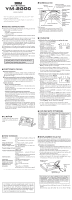
MULTI METRONOME YM-2000 OWNER'S MANUAL Thank you for purchasing the YAMAHA YM-2000 Multi Metronome. Please read this manual thoroughly and keep it in a safe place for future reference. I PRECAUTIONS N To prevent damage, do not use the metronome in the following locations: • places where the unit will be in direct sunlight; • places subject to temperature and humidity extremes; • places that are sandy or dusty. N To power the metronome, use only a CR-2025 lithium battery. N For maximum battery life, always be sure the metronome is turned OFF when not in use. N If an exhausted battery is left in the unit for an extended period of time, it may leak and cause malfunctioning of the unit. When the battery becomes exhausted, always remove it and replace it as soon as possible. N Do not use press or bump on the LCD panel. N If the indications on the LCD panel are difficult to see, adjust the viewing angle. N Do not subject the metronome to strong physical shock or vibration. Do not use excessive force on any of the controls. N Never use solvents such as benzene or thinner to clean the metronome. Wipe clean with a soft, dry cloth. N After reading the owner's manual, keep it in a safe place for future reference. Never dispose of used batteries by burning them. Also make sure to keep batteries away from children. I FEATURES OF THE YM-2000 G Metronome Function 11 beat patterns (1 to 7 beats, duplets, triplets, quintuplets) and 30 rhythm patterns can be played at a variable tempo (30 to 240 beats per minute). G Note/Standard Pitch Sound Generating Function The unit can generate a tuning note selectable within one octave (C - B) in half-tone steps. The standard pitch (for note A) can be set within the range of 438 to 445 Hz. G Other Functions * Operation Confirmation Beep When a button is pressed, a beep sound will comfirm the operation. The confirmation beep will also be produced when the metronome sound is muted. * Auto Power Off Function When the unit is used in metronome mode and none of the buttons is pressed for approximately 15 minutes, the power will automatically turn off. When the unit is set to note/standard pitch setting mode and none of the buttons is pressed for approximately 5 minutes, the power will automatically turn off. * Memory Backup Function This function retains all current settings in memory when the unit is turned off (POWER button or Auto Power Off). The MUTE function, however, will be released, and sound will be heard when the unit is turned on again. I THE HARD CASE The hard case can be used as a stand as shown in the illustration on the right. I SPECIFICATIONS Indicators : Display (LCD panel), tempo indicator Tempo : 30 - 240 beats/minute, accuracy ±0.2 % Metronome beats : 1 - 7 beats, duplets, triplets, quintuplets Rhythm patterns : 30 preset patterns Note setting range : C4 - B4 (in half-tone steps), accuracy ±1 cent Standard pitch setting range : 438 Hz - 445 Hz Auto Power Off Function : Metronome mode - after approx. 15 minutes Note/standard pitch setting mode - after approx. 5 minutes Other Functions : Operation confirmation beep, memory backup function Connector : 3.5 ear phone jack (monaural) Power Source : Lithium battery x 1 (CR-2025) Battery Life : Approx. 45 hours Dimensions (W x H x D) : 102 x 12 x 64 mm (4-1/8" x 1/2" x 2-1/2") Weight (including battery) : 65 g (2.1 oz) Accessories : Lithium battery x 1 (CR-2025), Hard case (can be used as stand) * Specifications and design subject to change without notice. I COMPONENTS Speaker Display (LCD Panel) Tempo indicator The indicator dots light up from left to right in the set tempo. YM-2000 MULTI METRONOME UP RHYTHM TEMPO POWER DOWN NOTE PITCH MUTE RHYTHM button TEMPO button POWER button MUTE button PITCH button NOTE button UP button Earphone jack DOWN button This jack allows connection of a standard earphone (3.5 ). If a stereo headphone is connected, sound will be produced from one side only. When connecting an earphone the internal speaker is muted automatically. I OPERATION G Selecting a Rhythm Pattern and Setting the Tempo 1. Press the RHYTHM button. "RHYTHM" on the display will blink. 2. Press the UP or DOWN button to select a rhythm pattern. Each time the button is pressed, the number on the display will increase/decrease by one. When the button is kept pressed, the number will change continuously. RHYTHM STEP TEMPO MUTE 3. Press the TEMPO button. "TEMPO" on the display will blink. 4. Press the UP or DOWN button to set the desired tempo. Each time the button is pressed, the tempo value will increase/decrease by one. When the button is kept pressed, the tempo value will change continuously. 5. To use without metronome sound, press the MUTE button. "MUTE" will appear on the display. * The 8 STEP indicator segments at the bottom of the display light up or blink according to the rhythm pattern. * The setting can be returned to its initial value (default) by pressing the UP and DOWN buttons simultaneously. G Selecting the Note and Setting the Standard Pitch 1. Press the NOTE button. "NOTE" on the display will blink and the currently set note will sound. 2. Press the UP or DOWN button to select NOTE PITCH the desired note. Each time the button is pressed, the note will change in half- MUTE tone steps. However, the note will not change continuously if the button is kept pressed. 3. Press the PITCH button. "PITCH" on the display will blink. 4. Press the UP or DOWN button to adjust the standard pitch (A) between 438 and 445 Hz. Each time the button is pressed, the pitch value will change by 1 Hz. However, the pitch will not change continuously if the button is kept pressed. 5. To set the note and pitch without sound, press the MUTE button. "MUTE" will appear on the display. * The standard pitch (438 - 445 Hz) will always be set for note A. * The setting can be returned to its initial value (default) by pressing the UP and DOWN buttons simultaneously. I RHYTHM PATTERN LIST No. Rhythm Pattern 0 1 BEAT (weak) 1 1 BEAT (strong) 2 2 BEATS 3 3 BEATS 4 4 BEATS 5 5 BEATS 6 6 BEATS 7 7 BEATS 8 DUPLETS 9 TRIPLETS 10 QUINTUPLETS 11 ROCK 1 12 ROCK 2 13 ROCK 3 No. Rhythm Pattern 14 16 BEAT 1 15 16 BEAT 2 16 POPS 1 17 POPS 2 18 FUNK 1 19 FUNK 2 20 DISCO 21 BALLAD 1 22 BALLAD 2 23 SHUFFLE 1 24 SHUFFLE 2 25 SWING 26 ROCK WALTZ 27 JAZZ WALTZ No. Rhythm Pattern 28 BOSSA NOVA 29 SAMBA 30 JAZZ SAMBA 31 SONGO 32 BOLERO 33 TANGO 34 CHA CHA 35 MAMBO 36 RHUMBA 37 BEGUINE 38 WALTZ 39 MARCH 40 ONDO * No. 0: Single weak beat No. 1: Single strong beat I BATTERY REPLACEMENT When the battery weakens, the display indications will fade and the tempo indicator dots grow dim, while the sound volume decreases. In this case, replace the battery with a new one (CR-2025 lithum battery) as soon as possible. N Replacement Procedure 1. Remove the battery cover fixing screw at the bottom of the unit and remove the battery cover by sliding it in the direction of the arrow as shown in the illustration below. 2. Lift out the old battery using a pointed tool (tweezers etc.). 3. Insert the new battery with its - pole facing down (+ pole must be visible when inserted). 4. Attach the battery cover and secure it using the fixing screw. * Always press the POWER button to turn off the unit before changing the battery. Reset button Bottom side Screw hole Battery cover After battery replacement, turn on the power to check if operation is normal. If the unit is operating abnormally, press the reset button on the bottom side, and then turn on the power again to check the operation. * The default settings after resetting the unit are as follows: Metronome mode, tempo "120", rhythm "11", note "A", pitch "440" Hz FCC INFORMATION (U.S.A.) 1. IMPORTANT NOTICE: DO NOT MODIFY THIS UNIT! This product, when installed as indicated in the instructions contained in this manual, meets FCC requirements. Modifications not expressly approved by Yamaha may void your authority, granted by the FCC, to use the product. 2. IMPORTANT: When connecting this product to accessories and/or another product use only high quality shielded cables. Cable/s supplied with this product MUST be used. Follow all installation instructions. Failure to follow instructions could void your FCC authorization to use this product in the USA. 3. NOTE: This product has been tested and found to comply with the requirements listed in FCC Regulations, Part 15 for Class "B" digital devices. Compliance with these requirements provides a reasonable level of assurance that your use of this product in a residential environment will not result in harmful interference with other electronic devices. This equipment generates/uses radio frequencies and, if not installed and used according to the instructions found in the users manual, may cause interference harmful to the operation of other electronic devices. Compliance with FCC regulations does not guarantee that interference will not occur in all installations. If this product is found to be the source of interference, which can be determined by turning the unit "OFF" and "ON", please try to eliminate the problem by using one of the following measures: Relocate either this product or the device that is being affected by the interference. Utilize power outlets that are on different branch (circuit breaker or fuse) circuits or install AC line filter/s. In the case of radio or TV interference, relocate/reorient the antenna. If the antenna lead-in is 300 ohm ribbon lead, change the lead-in to coaxial type cable. If these corrective measures do not produce satisfactory results, please contact the local retailer authorized to distribute this type of product. If you can not locate the appropriate, please contact Yamaha Corporation of America, Electronic Service Division, 6600 Orangethorpe Ave, Buena Park, CA 90620 The above statements apply ONLY to those products distributed by Yamaha Corporations of America or its subsidiaries. THIS DIGITAL APPARATUS DOES NOT EXCEED THE "CLASS B" LIMITS FOR RADIO NOISE EMISSIONS FROM DIGITAL APPARATUS SET OUT IN THE RADIO INTERFERENCE REGULATION OF THE CANADIAN DEPARTMENT OF COMMUNICATIONS. Printed in Hong Kong
-
 1
1 -
 2
2 -
 3
3 -
 4
4
 |
 |
