Yamaha YTS-F500 YTS-F500 Install Manual - Page 11
Installing the speaker, Installation du haut-parleur
 |
View all Yamaha YTS-F500 manuals
Add to My Manuals
Save this manual to your list of manuals |
Page 11 highlights
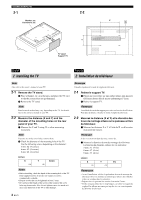
3-1 YSP-4000 YSP-5100/4100 3-2 YSP-4000 YSP-5100/4100 ASSEMBLING/MONTAGE English Français YAS-81/71 YHT-S1400/S400 YHT-S1400/S400 YAS-81/71 YHT-S1400/S400 YAS-81/71 English 3 Installing the speaker Français 3 Installation du haut-parleur Notes • Before mounting the speaker to the floor stand, complete the cable connections. For details, refer to the owner's manual of your speaker. • Remove the speaker stand when it is attached. 3-1 Attach or with (4 screws). Choose or depending on the speaker. : YSP-4000, YSP-5100/4100 : YAS-81/71, YHT-S1400/S400 (As of October, 2009) In the case of YHT-S1400/S400, attach to the terminal side of the speaker. Align the holes on and , and stick to as shown in the illustration above. y • You can adjust the height to set the speaker by using the holes either at the top or at the bottom. • You can adjust the height of the speaker by setting upside down, only if you use and your speaker is YHT-S1400/S400. In this case, attach to the terminal side of the speaker. 3-2 Mount the speaker with . The number of screws you use varies depending on the speaker bracket attached. : 4 screws : 2 screws Note Be careful not to pinch the speaker cables between the speaker and the speaker bracket. Remarques • Avant d'installer le haut-parleur sur le pied de sol, vous devez raccorder les câbles. Pour plus de détails, consultez le mode d'emploi du haut-parleur. • Retirez le support du haut-parleur si celui-ci est fixé. 3-1 Fixez ou avec (4 vis). Choisissez ou en fonction du haut-parleur. : YSP-4000, YSP-5100/4100 : YAS-81/71, YHT-S1400/S400 (À compter d'octobre 2009) Pour les modèles YHT-S1400/S400, fixez au hautparleur, du côté où se trouvent les bornes. Alignez les trous de et , puis assemblez et comme indiqué dans l'illustration ci-dessus. y • Vous pouvez régler la hauteur du haut-parleur à l'aide des trous situés dans la partie supérieure ou inférieure. • Vous pouvez régler la hauteur du haut-parleur en installant à l'envers, uniquement si vous utilisez et si votre haut-parleur est YHT-S1400/S400. Dans ce cas, fixez au haut-parleur, du côté où se trouvent les bornes. 3-2 Montez le haut-parleur avec . Le nombre de vis que vous utilisez dépend du support de haut-parleur fixé. : 4 vis : 2 vis Remarque Prenez garde de ne pas coincer les câbles entre le haut-parleur et le support de fixation. 7 En/Fr
-
 1
1 -
2
-
3
-
4
-
5
-
 6
6 -
 7
7 -
 8
8 -
 9
9 -
 10
10 -
 11
11 -
 12
12 -
 13
13 -
 14
14
 |
 |
