Zanussi ZWI71201WA Product Manaul - Page 25
Building
 |
View all Zanussi ZWI71201WA manuals
Add to My Manuals
Save this manual to your list of manuals |
Page 25 highlights
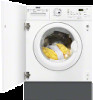
Building in This appliance has been designed to be built into the kitchen furniture. The recess should have the dimensions shown in picture A. 600 min. 560 596 555 min. 820 75 60 170 100 A 176,5 416 818 Caution! Do not remove the screw 8! Preparation and assembly of the door The machine is originally prearranged for the assembly of a door opening from right to left. In this case it is sufficient to screw in the hinges (1) and the counter-magnet (6) provided with the appliance, at the right level (Fig. B). 35 Ø 12,5-14 depth 16-22 B C 416 When installing the appliance into the kitchen furniture ensure, if possible, the hoses are placed in either of the two recesses on the back of the appliance. This will help to prevent the hoses from be- C coming kinked or trapped. 595-598 22±1,5 6 1 7 54 3 B 28 www.zanussi.com 25
-
 1
1 -
2
-
3
-
4
-
5
-
6
-
7
-
8
-
9
-
10
-
11
-
12
-
13
-
14
-
15
-
16
-
17
-
18
-
19
-
 20
20 -
 21
21 -
 22
22 -
 23
23 -
 24
24 -
 25
25 -
 26
26 -
 27
27 -
 28
28 -
 29
29 -
 30
30 -
31
-
32
 |
 |
