Zenith XBV443 Operating Guide - Page 15
VCR Setup Menu Options, Channel Selection, VCR Operation Setup Continued
 |
UPC - 044642701376
View all Zenith XBV443 manuals
Add to My Manuals
Save this manual to your list of manuals |
Page 15 highlights
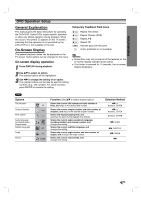
PREPARATION VCR Operation Setup (Continued) VCR Setup Menu Options 1 Press MENU and the MAIN menu will appear. 2 Use v/V to select the SETUP menu, then press ENTER. The SETUP menu will appear. Channel Selection This DVD+VCR is equipped with a frequency synthesized tuner capable of receiving up to 181 channels. These include VHF channels 2-13, UHF channels 14-69 and CATV channels 1-125. Preparation: Connect the DVD+VCR to the desired type of antenna or cable TV system, as shown in Connecting Antenna/Cable TV to DVD+VCR on page 11. 3 Use v/V to choose a desired option on the SETUP menu. Then use b/B to make adjustments. FUNCTION OSD The on-screen display of this DVD+VCR can be turned on or off. Use b/B to switch the FUNCTION OSD ON or OFF. AUDIO MODE The DVD+VCR has two separate audio playback systems, the high quality VHS Hi-Fi system and standard NORMAL mono system. The same audio is generally recorded on both systems. The VHS Hi-Fi system plays on separate (left and right) channels, and the NORMAL system plays monaural sound. The normal track is always played so the cassette can be played on a DVD+VCR that does not have VHS Hi-Fi. AUDIO MODE can be switched between HI-FI and NORMAL using b/B. BROADCAST TYPE (STEREO/SAP/MONO) Multichannel Television Sound (MTS) carries stereo and/or Second Audio Program (SAP) bilingual signals. Set this display to the desired position when both MTS stereo and SAP signals are received. When only one of the MTS signal is received, the DVD+VCR automatically selects the corresponding receiving mode (Stereo or SAP) regardless of the selected position. For normal operation, the display should be in the STEREO position. The DVD+VCR will then record a STEREO program when available, and record a mono program IF the program is NOT IN STEREO. For weak STEREO and/or SAP broadcasts, changing the display to mono may give clearer sound. BROADCAST TYPE can be switched between STEREO, SAP, and MONO using b/B. AUDIO OUTPUT (STEREO/LEFT/RIGHT) Used during playback [when AUDIO MODE (HI-FI/NORMAL) is in HI-FI position] for selecting the audio output signals from the AUDIO OUT terminals (L ch and R ch), and RF.OUT. This display setting should normally be left in the stereo position, so that when a stereo tape is played, the stereo sound will be heard through the left and right channels. If a mono tape is played and the audio output is set to stereo, the same mono sound will be heard from both left and right channels. AUDIO OUTPUT can be switched between STEREO, LEFT, and RIGHT using b/B. 4 Press MENU when finished. AUTO CHANNEL PROGRAMMING 1 Press MENU and the MAIN menu will appear. 2 Use v/V to select the TUNING menu, then press ENTER. The TUNING menu will appear. 3 Use v/V to choose the SOURCE SELECT option, then use b/B to select TUNER. Press b/B repeatedly to switch between TUNER, LINE1, and LINE2. 4 Press v/V to choose the AUTO CHANNEL SET option, then press b/B to set the channel. • The tuner will automatically cycle through all available channels (TV/CATV) in the area and place them in the tuner's memory. • After the AUTO CHANNEL SET is complete, the TUNING menu will hide and return to the TV screen automatically. 5 Make sure the TUNING BAND is set appropriately (TV or CATV). • TV : If you are using a standard antenna to receive channels. CATV : If you are using basic cable to receive channels. • Change the setting of TUNING BAND to check the TV channels. 6 Use CH/TRK (v/V) on the remote control or CH (V/v) on the front panel to cycle the DVD+VCR through the channels in memory. TO ADD OR ERASE CHANNELS This feature allows you to add or erase channels from memory manually. 1 Use v/V to choose the CH. ADD/DEL option on the TUNING menu. Use b/B to select a channel to add or erase. 2 Use ENTER to add or erase the channel. Repeat steps 1 and 2 to add or erase other channels. 3 Press MENU to return to the TV screen. 15
-
 1
1 -
2
-
3
-
4
-
5
-
6
-
7
-
8
-
9
-
 10
10 -
 11
11 -
 12
12 -
 13
13 -
 14
14 -
 15
15 -
 16
16 -
 17
17 -
 18
18 -
 19
19 -
 20
20 -
21
-
22
-
23
-
24
-
25
-
26
-
27
-
28
-
29
-
30
-
31
-
32
-
33
-
34
-
35
-
36
-
37
-
38
-
39
-
40
 |
 |
