2002 Ford Thunderbird Owner's Manual - Page 52
2002 Ford Thunderbird Manual
Page 52 highlights
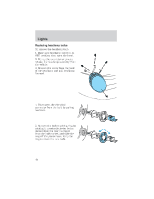
Lights Replacing tail/brake/turn/backup lamp bulbs The tail/brake//turn/backup bulbs are located in the tail lamp assembly, one just below the other. Follow the same steps to replace either bulb: Prior to pulling the carpet away, in step 1, the trunk trim scuff plate must be removed. This can be accomplished by pulling gently on the component until the 6 push pins along the rear of the trunk release. The part can be placed aside and the carpet pulled away. To replace the piece, re-align the pins and push into place. 1. Make sure the headlamp switch is in the OFF position and then open the trunk and carefully pull the carpet away to expose the nut and washer assemblies. 2. Remove the two nut and washer assemblies from the lamp assembly. 3. Pull the lamp assembly towards the rear of the vehicle disengaging the ball stud locator from the ball stud socket in the body. Carefully remove the lamp assembly from the vehicle. 4. Rotate the bulb socket counterclockwise and remove from lamp assembly. 5. Pull the bulb straight out of the socket and push in the new bulb. 6. To complete installation, follow the removal procedure in reverse order. 52
-
 1
1 -
2
-
3
-
4
-
5
-
6
-
7
-
8
-
9
-
10
-
11
-
12
-
13
-
14
-
15
-
16
-
17
-
18
-
19
-
20
-
21
-
22
-
23
-
24
-
25
-
26
-
27
-
28
-
29
-
30
-
31
-
32
-
33
-
34
-
35
-
36
-
37
-
38
-
39
-
40
-
41
-
42
-
43
-
44
-
45
-
46
-
 47
47 -
 48
48 -
 49
49 -
 50
50 -
 51
51 -
 52
52 -
 53
53 -
 54
54 -
 55
55 -
 56
56 -
 57
57 -
58
-
59
-
60
-
61
-
62
-
63
-
64
-
65
-
66
-
67
-
68
-
69
-
70
-
71
-
72
-
73
-
74
-
75
-
76
-
77
-
78
-
79
-
80
-
81
-
82
-
83
-
84
-
85
-
86
-
87
-
88
-
89
-
90
-
91
-
92
-
93
-
94
-
95
-
96
-
97
-
98
-
99
-
100
-
101
-
102
-
103
-
104
-
105
-
106
-
107
-
108
-
109
-
110
-
111
-
112
-
113
-
114
-
115
-
116
-
117
-
118
-
119
-
120
-
121
-
122
-
123
-
124
-
125
-
126
-
127
-
128
-
129
-
130
-
131
-
132
-
133
-
134
-
135
-
136
-
137
-
138
-
139
-
140
-
141
-
142
-
143
-
144
-
145
-
146
-
147
-
148
-
149
-
150
-
151
-
152
-
153
-
154
-
155
-
156
-
157
-
158
-
159
-
160
-
161
-
162
-
163
-
164
-
165
-
166
-
167
-
168
-
169
-
170
-
171
-
172
-
173
-
174
-
175
-
176
-
177
-
178
-
179
-
180
-
181
-
182
-
183
-
184
-
185
-
186
-
187
-
188
-
189
-
190
-
191
-
192
-
193
-
194
-
195
-
196
-
197
-
198
-
199
-
200
-
201
-
202
-
203
-
204
-
205
-
206
-
207
-
208
-
209
-
210
-
211
-
212
-
213
-
214
-
215
-
216
-
217
-
218
-
219
-
220
-
221
-
222
-
223
-
224
-
225
-
226
-
227
-
228
-
229
-
230
-
231
-
232
 |
 |
