2006 Ford Crown Victoria Owner Guide 2nd Printing - Page 28
2006 Ford Crown Victoria Manual

Page 28 highlights
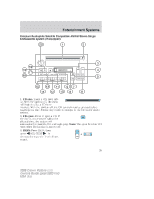
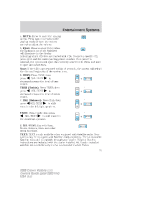
Entertainment Systems Dolby Laboratories Licensing Corporation. Dolby and the double-D symbol are registered trademarks of Dolby Laboratories Licensing Corporation. Setting the clock: Press MENU repeatedly until SELECT HOUR or SEL-TEXT to manually SELECT MINS is displayed. Press decrease/increase the hours/minutes. Press MENU again to disengage clock mode. Note: The menu selections will remain in the display for approximately 10 seconds, at which time the display will return to the previous mode. You may also exit the menu options by pressing any other audio control. 8. Cassette: Insert a cassette facing to the right. 9. TUNE: Press to manually go up or down the radio frequency. CAT: CAT is only available when equipped with Satellite Radio. Your system may be equipped with Satellite ready capability. The kit to enable Satellite reception is available through your dealer. Detailed Satellite instructions are included with the dealer installed kit. Dealer installed satellite kit not available in Canada. 10. Side 1-2: Press to access the next side of the cassette tape. The display will indicate whether TAPE 1 or TAPE 2 is playing. 11. SEEK: Press to access the next/previous radio station, tape selection or CD track. 12. REW (Rewind): Press to 3 4 rewind in tape or CD mode. REW FF FF (Fast forward): Press to fast forward in tape or CD mode. 13. SCAN: Press SCAN to hear a brief sampling of radio stations, selections or CD tracks. Press again to stop. 28 2006 Crown Victoria (cro) Owners Guide (post-2002-fmt) USA (fus)
-
 1
1 -
2
-
3
-
4
-
5
-
6
-
7
-
8
-
9
-
10
-
11
-
12
-
13
-
14
-
15
-
16
-
17
-
18
-
19
-
20
-
21
-
22
-
 23
23 -
 24
24 -
 25
25 -
 26
26 -
 27
27 -
 28
28 -
 29
29 -
 30
30 -
 31
31 -
 32
32 -
 33
33 -
34
-
35
-
36
-
37
-
38
-
39
-
40
-
41
-
42
-
43
-
44
-
45
-
46
-
47
-
48
-
49
-
50
-
51
-
52
-
53
-
54
-
55
-
56
-
57
-
58
-
59
-
60
-
61
-
62
-
63
-
64
-
65
-
66
-
67
-
68
-
69
-
70
-
71
-
72
-
73
-
74
-
75
-
76
-
77
-
78
-
79
-
80
-
81
-
82
-
83
-
84
-
85
-
86
-
87
-
88
-
89
-
90
-
91
-
92
-
93
-
94
-
95
-
96
-
97
-
98
-
99
-
100
-
101
-
102
-
103
-
104
-
105
-
106
-
107
-
108
-
109
-
110
-
111
-
112
-
113
-
114
-
115
-
116
-
117
-
118
-
119
-
120
-
121
-
122
-
123
-
124
-
125
-
126
-
127
-
128
-
129
-
130
-
131
-
132
-
133
-
134
-
135
-
136
-
137
-
138
-
139
-
140
-
141
-
142
-
143
-
144
-
145
-
146
-
147
-
148
-
149
-
150
-
151
-
152
-
153
-
154
-
155
-
156
-
157
-
158
-
159
-
160
-
161
-
162
-
163
-
164
-
165
-
166
-
167
-
168
-
169
-
170
-
171
-
172
-
173
-
174
-
175
-
176
-
177
-
178
-
179
-
180
-
181
-
182
-
183
-
184
-
185
-
186
-
187
-
188
-
189
-
190
-
191
-
192
-
193
-
194
-
195
-
196
-
197
-
198
-
199
-
200
-
201
-
202
-
203
-
204
-
205
-
206
-
207
-
208
-
209
-
210
-
211
-
212
-
213
-
214
-
215
-
216
-
217
-
218
-
219
-
220
-
221
-
222
-
223
-
224
-
225
-
226
-
227
-
228
-
229
-
230
-
231
-
232
-
233
-
234
-
235
-
236
-
237
-
238
-
239
-
240
-
241
-
242
-
243
-
244
-
245
-
246
-
247
-
248
-
249
-
250
-
251
-
252
-
253
-
254
-
255
-
256
-
257
-
258
-
259
-
260
-
261
-
262
-
263
-
264
-
265
-
266
-
267
-
268
-
269
-
270
-
271
-
272
 |
 |