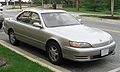
1996 Lexus ES 300 Owners Manual
1996 Lexus ES 300 Manual
1996 Lexus ES 300 manual content summary:
- 1996 Lexus ES 300 | Owners Manual - Page 1
are proud of the advanced engineering and quality construction of each vehicle we build. This Owner's Manual explains the features of your new Lexus. Please read it and follow the instructions carefully so that you can enjoy many years of safe motoring. When it comes to service, remember that your - 1996 Lexus ES 300 | Owners Manual - Page 2
New vehicle warranty Your new vehicle is covered by the following Lexus limited warranties: S New vehicle warranty S Emission control systems warranty S Others For further information, please refer to the separate "Owner's Guide", "Owner's Manual Supplement" or "Warranty Booklet". This vehicle - 1996 Lexus ES 300 | Owners Manual - Page 3
engine not starting or getting a flat tire, etc. If such a problem occurs, check the contents of this Owner's Manual and follow the instructions Lexus will help to keep your vehicle in its best condition. SECTION 6 - SERVICE PROCEDURES AND SPECIFICATIONS Simple maintenance procedure and service - 1996 Lexus ES 300 | Owners Manual - Page 4
or must not do in order to avoid or reduce the risk of damage to your Lexus and its equipment. Your Lexus Owner's Manual provides you with a considerable amount of information. To use this information most effectively, please take the time to familiarize yourself with the contents and use of the - 1996 Lexus ES 300 | Owners Manual - Page 5
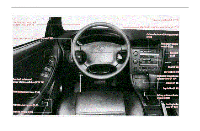
PICTORIAL INDEX INSTRUMENT PANEL - 1996 Lexus ES 300 | Owners Manual - Page 6
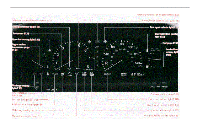
PICTORIAL INDEX INSTRUMENT CLUSTER (Vehicles sold in U.S.A.) - 1996 Lexus ES 300 | Owners Manual - Page 7
PICTORIAL INDEX INSTRUMENT CLUSTER (Vehicles sold in Canada) - 1996 Lexus ES 300 | Owners Manual - Page 8
PICTORIAL INDEX SEAT AND STEERING WHEEL - 1996 Lexus ES 300 | Owners Manual - Page 9
PICTORIAL INDEX EXTERIOR VIEW - 1996 Lexus ES 300 | Owners Manual - Page 10
BASIC OPERATION QUICK REFERENCE Driver's seat Steering wheel Automatic transmission Headlight and turn signal switch Wiper switch 2 2 3 4 5 1 - 1996 Lexus ES 300 | Owners Manual - Page 11
BASIC OPERATION-QUICK REFERENCE 1. DRIVER'S SEAT 2. STEERING WHEEL S TILT STEERING WHEEL Seat adjustment Seat postion Seat cushion angle Seat cushion height Seatback angle Lumbar support Head restraint height Head restraint angle To tilt the steering wheel up or down to the desired angle: 1. - 1996 Lexus ES 300 | Owners Manual - Page 12
SWITCH For selecting either a three-speed or four-speed transmission SELECTOR LEVER POSITION Parking, engine starting and key removal position Reverse position Neutral position Normal driving position Position for engine braking Position for stronger engine braking than that in "2" position - 1996 Lexus ES 300 | Owners Manual - Page 13
SWITCH (FOR U.S.A.) Parking, tail, license plate, side marker and instrument panel lights turn on. Headlights also turn on. With the engine started and parking brake released Parking, tail, license plate, side marker and instrument panel lights turn on. Headlights turn on at full intensity. High - 1996 Lexus ES 300 | Owners Manual - Page 14
BASIC OPERATION-QUICK REFERENCE 5. WIPER SWITCH Mist wiper operation Intermittent operation Low speed operation High speed operation Washer on 5 - 1996 Lexus ES 300 | Owners Manual - Page 15
coolant.) For checking the engine coolant, see page 167. S Automatic transmission: Fluid type - Automatic transmission fluid DII or DEXRON®III (DEXRON®II) S Tire information: See page 174 through 179 for detailed information. S Tire pressure: Tire size: P205/65R15 92V cold tires kPa (kgf/cm2 or - 1996 Lexus ES 300 | Owners Manual - Page 16
SECTION Keys and doors Keys Doors 1-1 8 9 INSTRUMENTS AND CONTROLS 7 - 1996 Lexus ES 300 | Owners Manual - Page 17
objects. S Avoid putting them in water. For information on use of the wireless remote control key, see page 11. Master key (wireless key) - The master key works in every lock. Subkey - The subkey will not open the trunk, glovebox and armrest door in the rear seat. Key number plate - Keep the plate - 1996 Lexus ES 300 | Owners Manual - Page 18
. The door will not lock if the key is left in the ignition switch when closing the front doors. ! CAUTION Before driving, make sure the doors are closed and locked, especially when small children are in the vehicle. Along with the proper use of seat belts, locking the doors helps prevent the - 1996 Lexus ES 300 | Owners Manual - Page 19
KEYS AND DOORS Locking with power door lock switch Locking with rear door child-protector Whenever small children are in on the label next to the knob. To lock all the doors simultaneously, push the power door lock switch on the "DOOR LOCK" side. Pushing on the opposite side will unlock them. 10 - 1996 Lexus ES 300 | Owners Manual - Page 20
the doors can be locked or unlocked from outside the vehicle. However, if any door is not closed securely or the key is in the ignition switch, locking cannot be done by the remote control switch. When you push the remote control switch, the vehicle sounds one - 1996 Lexus ES 300 | Owners Manual - Page 21
KEYS AND DOORS The operational range of the wireless remote control is approximately 1 meter (3 feet) from the outside handle of the driver's door. The , contact your Lexus dealer. For vehicles sold in U.S.A. FCC ID: HYQ1512A MADE IN JAPAN This device complies with FCC rules part 15. Operation is - 1996 Lexus ES 300 | Owners Manual - Page 22
SECTION Switches Headlight and turn signal switch Fog light switch Windshield wiper and washer switch Headlight cleaner switch Rear window and outside rear view mirror defogger switch Power window switches Emergency flasher switch Seat heater switches 1-2 14 16 16 19 19 20 22 22 INSTRUMENTS AND - 1996 Lexus ES 300 | Owners Manual - Page 23
are on, the headlight indicator lights up in the instrument cluster. Vehicles sold in Canada: When the tail lights are on, the tail light indicator lights up in the instrument cluster. The lights automatically turn off when the driver's door is opened with the ignition key turned to the "ACC - 1996 Lexus ES 300 | Owners Manual - Page 24
, pull it further back. A blue light in the instrument cluster indicates high beam or headlight flasher is on. The headlight flasher works even when the headlight switch is off. For signaling turns, move the lever up or down in the conventional manner. The ignition key must be in the "ON" position - 1996 Lexus ES 300 | Owners Manual - Page 25
the switch to the "ON" position. The fog lights come on only when the headlights are on low beam. To turn the wipers on, move the lever down. To make the washer squirt, push the button on the end of the lever. The ignition key must be in the "ON" position. For mist wiper - 1996 Lexus ES 300 | Owners Manual - Page 26
on page 193. Vehicles sold in Canada: The low washer fluid warning light in the instrument cluster comes on when the fluid level in the tank retracted position to the rest position above the hood level. When the snow season is over, manually return the wipers to the retracted position following - 1996 Lexus ES 300 | Owners Manual - Page 27
the hood. (See "Hood" on page 42 for instructions.) The change-over connector is at the right side of the engine hood and make sure it locks into place. If necessary, press down gently on the front edge to lock it. If you are unable to shift the position of the windshield wipers, contact your Lexus - 1996 Lexus ES 300 | Owners Manual - Page 28
) REAR WINDOW AND OUTSIDE REAR VIEW MIRROR DEFOGGER SWITCH To spray fluid on the headlights, push the switch with the headlights on. The ignition key must be in the "ON" position. The low washer fluid warning light in the instrument cluster comes on when the fluid level in the tank becomes nearly - 1996 Lexus ES 300 | Owners Manual - Page 29
wires. S To prevent the battery from being discharged, do not operate the defogger continuously longer than necessary. To raise or lower the windows, use the switch on each door. The passengers' windows can also be controlled by the switches on the driver's door. The ignition key must be in the "ON - 1996 Lexus ES 300 | Owners Manual - Page 30
"WINDOW LOCK" switch pressed in, only the driver's window can be raised or lowered. The indicator lights on the switch tell you which of the the head, hands and other parts of the body of all occupants are kept completely inside the vehicle before you close the power windows. If someone's neck, - 1996 Lexus ES 300 | Owners Manual - Page 31
the seat heater, push the switch to "HI" (high heating temperature) or "LO" (low heating temperature). Pushing lightly on the opposite side will turn it off. The ignition key must be in the "ON" position. NOTICE To prevent the battery from being discharged, turn the switches on only when the engine - 1996 Lexus ES 300 | Owners Manual - Page 32
SECTION 1-3 24 24 25 25 26 31 INSTRUMENTS AND CONTROLS Gauges, meters and service reminder indicators Fuel gauge Engine coolant temperature gauge Tachometer Odometer and trip meter Service reminder indicators and warning buzzers Instrument panel light control 23 - 1996 Lexus ES 300 | Owners Manual - Page 33
The indicator lamp goes off after driving several times. If the indicator lamp does not go off, contact your Lexus dealer as soon as possible. See the inner back cover for fuel capacity and recommended fuel selection. The gauge indicates the engine coolant temperature when the ignition switch is on - 1996 Lexus ES 300 | Owners Manual - Page 34
. S Do not continue driving with an overheated engine. See "If your vehicle overheats" on page 133. Driving with the engine running too fast causes excessive engine wear and poor fuel economy. Remember, in most cases the slower the engine speed, the greater the fuel economy. NOTICE Do not let the - 1996 Lexus ES 300 | Owners Manual - Page 35
if the electrical power source is disconnected. SERVICE REMINDER INDICATORS AND WARNING BUZZERS IF THIS INDICATOR OR BUZZER COMES ON...DO THIS. (a) or If parking brake is off, stop and check. Fasten seat belts. (b) (indicator and buzzer) (c) Take vehicle to Lexus dealer immediately. Stop - 1996 Lexus ES 300 | Owners Manual - Page 36
GAUGES, METERS, AND SERVICE REMINDER INDICATORS (a) (f) Add engine oil. Brake System Warning Light (g) Take vehicle to Lexus dealer. Take vehicle to Lexus dealer. Close all doors. Replace bulb. Add washer fluid. (h) or (i) (j) (k) (l) Low fuel level warning light Key reminder buzzer Fill up - 1996 Lexus ES 300 | Owners Manual - Page 37
continue to operate, however, until the battery is discharged. Turn off the air conditioning, blower, radio, etc., and drive to the nearest Lexus dealer or repair shop. (c) SRS Airbag Warning Light NOTICE Do not continue driving if the engine drive belt is broken or loose. This indicator comes - 1996 Lexus ES 300 | Owners Manual - Page 38
"Fuel tank cap" on page 43 for instructions.) c. There is a problem somewhere in your engine or automatic transmission electrical system. If it comes on while you are driving in case c., have your vehicle checked/repaired by your Lexus dealer as soon as possible. (k) Low Washer Fluid Warning Light - 1996 Lexus ES 300 | Owners Manual - Page 39
Reminder Buzzer This buzzer reminds you to remove the key when you open the driver's door with the ignition key in the "ACC" or "LOCK" position. How to check all the service reminder indicators (except the low fuel level warning light): 1. Apply the parking brake. 2. Open the door. The following - 1996 Lexus ES 300 | Owners Manual - Page 40
GAUGES, METERS, AND SERVICE REMINDER INDICATORS INSTRUMENT PANEL LIGHT CONTROL To adjust the brightness of the instrument panel lights, turn the knob. 31 - 1996 Lexus ES 300 | Owners Manual - Page 41
GAUGES, METERS AND SERVICE REMINDER INDICATORS 32 - 1996 Lexus ES 300 | Owners Manual - Page 42
SECTION Interior equipment Vanity mirrors Interior light Personal lights Ignition switch light Clock Cigarette lighter and ashtray Glovebox Cup holder Floor mat Luggage stowage precautions 1-4 34 34 34 35 35 36 37 37 38 39 INSTRUMENTS AND CONTROLS 33 - 1996 Lexus ES 300 | Owners Manual - Page 43
remains on for a while and then fades out. PERSONAL LIGHTS Vehicles without moon roof To use the vanity mirrors, swing the sun visor down and open the cover. The vanity light comes on when you open the cover. INTERIOR LIGHT To turn on the personal light, push the switch. To turn it off, push the - 1996 Lexus ES 300 | Owners Manual - Page 44
SWITCH LIGHT To reset the hour, press the "H" button. To reset the minutes, press the "M" button. To adjust the time to the nearest hour, press the ":00" button. For example, if the ":00" button is pressed when the time is between 9:30 - 9:59 or between 10:01 - 10:29, the time will change to - 1996 Lexus ES 300 | Owners Manual - Page 45
INTERIOR EQUIPMENT With the tail lights on, the background brightness of the time indication will be reduced. Once the electrical power source has been disconnected from the clock, the time is automatically set to 1:00. When finished with your cigarette, thoroughly extinguish it in the ashtray to - 1996 Lexus ES 300 | Owners Manual - Page 46
INTERIOR EQUIPMENT GLOVEBOX CUP HOLDER To open the glovebox door, pull the lever. To lock the glovebox door, insert the master key and turn it clockwise. With the tail lights on, the glovebox light will come on when the glovebox door is open. To use the cup holder, push the panel. The cup holder - 1996 Lexus ES 300 | Owners Manual - Page 47
a floor mat of the correct size. If the floor mat has a hole, then it is designed for use with a locking clip. Fix the floor mat and locking clip into the hole in the floor carpet. ! CAUTION Make sure the floor mat is properly placed on the floor carpet. If the floor mat slips and interferes with - 1996 Lexus ES 300 | Owners Manual - Page 48
may interfere with the driver's field of view. Or they may move during sharp vehicle acceleration or turning, and impair the driver's control of the vehicle. In an accident they may injure the vehicle occupants. NOTICE Do not load the vehicle beyond the vehicle capacity weight specified on the tire - 1996 Lexus ES 300 | Owners Manual - Page 49
SECTION Exterior equipment Hood Trunk lid Fuel tank cap Moon roof 1-5 42 42 43 45 INSTRUMENTS AND CONTROLS 41 - 1996 Lexus ES 300 | Owners Manual - Page 50
not forgotten any tools, rags, etc. Then lower the hood and make sure it locks. TRUNK LID To open the hood, pull the hood lock release lever under the instrument panel. The hood will spring up slightly. To unlock the trunk lid, insert the master key and turn it clockwise. To close the trunk lid - 1996 Lexus ES 300 | Owners Manual - Page 51
off the trunk lid opener system and lock the glovebox. FUEL TANK CAP To open the trunk lid while sitting in the driver's seat, push the switch with the main switch on. 1. To open the fuel filler door, push the switch on the driver's door panel. ! CAUTION S Do not smoke, cause sparks or allow - 1996 Lexus ES 300 | Owners Manual - Page 52
be stored on the back side of the fuel filler door. It is not times. If the indicator lamp does not go off, contact your Lexus dealer as soon as possible. Pull the manual lever toward the back. This is used in case the fuel filler door cannot be opened due to a discharged battery or other trouble - 1996 Lexus ES 300 | Owners Manual - Page 53
. However, even if the ignition key is turned to the "ACC" or S Always make sure nobody places his/her head, hands and other parts of the body in the roof opening before you close the roof. If someone's push the switch to the OPEN or CLOSE side. To tilt up or lower the rear end of the moon roof, - 1996 Lexus ES 300 | Owners Manual - Page 54
EXTERIOR EQUIPMENT S Never leave small children alone in the vehicle, especially with the ignition key still inserted. They could use the moon roof switches and get trapped in the roof opening. Unattended children can become involved in serious accidents. S Never - 1996 Lexus ES 300 | Owners Manual - Page 55
SECTION Comfort adjustment Front seats Trunk storage extension Head restraints Tilt steering wheel Outside rear view mirrors Inside rear view mirror Seat belts SRS airbags Child restraint 1-6 48 50 51 51 52 53 54 60 66 INSTRUMENTS AND CONTROLS 47 - 1996 Lexus ES 300 | Owners Manual - Page 56
COMFORT ADJUSTMENT FRONT SEATS Seat adjustment precautions Adjust the driver's seat so that the foot pedals, steering wheel and instrument panel controls are within easy reach of the driver. Adjusting front seats ! CAUTION S Do not adjust the seat while the vehicle is moving as the seat may - 1996 Lexus ES 300 | Owners Manual - Page 57
switch in the desired direction. Releasing the switch will stop the seat in that position. Do not place anything under the seat. It might interfere with the seat movement. To reduce the risk of sliding under the lap belt during a collision, avoid reclining the seatback any more than needed. The - 1996 Lexus ES 300 | Owners Manual - Page 58
only) TRUNK STORAGE EXTENSION Push the lever forward and release it. Repeat this until you have comfortable support. Pull down the center armrest in the rear seat. Pull the lever of the armrest door and open the armrest door. Access to the trunk can be prevented by locking the armrest door with - 1996 Lexus ES 300 | Owners Manual - Page 59
. Therefore, using a cushion on the seatback is not recommended. To change the steering wheel angle, hold the steering wheel, pull up the lock release lever, tilt the steering wheel to the desired angle and release the lever. When the steering wheel is in a low position, it will spring up as you - 1996 Lexus ES 300 | Owners Manual - Page 60
and farther away than if seen in a normal flat mirror. To adjust the power rear view mirror, first place the master switch at "L" (left) or "R" (right), and push the control switch on the desired side. If the engine is not running, the key must be in the "ACC" position for the operation of the - 1996 Lexus ES 300 | Owners Manual - Page 61
When driving at night, pull the lever toward you to reduce the glare from the headlights of vehicles behind you. Before adjusting the mirror to the position with most clarity, push the day-night change lever forward (daylight driving position). Remember that by reducing glare you also lose some rear - 1996 Lexus ES 300 | Owners Manual - Page 62
, SRS AND CHILD RESTRAINTS SEAT BELTS Seat belt precautions Lexus recommends that the driver and passengers in the vehicle be properly restrained at all times with the seat belts provided. Failure to do so could increase the chance of injury and/or the severity of injury in accidents. Baby or small - 1996 Lexus ES 300 | Owners Manual - Page 63
into the buckle. The seat belt length automatically adjusts to your size and the seat position. The retractor will lock the belt during a sudden stop seat belt does not function normally, immediately contact your Lexus dealer. Adjust the position of the lap and shoulder belts. Position the lap belt - 1996 Lexus ES 300 | Owners Manual - Page 64
belt during an accident. Keep the lap belt as low on your hip bone as possible. S For your safety, do not place the shoulder belt under your arm. Always be sure that the belt position to your size. To raise the anchor position, push the anchor up. To lower the anchor position, support the anchor - 1996 Lexus ES 300 | Owners Manual - Page 65
tab locks into the buckle. The seat belt length automatically adjusts to your size. The retractor will lock the belt during a sudden stop or on impact seat belt does not function normally, immediately contact your Lexus dealer. Adjust the position of the lap and shoulder belts. Position the lap belt - 1996 Lexus ES 300 | Owners Manual - Page 66
belt during an accident. Keep the lap belt as low on your hip bone as possible. S For your safety, do not place the shoulder belt under your arm. Sit up straight and well back in the seat. To fasten your belt the tab and buckle are locked and that the belt is not twisted. S Do not insert coins, - 1996 Lexus ES 300 | Owners Manual - Page 67
as low on your hip bone as possible. ! CAUTION When using the seat belt extender, observe the following. Failure to follow these instructions could result in less effectiveness of the seat belt restraint system in case of vehicle accident, increasing the chance of personal injury. S Never use - 1996 Lexus ES 300 | Owners Manual - Page 68
a severe frontal impact, the SRS airbags work together with the seat belts to prevent or reduce injury by inflating, in order to decrease the likelihood of the driver's or front passenger's head or face directly hitting the steering wheel or dashboard. The passenger airbag is activated even with no - 1996 Lexus ES 300 | Owners Manual - Page 69
ignition key is turned to the "ACC" or "ON" position. It goes off after about 6 seconds. This means the SRS airbags are operating properly. The SRS airbag warning light system monitors the front airbag sensors, center airbag sensor assembly, inflators, warning light, interconnecting wiring and power - 1996 Lexus ES 300 | Owners Manual - Page 70
safety, be sure to always wear your seat belts. In a severe frontal impact, sensors swellings. Parts of the airbag module (steering wheel hub, side or rear impact, if it rolls over, or if it is involved in a low-speed frontal collision. The center airbag sensor assembly consists of a safing sensor - 1996 Lexus ES 300 | Owners Manual - Page 71
may be thrown forward. To obtain further protection in an accident, the driver and all passengers in the vehicle should always wear their seat belts when driving. For instructions and precautions concerning the seat belt system, see "Seat belts" on page 54. S A baby or small child who is too small - 1996 Lexus ES 300 | Owners Manual - Page 72
, and always use your seat belt. S Do not put objects on or in front of the dashboard S Do not allow a child to stand up, or to kneel on the front passenger seat. The airbag inflates with considerable speed and force; the child may be severely injured. or steering wheel pad that houses the airbag - 1996 Lexus ES 300 | Owners Manual - Page 73
equipment to the front end. S Repairs made on or near the front fenders, console, steering column, steering wheel or dashboard near the front passenger airbag. This SRS airbag system has a service reminder indicator to inform the driver of operating problems. If either of the following conditions - 1996 Lexus ES 300 | Owners Manual - Page 74
steering wheel or front passenger airbag cover (shaded in the illustration) is scratched, cracked, or otherwise damaged. CHILD RESTRAINT Child restraint precautions Lexus cases, contact your Lexus dealer as soon as possible: S The SRS airbags have been inflated. S The front part of the vehicle ( - 1996 Lexus ES 300 | Owners Manual - Page 75
seat with either the lap belt or the lap portion of the lap/shoulder belt. The child restraint system should conform to the size of the child and properly fit the vehicle seat. For greater safety not provide any of the necessary parts, you can purchase the following items from your Lexus dealer. 67 - 1996 Lexus ES 300 | Owners Manual - Page 76
kit (Part No. 04731-22012) - contains 1 bolt, 3 types of spacer and 1 locking clip. S Bolt (Part No. 91511-60830) 1. Run your fingers across the trim of the filler panel to locate the holes underneath it in the positions shown above. 2. Make a hole in the covering Motor Vehicle Safety Standards, - 1996 Lexus ES 300 | Owners Manual - Page 77
and buckle. S If the seat belt does not function normally, immediately contact your Lexus dealer. When installing a belt is tight by pulling its free end while you firmly push down the child restraint system. 1. Fasten the center lap belt over the child restraint system following the instructions - 1996 Lexus ES 300 | Owners Manual - Page 78
strap. 4. To remove the child restraint system, press the buckle-release button and unhook the top strap. INSTALLATION ON OUTER REAR SEAT ! CAUTION When installing a rear-facing child restraint system, follow the same procedure as when installing a forward-facing child restraint system. Push - 1996 Lexus ES 300 | Owners Manual - Page 79
belt over the child restraint system following the instructions provided by its manufacturer. Keep the lap portion of the belt tight. 2. Fully extend the shoulder belt If the seat belt does not function normally, immediately contact your Lexus dealer. 3. Place the shoulder belt between the vehicle - 1996 Lexus ES 300 | Owners Manual - Page 80
the top strap. 5. To remove the child restraint system, press the buckle-release button and allow the belt to retract. Unhook the top strap. INSTALLATION ON FRONT SEAT ! CAUTION Make sure the seat belt is securely locked. Also make sure the child restraint is secure by pushing and pulling it in - 1996 Lexus ES 300 | Owners Manual - Page 81
the instructions provided by its manufacturer. Keep the lap portion of the belt tight. the front seat because the force of the rapid inflation of the passenger airbag may cause severe injury to the child. Vehicles with a passenger airbag display a caution label on the passenger side insrument - 1996 Lexus ES 300 | Owners Manual - Page 82
retract as far as it will go while firmly pushing down the child restraint system. ! CAUTION Make sure the seat belt is securely locked. Also make sure the child restraint is secure by pushing and pulling it in different directions. 4. If your child restraint system requires - 1996 Lexus ES 300 | Owners Manual - Page 83
SECTION Theft deterrent Theft deterrent system Theft prevention labels 1-7 76 78 INSTRUMENTS AND CONTROLS 75 - 1996 Lexus ES 300 | Owners Manual - Page 84
, trunk and hood is forcibly unlocked or the battery terminal is disconnected and then reconnected while the vehicle is locked. The alarm blows the horn intermittently and flashes the headlights, tail lights and other exterior lights. The engine cannot be started because the starter circuit will be - 1996 Lexus ES 300 | Owners Manual - Page 85
starter circuit will be reactivated at once. INDICATOR LIGHT The indicator light gives the following three indications. FLASHING - The system is set. You need the master key or wireless door lock remote control to open the doors, trunk or hood. ON - The system will automatically be set when the time - 1996 Lexus ES 300 | Owners Manual - Page 86
key or wireless door lock remote control. Be sure to wait until the indicator light key or the wireless door lock remote control to cancel the system. 5. Repeat this operation for the other doors and hood. When testing the hood, also check that the system is activated when the battery of parts from - 1996 Lexus ES 300 | Owners Manual - Page 87
SECTION AIR CONDITIONING AND AUDIO Automatic air conditioning controls Audio system 2 80 85 79 - 1996 Lexus ES 300 | Owners Manual - Page 88
AIR CONDITIONING AND AUDIO AUTOMATIC AIR CONDITIONING CONTROLS 80 - 1996 Lexus ES 300 | Owners Manual - Page 89
AIR CONDITIONING AND AUDIO 81 - 1996 Lexus ES 300 | Owners Manual - Page 90
which automatically selects the most suitable fan speed and air flow to control the temperature. The ignition key must be in the "ON" position. You may use manual control to override the automatic settings. SETTING OPERATION - manual control If manual air flow selection is desired - The outlets - 1996 Lexus ES 300 | Owners Manual - Page 91
cooling is desired - Obtain maximum power by turning the "AUTOSTEMP" knob fullly. At this time, "MAX.HOT" or MAX.COLD" will appear on the display. If manual fan speed control is desired - The fan speed can be set to your desired speed by pushing either side of the fan speed control (FAN) button. The - 1996 Lexus ES 300 | Owners Manual - Page 92
- Push in the (FRONT WINDSHIELD) button. To remove frost or exterior fog on the windshield - 1. Place the temperature control knob at the maximum temperature. 2. Push the (FRONT WINDSHIELD) button. (FAN) 3. Push the right side of the fan speed control button to set the fan speed at the maximum - 1996 Lexus ES 300 | Owners Manual - Page 93
at "ON" or "ACC." However, if the engine is not running, the key must be in the "ACC" position. NOTICE To prevent the battery from being discharged, do not leave the car audio on longer than necessary when the engine is not running. The side vents may be opened or closed as shown. Lower vent - 1996 Lexus ES 300 | Owners Manual - Page 94
AIR CONDITIONING AND AUDIO Radio operation 86 - 1996 Lexus ES 300 | Owners Manual - Page 95
.VOL" knob to adjust the volume. 3. Tune in the desired station. (See "(b) Selecting a station.") The radio will change automatically to stereo reception when an FM stereo broadcast is being received. At the same time "ST" will appear on the display. When the receiving signal gets weak, the channel - 1996 Lexus ES 300 | Owners Manual - Page 96
your choice, simply push the again. Manual tuning: Push the (TUNE) button briefly. Each time you push the button, the radio will step up or down to change the preset station to a different one, follow the same procedure. The preset station will be cancelled when the power source is cut off (battery - 1996 Lexus ES 300 | Owners Manual - Page 97
are completely normal for a given reception area, and they do not indicate any problem with the radio itself. S Fading and drifting: FM range is limited to about 40 km (25 miles), except for some high power stations. If a vehicle is moving away from the desired station's transmitter, the signal - 1996 Lexus ES 300 | Owners Manual - Page 98
AIR CONDITIONING AND AUDIO Cassette tape player operation 90 - 1996 Lexus ES 300 | Owners Manual - Page 99
side to the right and lightly push it in. The tape player will grasp the cassette and slide it into place to play. If the radio is on when the cassette is inserted, the radio off. If the radio was on when the cassette tape was inserted, it will automatically turn on again. The ignition key can be at - 1996 Lexus ES 300 | Owners Manual - Page 100
AIR CONDITIONING AND AUDIO Manual program selection (REW, FF) button on the right side to fast Push the forward the tape or on the left side to rewind the tape. At this time, "FF" or "REW" will appear on the display. To stop either fast forwarding or rewinding, push the button on the same (TAPE - 1996 Lexus ES 300 | Owners Manual - Page 101
good quality, having no damage. Avoid using tapes with a total playing time longer than 90 minutes. Using damaged tapes may cause harm to the use a wet type cleaning cassette to clean off tape coating residue accumulated on the head, capstan and pinch roller. NOTICE Do not oil any part of the player - 1996 Lexus ES 300 | Owners Manual - Page 102
AIR CONDITIONING AND AUDIO Compact disc player operation (Vehicles with automatic changers only) 94 - 1996 Lexus ES 300 | Owners Manual - Page 103
is mounted in the trunk, on the right and is operated from the driver's seat. (a) Inserting compact discs 2. Push the lever on the side of the magazine to open the tray. 1. When you push the OPEN button of the player, the cover opens and the magazine containing discs is ejected. Remove the magazine - 1996 Lexus ES 300 | Owners Manual - Page 104
disc currently being played, the track number and the time from the beginning of the program will appear on radio operation.) 5. Push the "PWR.VOL" knob to turn the compact disc player off. 4. Insert the magazine into the player and close the cover. Be sure the cover is fully closed. If the cover - 1996 Lexus ES 300 | Owners Manual - Page 105
player will start playing the selected program from the beginning. Manual program selection: Push either of the (FAST) button on the right side and hold it to fast forward the disc. Releasing the button of the disc cannot be read or the system has trouble. Push the (CD) button once again. 97 - 1996 Lexus ES 300 | Owners Manual - Page 106
operate, take it to your Lexus dealer. Compact disc player operating tips Never attempt to disassemble or oil any part of the player unit. serviceable parts inside the compact disc player. A new disc may have rough edges on its inner and outer perimeter. Remove the rough edges by pressing the side - 1996 Lexus ES 300 | Owners Manual - Page 107
the center. Do not use a conventional record cleaner or anti-static record preservative. ! CAUTION Compact disc players use invisible laser beams which could cause hazardous radiation exposure if directed outside the unit. Be sure to operate the player correctly as - 1996 Lexus ES 300 | Owners Manual - Page 108
AIR CONDITIONING AND AUDIO 100 - 1996 Lexus ES 300 | Owners Manual - Page 109
Starting and driving Three-way catalytic converter Engine exhaust caution Before starting the engine Ignition switch with steering lock Parking brake How to start the engine Automatic transmission Cruise control Brake system Brake pad wear limit indicators Types of tires 3-1 102 103 103 104 105 105 - 1996 Lexus ES 300 | Owners Manual - Page 110
as grass, leaves, paper or rags. running out of fuel could cause the engine to misfire, creating an excessive load on the three-way catalytic converter. S Do not allow the engine to run at idle speed for more than 20 minutes. S Avoid racing the engine. S Do not push-start or pull-start your vehicle - 1996 Lexus ES 300 | Owners Manual - Page 111
, seatback angle, head restraint height and steering wheel angle. 3. Adjust inside and outside rear view mirrors. 4. Lock all doors. 5. Fasten seat belts. Remember to check that the service reminder indicators function when turning the key to "ON", and check the fuel gauge to see that you have - 1996 Lexus ES 300 | Owners Manual - Page 112
leave the key in the "ON" position if the engine is not running. The battery will discharge and the electronic ignition system/distributor ignition system could be damaged. "ACC" - Accessories such as the radio operate, but the engine is off. "LOCK" - Engine is off and the steering wheel is locked - 1996 Lexus ES 300 | Owners Manual - Page 113
Apply the parking brake firmly. 2. Turn off unnecessary lights and accessories. 3. Put the selector lever in "P". If you need to restart the engine while the vehicle is moving, put the selector lever in "N". A starter safety device will prevent the starter from operating if the selector lever is in - 1996 Lexus ES 300 | Owners Manual - Page 114
given in normal starting. If the engine will not start See "If your vehicle will not start" on page 130. NOTICE S Do not crank for more than 15 seconds at a time. This may overheat the starter and wiring systems. S Do not race a cold engine. S If the engine becomes difficult to start or stalls - 1996 Lexus ES 300 | Owners Manual - Page 115
AND DRIVING AUTOMATIC TRANSMISSION Note: When the cruise control is being used, even if you downshift the transmission by turning off the overdrive switch, engine braking will not be applied because the cruise control is not cancelled. For the operation to decrease the vehicle speed, see page 114 - 1996 Lexus ES 300 | Owners Manual - Page 116
driving, Lexus recommends that you use the "NORM" position to improve fuel economy. 3. For more powerful acceleration and sporty driving, use the "PWR" position. In the "PWR" position, the "ECT PWR" light in the instrument cluster is on and the transmission is shifted up at higher vehicle speeds and - 1996 Lexus ES 300 | Owners Manual - Page 117
or first gear according to the vehicle speed. If engine braking is needed, such as in descending a long hill, see "(b) Using engine braking". 4. Set the overdrive switch to the ON position. Always set the overdrive switch to the ON position to improve fuel economy and quiet driving. (See "(b) Using - 1996 Lexus ES 300 | Owners Manual - Page 118
abrupt change in engine speed could cause the vehicle to spin or skid. To use the braking power of the engine, downshift the transmission in The "O/D OFF" indicator light in the instrument cluster will come on and the transmission will downshift to the third gear and engine braking will be obtained - 1996 Lexus ES 300 | Owners Manual - Page 119
STARTING AND DRIVING NOTICE (e) Parking S Do not continue hill climbing for a long time in the "2" or "L" position. This may cause severe automatic transmission damage from overheating. To prevent such damage, "D" position should be used in hill climbing or hard towing. (d) Backing up 1. - 1996 Lexus ES 300 | Owners Manual - Page 120
on slippery (rainy, icy or snow-covered) or winding roads. S Avoid vehicle speed increases when driving downhill. If the vehicle speed is too fast in relation to the cruise control set speed, cancel the cruise control then downshift the transmission to use engine braking to slow down. If you cannot - 1996 Lexus ES 300 | Owners Manual - Page 121
completely off. When the ignition key is turned off, the main switch is also automatically turned off. To use the cruise control again, push the main switch again to turn it on. ! CAUTION The transmission must be in "D" before you set the cruise control speed. Bring the vehicle to the desired - 1996 Lexus ES 300 | Owners Manual - Page 122
engine braking will not be applied because the cruise control is not cancelled. To decrease the vehicle speed, reset to a slower speed speed. When the difference between the actual vehicle speed and the set speed is less than 5 km/h (3 mph), the set speed can be increased 1.6 km/h (1 mph) each time - 1996 Lexus ES 300 | Owners Manual - Page 123
indicator light in the instrument cluster flashes five times and then goes out when using the cruise control, it means that there is trouble in the cruise control system. Contact your Lexus dealer. Anti-lock brake system The anti-lock brake system is designed to prevent lock-up of the wheels during - 1996 Lexus ES 300 | Owners Manual - Page 124
the ignition key is turned to the "ON" position. After about 3 seconds, the light will go off. If either of the following conditions occurs, this indicates a malfunction somewhere in the parts monitored by the warning light system. Contact your Lexus dealer as soon as possible to service the vehicle - 1996 Lexus ES 300 | Owners Manual - Page 125
brake shoes and/or drums are replaced. Have your Lexus dealer perform the bedding-down. TYPES OF TIRES Determine what kind of tires your vehicle is originally equipped with. 1. Summer tires Summer tires are high-speed capability tires best suited to highway driving under dry conditions. Since - 1996 Lexus ES 300 | Owners Manual - Page 126
SECTION STARTING AND DRIVING Driving tips Break-in period Operation in foreign countries Tips for driving in various conditions Winter driving tips Trailer towing How to save fuel and make your vehicle last longer 3-2 120 120 120 121 122 127 119 - 1996 Lexus ES 300 | Owners Manual - Page 127
a Lexus dealer for assistance. ! CAUTION S Before driving off, make sure the parking brake is fully released and that the parking brake reminder light is off. S Do not rest your foot on the brake pedal while driving. It can cause dangerous overheating, needless wear, and poor fuel economy. 120 - 1996 Lexus ES 300 | Owners Manual - Page 128
so it must be in top shape to provide enough power for winter starting. Page 186 tells you how to visually inspect the battery. Your Lexus dealer and most service stations will be pleased to check the battery charge level. Make sure the engine oil viscosity is suitable for the cold weather. See page - 1996 Lexus ES 300 | Owners Manual - Page 129
, braking, durability and driving economy (fuel consumption, etc.). Your safety and satisfaction depend on the proper use of correct equipment and cautious drving habits. For your safety and the safety of others, you must not overload your vehicle or trailer. Lexus warranties do not apply to - 1996 Lexus ES 300 | Owners Manual - Page 130
907 kg (2000 lb.). Exceeding this weight is dangerous. S The gross vehicle weight must not exceed the Gross Vehicle weight Rating (GVWR) indicated on the Certification Label. The gross vehicle weight is the sum weight of the unloaded vehicle, driver, passengers, luggage, hitch and trailer tongue - 1996 Lexus ES 300 | Owners Manual - Page 131
by your Lexus dealer. Do not install the trailer hitch on the bumper; this may cause body damage. S Do not use axle-mounted hitches as they can cause damage to the axle housing, wheel bearings, wheels or tires. Tires S Ensure that your vehicle's tires are properly inflated. Adjust the tire pressure - 1996 Lexus ES 300 | Owners Manual - Page 132
lights. Pre-towing safety check S Check that your vehicle remains level when a loaded or Break-in schedule S Lexus recommends that you do not tow a trailer with a new vehicle or a vehicle with any new power train component (engine, transmission, differential, wheel the "Owner's Manual Supplement/ - 1996 Lexus ES 300 | Owners Manual - Page 133
to the right. (This procedure is generally opposite to that when backing without a trailer.) Also, just turn the steering wheel a little at a time, avoiding sharp or prolonged turning. Have someone guide you when backing to reduce the risk of an accident. S Because stopping distance may be increased - 1996 Lexus ES 300 | Owners Manual - Page 134
fuel and repairs: S Keep your tires inflated at the correct pressure. Check the pressure every two weeks, or at least once a month. Under inflation causes tire wear and wastes fuel. S Do not carry unneeded weight in your vehicle. Excess weight puts a heavier load on the engine, causing greater fuel - 1996 Lexus ES 300 | Owners Manual - Page 135
brake pedal. This causes needless wear, overheating and poor fuel economy. S Maintain a moderate speed on highways. The faster you drive, the greater the fuel consumption. By reducing your speed, you will cut down on fuel consumption. S Keep the front wheels in proper alignment. Avoid hitting the - 1996 Lexus ES 300 | Owners Manual - Page 136
SECTION IN CASE OF AN EMERGENCY If your engine stalls while driving If your vehicle will not start If your vehicle overheats If you have a flat tire If your vehicle needs to be towed If you cannot shift automatic transmission selector lever If you lose your keys or lock yourself out 4 130 130 133 - 1996 Lexus ES 300 | Owners Manual - Page 137
a flooded engine" for further instructions. 2. If the engine still will not start, it needs adjustment or repair. Call a Lexus dealer, Roadside Assistance or Customer Service Assistance. (See "Foreword.") ! CAUTION If the engine is not running, the power assist for the brakes and steering will - 1996 Lexus ES 300 | Owners Manual - Page 138
the engine still will not start, it needs adjustment or repair. Call a Lexus dealer, Roadside Assistance or Customer Service Assistance. (See "Foreword.") S If you should accidentally get acid on yourself or NOTICE Do not crank for more than 15 seconds at a time. This may overheat the starter and - 1996 Lexus ES 300 | Owners Manual - Page 139
your engine in the normal way. After starting, run it at about 2000 rpm for several minutes with the accelerator pedal lightly depressed. 6. Carefully disconnect the cables in the exact reverse order: the negative cable and then the positive cable. 7. Carefully dispose of the battery cover cloths - 1996 Lexus ES 300 | Owners Manual - Page 140
is running, keep hands and clothing away from the moving fan and engine drive belt. 4. If coolant is leaking, stop the engine immediately. Call a Lexus dealer, Roadside Assistance or Customer Service Assistance. (See "Forward".) 5. If there are no obvious leaks, check the coolant reservoir. If - 1996 Lexus ES 300 | Owners Manual - Page 141
each tool, and their storage locations. 2. Remove the cover. S Follow jacking instructions. S Use a jack only for lifting your vehicle during wheel changing. a jack. S Never get beneath the vehicle when supported by S Do not start or run the engine while your vehicle is supported by a jack. 134 - 1996 Lexus ES 300 | Owners Manual - Page 142
the nut and remove it. 2. Remove the spare tire cover. 3. Loosen the bolt and remove it. When storing the spare tire, place it with the outer side of the wheel facing up. Then bolt the tire in place and install the spare tire cover to prevent the tire from flying forward during a collision or sudden - 1996 Lexus ES 300 | Owners Manual - Page 143
- just unscrew them about one-half turn. 3. Block the wheel diagonally opposite the flat tire to keep the vehicle from rolling when it is jacked up. When blocking the wheel, place a wheel block in front of the front wheels or behind the rear wheels. 5. Position the jack at the jack points as shown - 1996 Lexus ES 300 | Owners Manual - Page 144
that it is properly positioned. 7. Remove the wheel nuts and remove the flat tire. Lift the flat tire straight off and put it aside. ! CAUTION Never get under the vehicle when it is supported by the jack alone. Before putting on the wheel, remove any corrosion on the mounting surfaces with - 1996 Lexus ES 300 | Owners Manual - Page 145
tire and press it back over the other bolts. Reinstall the wheel nuts and tighten them as much as you can by hand. Press the tire little at a time in order shown. Repeat the process until all the nuts are tight. ! CAUTION As soon as possible after changing wheels, have the wheel nuts tightened - 1996 Lexus ES 300 | Owners Manual - Page 146
IN CASE OF AN EMERGENCY 10. After changing the wheel, check the air pressure of the replaced tire. Stow all the tools, jack and flat tire securely. If the pressure of the replaced tire is low, drive slowly to the nearest service station and fill to the correct pressure. Do not forget to reinstall - 1996 Lexus ES 300 | Owners Manual - Page 147
IN CASE OF AN EMERGENCY S Tie down points NOTICE Do not use the rear emergency towing eyelets. S Tie down angle If your Lexus is transported by a flat bed, it should be tied down at locations A and B as shown above. If you use chains or wires to tie down - 1996 Lexus ES 300 | Owners Manual - Page 148
the rear with the front wheels on the ground, as this may cause serious damage to the transmission. 3. Towing with a sling type truck Release the parking brake. S From rear NOTICE Do not tow with a sling type truck, either from the front or rear. This may cause body damage. Use a towing dolly - 1996 Lexus ES 300 | Owners Manual - Page 149
for a short distance and at low speeds. Also, the wheels, axles, drive train, steering and brakes must all be in good condition. Before towing, release the parking brake and put the transmission in "N." The ignition key must be in "ACC" (engine off) or "ON" (engine running). If you cannot shift the - 1996 Lexus ES 300 | Owners Manual - Page 150
hole to push down the shift lock override button. You can shift out of "P" position only while pushing the button. 4. Shift into "N" position. 5. Insert the cover. 6. Start the engine. For your safety, keep the brake pedal depressed. Be sure to have the system checked by your - 1996 Lexus ES 300 | Owners Manual - Page 151
IN CASE OF AN EMERGENCY 144 - 1996 Lexus ES 300 | Owners Manual - Page 152
SECTION MAINTENANCE Maintenance requirements General maintenance Does your vehicle need repairing? 5 146 147 150 For scheduled maintenance information, please refer to the separate "Owner's Manual Supplement/Maintenance Schedule". 145 - 1996 Lexus ES 300 | Owners Manual - Page 153
devices and system performed by any automotive repair establishment or individual without invalidating this warranty. See Owner's Guide, Owner's Manual Supplement or Warranty Booklet for complete warranty information. Where to go for service? Lexus technicians are well-trained specialists and are - 1996 Lexus ES 300 | Owners Manual - Page 154
. Simple instructions for how to perform them are presented in Section 6. If you are a skilled do-it-yourself mechanic, the Lexus service manuals are recommended. Please be aware that do-it-yourself maintenance can affect your warranty coverage. See your Owner's Guide, Owner's Manual Supplement or - 1996 Lexus ES 300 | Owners Manual - Page 155
the engine hood secondary latch secures the hood when the primary latch is released. Vehicle interior Items listed below should be checked regularly, e.g. while performing periodic services, cleaning the vehicle, etc. Lights Make sure the headlight, stop lights, tail lights, turn signal lights, and - 1996 Lexus ES 300 | Owners Manual - Page 156
level is between the "FULL" and "LOW" lines on the see-through reservoir when the engine is cold. See page 167 for additional information. Battery Your Lexus has a maintenance free battery. You do not have to add distilled water. For longer life of the battery, however, see page 186 for additional - 1996 Lexus ES 300 | Owners Manual - Page 157
Section 3-1.) DOES YOUR VEHICLE NEED REPAIRING? Be on the alert for changes in performances and sounds, and visual tip-offs that indicate service is needed. Some important clues are: S Engine missing, stumbling, or pinging S Appreciable loss of power S Strange engine noises S A fluid leak under the - 1996 Lexus ES 300 | Owners Manual - Page 158
MAINTENANCE If you notice any of these clues, take your vehicle to your Lexus dealer as soon as possible. It probably needs adjustment or repair. ! CAUTION Do not continue driving with the vehicle unchecked. It could result in serious vehicle damage and possibly personal injury. 151 - 1996 Lexus ES 300 | Owners Manual - Page 159
MAINTENANCE 152 - 1996 Lexus ES 300 | Owners Manual - Page 160
SECTION SERVICE PROCEDURES AND SPECIFICATIONS Introduction Vehicle identification Engine compartment overview Do-it-yourself service precautions Parts and tools 6-1 154 155 156 157 153 - 1996 Lexus ES 300 | Owners Manual - Page 161
(VIN) is also on the Certification Label. This is the primary identification number for your Lexus. It is used in registering the ownership of your vehicle. The engine number is stamped on the engine block as shown. The vehicle identification number (VIN) is the legal identifier for your vehicle - 1996 Lexus ES 300 | Owners Manual - Page 162
INTRODUCTION ENGINE COMPARTMENT OVERVIEW 155 - 1996 Lexus ES 300 | Owners Manual - Page 163
is running, keep hands, clothing, and tools away from the moving fan and engine drive belt. (Removing rings, watches, and ties is advisable.) £ Right after driving, the engine compartment - the engine, radiator, exhaust manifold and power steering fluid reservoir, etc. - will be hot. So be 156 - 1996 Lexus ES 300 | Owners Manual - Page 164
INTRODUCTION PARTS AND TOOLS Here is a list of parts and tools you will need to perform do-it-yourself maintenance. Remember all Lexus parts are designed in metric sizes, so your tools must be metric. Checking brake fluid Parts (if level is low): - 1996 Lexus ES 300 | Owners Manual - Page 165
is necessary): ¡ Fuse with same amperage rating as original Checking the cartridge type fuses Parts (if replacement is necessary): ¡ Genuine Lexus fuse or equivalent with same amperage rating as original Adding washer fluid Parts: ¡ Water ¡ Washer fluid containing antifreeze (for winter - 1996 Lexus ES 300 | Owners Manual - Page 166
SECTION SERVICE PROCEDURES AND SPECIFICATIONS Engine Specifications Fuel Facts about engine oil consumption Used engine oil Checking the engine oil level Checking the engine coolant level 6-2 160 162 163 164 165 167 159 - 1996 Lexus ES 300 | Owners Manual - Page 167
Displacement Valve clearance (engine cold) Intake Exhaust Drive belt tension (with Borroughs drive belt tension gauge No. BT-33-73F) - LUBRICATION SYSTEM Oil capacity Drain and refill with filter without filter Oil grade Recommended oil viscosity (SAE): 1MZ-FE 6 cylinder V type, 4 cycle, gasoline 87 - 1996 Lexus ES 300 | Owners Manual - Page 168
ENGINE - COOLING SYSTEM Capacity Coolant type - FUEL Fuel type Research octane number - IGNITION SYSTEM Spark plug - Make - Gap - ELECTRICAL SYSTEM Battery -Maintenance type battery Specific gravity reading at 20°C (68°F): NIPPONDENSO NGK 8.7 L (9.2 qt., 7.7 Imp. qt.) Ethylene - glycol coolant (Do - 1996 Lexus ES 300 | Owners Manual - Page 169
on pumps with leaded gas will not. If your engine knocks...If you detect heavy knocking even when using the recommended fuel, or if you hear steady knocking while holding a steady speed on level roads, consult your Lexus dealer. However, now and then, you may notice light knocking for a short time - 1996 Lexus ES 300 | Owners Manual - Page 170
gases also burn the oil used to lubricate the exhaust valve stems. NOTICE S Do not use gasohol other than stated above. It will cause fuel system damage or vehicle performance problems. S If driveability problems are encountered (poor hot starting, vaporizing, engine knock, etc.), discontinue its - 1996 Lexus ES 300 | Owners Manual - Page 171
has not changed. The diluting ingredients evaporate out when the vehicle is then driven at high speeds, as on an expressway, making it appear that oil is excessively consumed after driving at high speeds. NOTICE Failure to check the oil level regularly could lead to serious engine trouble due to - 1996 Lexus ES 300 | Owners Manual - Page 172
go, or the reading will not be correct. 4. Pull the dipstick out and look at the oil level on the end. If it is between the full line and the low line, it is O.K. If the oil level is below or only slightly above the low line, add engine oil of the same type as already in the - 1996 Lexus ES 300 | Owners Manual - Page 173
II multigrade engine oil or ILSAC multigrade engine oil. Recommended viscosity (SAE): NOTICE Avoid overfilling, or the engine could be damaged. Check the oil level on the dipstick once again after adding the oil. SAE 5W-30 is the best choice for your vehicle, for good fuel economy, and good - 1996 Lexus ES 300 | Owners Manual - Page 174
-glycol type coolant. (For information on ethylene-glycol coolant, see also "Engine coolant selection" described below.) If the coolant level drops within a short time after replenishing, there may be a leak in the system. Visually check the radiator, hoses, radiator cap, drain cock and water pump - 1996 Lexus ES 300 | Owners Manual - Page 175
Lexus dealer test the cap pressure and check for leaks in the cooling system. ! CAUTION To prevent burning yourself, do not remove the radiator cap when the engine is hot. Engine water. The total capacity of the cooling system is given on page 161. We recommend 50% solution be used for your Lexus - 1996 Lexus ES 300 | Owners Manual - Page 176
SECTION SERVICE PROCEDURES AND SPECIFICATIONS Chassis Specifications Checking brake fluid Checking power steering fluid Checking tire pressure Rotating tires Checking and replacing tires Installing snow tires and chains Replacing wheels Aluminum wheel precautions Suspension and chassis 6-3 170 172 - 1996 Lexus ES 300 | Owners Manual - Page 177
BRAKES Pedal clearance Pedal freeplay Brake pad wear limit Parking brake lining wear limit Parking brake adjustment Fluid type *1 *2 3.5 L (3.7 qt., 3.1 Imp. qt.) 0.85 L (0.9 qt., 0.7 lmp. qt.) Automatic transmission fluid DII or DEXRON®III (DEXRON®II) 70 mm (2.8 in.) Min. *1 1 - 6 mm (0.04 - 0.24 - 1996 Lexus ES 300 | Owners Manual - Page 178
CHASSIS - STEERING Wheel freeplay Power steering fluid type - TIRES AND WHEELS Tire size Recommended cold tire inflation pressure Vehicle load up to 4 occupants Vehicle loaded up to vehicle capacity weight Spare tire Trailer towing (conventional and snow tires) Wheel size Wheel nut torque P205/65 - 1996 Lexus ES 300 | Owners Manual - Page 179
FMVSS No. 116 DOT 3 or SAE J1703 brake fluid to the brake reservoir. Remove and replace the reservoir cover by hand. Add brake fluid up to the "MAX" line. If you spill some of the fluid, be sure to wash it off with water to prevent it from damaging the parts or paintwork. 172 - 1996 Lexus ES 300 | Owners Manual - Page 180
POWER STEERING FLUID Check the fluid level on the dipstick. If necessary, add automatic transmission temperature, 10°C-30°C or 50°F-85°F) if the engine has not been run for about five hours. the level is at the low side of the appropriate range, add automatic transmission fluid DEXRON®II or III to - 1996 Lexus ES 300 | Owners Manual - Page 181
handling, reduced fuel economy, and the possibility of blowouts from overheated tires. Also, low tire pressure can cause poor sealing of the tire bead. If the tire pressure is excessively low, there is the possibility of wheel deformation and/or tire separation. So keep your tire pressures at the - 1996 Lexus ES 300 | Owners Manual - Page 182
your tires To equalize tire wear and help extend tire life, Lexus recommends that you rotate your tires approximately every 12000 km (7500 miles). However, the most appropriate timing for tire rotation may vary according to your driving habits and road surface conditions. The wheel assemblies - 1996 Lexus ES 300 | Owners Manual - Page 183
due to the size or location of a cut or other damage, it should be replaced. If you are not sure, consult with your Lexus dealer. If an air loss occurs while driving, do not continue driving with a deflated tire. Driving even a short distance can damage a tire beyond repair. Any tires which are over - 1996 Lexus ES 300 | Owners Manual - Page 184
capacity. Using any other size or type of tire may seriously affect handling, ride, speedometer/odometer calibration, ground clearance, and clearance between the body and tires or snow chains. Do not mix radial, belted, or conventional tires on your vehicle. Do not use tires or wheels other than the - 1996 Lexus ES 300 | Owners Manual - Page 185
- 1/2 mile). When installing chains on your tires, carefully follow the instructions of the chain manufacturer. Snow tire selection If you need snow tires, select the same size, construction and load capacity as the original tires on your Lexus. Do not use tires other than stated above. Since your - 1996 Lexus ES 300 | Owners Manual - Page 186
at your Lexus dealer. A wheel of a different size or type may adversely affect handling, wheel and bearing life, brake cooling, speedometer/odometer calibration, stopping ability, headlight aim, bumper height, vehicle ground clearance, and tire or snow chain clearance to the body and chassis - 1996 Lexus ES 300 | Owners Manual - Page 187
CHASSIS 180 - 1996 Lexus ES 300 | Owners Manual - Page 188
SECTION SERVICE PROCEDURES AND SPECIFICATIONS Electrical components Specifications Checking battery condition Battery recharging precautions Checking and replacing the blade type fuses Checking the cartridge type fuses Adding washer fluid Checking the headlight aim Replacing light bulbs 6-4 182 186 - 1996 Lexus ES 300 | Owners Manual - Page 189
ELECTRICAL COMPONENTS SPECIFICATIONS - LOCATION OF FUSES - FUSES Driver's side instrument panel Driver's side kick panel 182 - 1996 Lexus ES 300 | Owners Manual - Page 190
ELECTRICAL COMPONENTS Engine compartment (U.S.A.) Engine compartment (Canada) 183 - 1996 Lexus ES 300 | Owners Manual - Page 191
's side kick panel No. FUSE AMPERE CIRCUIT Cruise control system, power steering control system, shift lock system, anti-lock brake system, SRS airbag system, power door lock and theft deterrent system, power antenna, telephone, electronic cooling fan system Gauges and meters, service reminder - 1996 Lexus ES 300 | Owners Manual - Page 192
injection system /sequential multiport fuel injection system Telephone Horns Radio, cassette tape player, compact disc player, power antenna, interior light, personal lights, door courtesy lights, ignition switch light, trunk light, electronic moon roof system, instrument panel lights, door lock and - 1996 Lexus ES 300 | Owners Manual - Page 193
-hand headlight (low beam) Fog lights Radio, cassette tape player, compact disc player, power antenna Vehicles sold in Canada Daytime Running Light System Environmental control system Spare fuse CHECKING BATTERY CONDITION Precautions ! CAUTION BATTERY PRECAUTIONS The battery produces flammable - 1996 Lexus ES 300 | Owners Manual - Page 194
, if necessary. S If you happen to swallow electrolyte, drink a large quantity of water or milk. Follow with milk of magnesia, beaten raw egg or vegetable oil. Then go immediately for emergency help. Check the battery for corroded or loose connections, cracks, or loose hold-down clamps. 1. If the - 1996 Lexus ES 300 | Owners Manual - Page 195
2 types of batteries: maintenance type and non-maintenance type. A non-maintenance battery has "MAINTENANCE FREE BATTERY" on its top. A maintenance type battery does not have such indication. Maintenance type battery Check the fluid condition by the fluid level lines on the side of the battery. Or - 1996 Lexus ES 300 | Owners Manual - Page 196
type battery BLUE - Good condition. WHITE - Charging necessary. Have the battery checked by your Lexus dealer. RED - Have the battery checked by your Lexus dealer. 1. Remove the vent plugs. 2. Add distilled water to cells needing fluid. If the side of the battery is covered, check the water - 1996 Lexus ES 300 | Owners Manual - Page 197
do a slow charge (5A or less). Charging at a quicker rate is dangerous. The battery may explode causing personal injuries. Maintenance type batteries: Be sure to remove the vent plugs before recharging. NOTICE Never recharge the battery while the engine is running. Also, be sure all accessories are - 1996 Lexus ES 300 | Owners Manual - Page 198
clips. 1. Turn the ignition switch off and open the fuse box lid. Determine which fuse may be causing the problem. The lid of the fuse box shows the name of the circuit for each fuse. a. Look carefully at see, try replacing the suspected fuse with one of the same value that you know is good. 191 - 1996 Lexus ES 300 | Owners Manual - Page 199
a problem with the electrical system. Have your Lexus dealer correct it as soon as possible. CHECKING THE CARTRIDGE TYPE FUSES ! CAUTION Never use a fuse with a higher amperage rating, or any other object, in place of a fuse. This may cause extensive damage and possibly a fire. If the headlights - 1996 Lexus ES 300 | Owners Manual - Page 200
point, use washer fluid containing antifreeze. This product is available at your Lexus dealer and most auto parts stores. Follow the manufacturer's directions for how much to mix with water. ! NOTICE Do not use engine antifreeze or any other substitute because it may damage your vehicle's paint - 1996 Lexus ES 300 | Owners Manual - Page 201
Be sure that the body around the headlights is not deformed. 2. Park the vehicle on a level spot. 3. The driver gets into the driver's seat and puts the vehicle in a state readying for a driving (with a full tank). 4. Bounce the vehicle several times. To check the headlight aim, check the vertical - 1996 Lexus ES 300 | Owners Manual - Page 202
the glass part of a bulb with bare hands. NOTICE Only use a bulb of the listed type. Light Bulbs Headlights (low and high beam) Bulb No. 9006 9005 - 1157NA 1156 1157 1156 921 W 55 65 55 27/8 27 27/8 27 18 Type A B C D D D D E 195 Mark Headlights (high beam) Acceptable range Fog lights Front turn - 1996 Lexus ES 300 | Owners Manual - Page 203
ELECTRICAL COMPONENTS Light Bulbs License plate lights Rear side marker lights Interior light Personal light with moon roof without moon roof Glovebox light Door courtesy light Vanity lights Trunk light A: B: C: D: E: F: HB4 halogen bulbs HB3 halogen bulbs H3 halogen bulbs Single end bulbs Wedge - 1996 Lexus ES 300 | Owners Manual - Page 204
ELECTRICAL COMPONENTS 197 - 1996 Lexus ES 300 | Owners Manual - Page 205
ELECTRICAL COMPONENTS 198 - 1996 Lexus ES 300 | Owners Manual - Page 206
SECTION SERVICE PROCEDURES AND SPECIFICATIONS Body Specifications Protecting your vehicle from corrosion Washing and waxing Cleaning the interior 6-5 200 201 202 203 199 - 1996 Lexus ES 300 | Owners Manual - Page 207
BODY SPECIFICATIONS - DIMENSIONS AND WEIGHT Overall length Overall width Overall height Wheelbase Tread - Front - Rear Vehicle capacity weight (occupants + luggage) *1: Unladen vehicle plus 2 occupants - FUEL TANK Capacity 70 L (18.5 gal., 15.4 Imp. gal.) *2: Unladen vehicle 4770 mm (187.8 in.) - 1996 Lexus ES 300 | Owners Manual - Page 208
or damp for an extended period of time, even though other parts of the vehicle are dry. S Components of the vehicle which are prevented from quick-drying due to lack of proper ventilation are exposed to high temperature. To help prevent corrosion on your Lexus, follow these guidelines: Keep your - 1996 Lexus ES 300 | Owners Manual - Page 209
BODY Check the interior of your vehicle. Water and dirt can accumulate under the floor mats and could cause corrosion. Occasionally check under the mats to make sure the area is dry. Be particularly careful when transporting chemicals, cleansers, fertilizers, salt, etc. These should be transported - 1996 Lexus ES 300 | Owners Manual - Page 210
Water may get into audio components or other electrical components above or under the floor carpet (or mat) and cause a malfunction; and it may cause body corrosion. Waxing your Lexus Polishing and waxing is recommended to maintain the original beauty of your Lexus 's instructions and any part of - 1996 Lexus ES 300 | Owners Manual - Page 211
BODY Windows and Seat Belts Begin by vacuuming thoroughly to remove as much dirt as possible. Several types of foam cleaners instructions and follow them closely. The seat belts may be cleaned with mild soap and water or with lukewarm water. Use a cloth or sponge. As you are cleaning, check the belts - 1996 Lexus ES 300 | Owners Manual - Page 212
BODY Air Conditioning Control Panel, Car Audio, Instrument Panel, Console Panel, and Switches Use a soft damp cloth for cleaning. Soak a clean soft cloth in water or lukewarm water then lightly questions about the cleaning of your Lexus, your local Lexus dealer will be pleased to answer them. 205 - 1996 Lexus ES 300 | Owners Manual - Page 213
BODY 206 - 1996 Lexus ES 300 | Owners Manual - Page 214
SECTION REPORTING SAFETY DEFECTS FOR U.S. OWNERS Reporting safety defects for U.S. owners 7 208 207 - 1996 Lexus ES 300 | Owners Manual - Page 215
-25-LEXUS). If NHTSA receives similar complaints, it may open an investigation, and if it feels that a safety defect exists in a group of vehicles, it may order a recall and remedy campaign. However, NHTSA cannot become involved in individual problems between you, your dealer, or Toyota Motor Sales
-
 1
1 -
 2
2 -
 3
3 -
 4
4 -
 5
5 -
 6
6 -
 7
7 -
8
-
9
-
10
-
11
-
12
-
13
-
14
-
15
-
16
-
17
-
18
-
19
-
20
-
21
-
22
-
23
-
24
-
25
-
26
-
27
-
28
-
29
-
30
-
31
-
32
-
33
-
34
-
35
-
36
-
37
-
38
-
39
-
40
-
41
-
42
-
43
-
44
-
45
-
46
-
47
-
48
-
49
-
50
-
51
-
52
-
53
-
54
-
55
-
56
-
57
-
58
-
59
-
60
-
61
-
62
-
63
-
64
-
65
-
66
-
67
-
68
-
69
-
70
-
71
-
72
-
73
-
74
-
75
-
76
-
77
-
78
-
79
-
80
-
81
-
82
-
83
-
84
-
85
-
86
-
87
-
88
-
89
-
90
-
91
-
92
-
93
-
94
-
95
-
96
-
97
-
98
-
99
-
100
-
101
-
102
-
103
-
104
-
105
-
106
-
107
-
108
-
109
-
110
-
111
-
112
-
113
-
114
-
115
-
116
-
117
-
118
-
119
-
120
-
121
-
122
-
123
-
124
-
125
-
126
-
127
-
128
-
129
-
130
-
131
-
132
-
133
-
134
-
135
-
136
-
137
-
138
-
139
-
140
-
141
-
142
-
143
-
144
-
145
-
146
-
147
-
148
-
149
-
150
-
151
-
152
-
153
-
154
-
155
-
156
-
157
-
158
-
159
-
160
-
161
-
162
-
163
-
164
-
165
-
166
-
167
-
168
-
169
-
170
-
171
-
172
-
173
-
174
-
175
-
176
-
177
-
178
-
179
-
180
-
181
-
182
-
183
-
184
-
185
-
186
-
187
-
188
-
189
-
190
-
191
-
192
-
193
-
194
-
195
-
196
-
197
-
198
-
199
-
200
-
201
-
202
-
203
-
204
-
205
-
206
-
207
-
208
-
209
-
210
-
211
-
212
-
213
-
214
-
215
 |
 |

Welcome to the growing group of value–conscious people who drive Lexus vehicles. We are
proud of the advanced engineering and quality construction of each vehicle we build.
This Owner’s Manual explains the features of your new Lexus. Please read it and follow the
instructions carefully so that you can enjoy many years of safe motoring.
When it comes to service, remember that your Lexus dealer knows your vehicle best and is
interested in your complete satisfaction. Your Lexus dealer will provide quality maintenance and
any other assistance you may require.
If there is not a Lexus dealer near you, or you need emergency assistance for any reason,
please call the following number:
U.S. OWNERS
S
When traveling in the U.S. mainland or Canada:
Lexus Roadside Assistance
1–800–25–LEXUS (Toll–Free)
(1–800–255–3987)
S
HAWAII:
Lexus Customer Service Assistance
1–800–25–LEXUS (Toll–Free)
(1–800–255–3987)
CANADIAN OWNERS
S
Please refer to the separate “Owner’s Guide” or “Owner’s Manual Supplement”.
Please leave this Owner’s Manual in this vehicle at the time of resale. The next owner
will need this information also.
All information and specifications in this manual are current at the time of printing.
However, because of the Lexus policy of continual product improvement, we reserve
the right to make changes at any time without notice.
Please note that this manual applies to all models and explains all equipment, including
options. Therefore, you may find some explanations for equipment not installed on
your vehicle.
TOYOTA MOTOR CORPORATION
FOREWORD