1998 Lincoln Continental Owner's Manual - Page 139
1998 Lincoln Continental Manual
Page 139 highlights
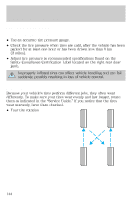
Maintenance and care 3. Pull the rubber cowl seal (number 1 in figure) away from the cowl vent screen. Remove the right half of the cowl vent screen (number 2 in figure) by placing your hand underneath the cowl vent screen and lifting straight up to release the four spring clips. 2 1 4. Remove the water shield (number 3 in figure) by disengaging the two water shield locking tabs (number 4 in figure), then sliding the water shield toward the front of the vehicle. After the locking tabs are disengaged from the water shield, lift the water shield up and away from the vehicle. 5. Remove the filter. Reverse the procedure to install the new filter. 4 3 Be careful when installing the new filter. Avoid bending or tearing the filter and make sure it is fully seated in its mounting location after installation. WINDSHIELD WIPER BLADES Check the wiper blades at least twice a year or when they seem less effective. Substances such as tree sap and some hot wax treatments used by commercial car washes reduce the effectiveness of wiper blades. 139
-
 1
1 -
2
-
3
-
4
-
5
-
6
-
7
-
8
-
9
-
10
-
11
-
12
-
13
-
14
-
15
-
16
-
17
-
18
-
19
-
20
-
21
-
22
-
23
-
24
-
25
-
26
-
27
-
28
-
29
-
30
-
31
-
32
-
33
-
34
-
35
-
36
-
37
-
38
-
39
-
40
-
41
-
42
-
43
-
44
-
45
-
46
-
47
-
48
-
49
-
50
-
51
-
52
-
53
-
54
-
55
-
56
-
57
-
58
-
59
-
60
-
61
-
62
-
63
-
64
-
65
-
66
-
67
-
68
-
69
-
70
-
71
-
72
-
73
-
74
-
75
-
76
-
77
-
78
-
79
-
80
-
81
-
82
-
83
-
84
-
85
-
86
-
87
-
88
-
89
-
90
-
91
-
92
-
93
-
94
-
95
-
96
-
97
-
98
-
99
-
100
-
101
-
102
-
103
-
104
-
105
-
106
-
107
-
108
-
109
-
110
-
111
-
112
-
113
-
114
-
115
-
116
-
117
-
118
-
119
-
120
-
121
-
122
-
123
-
124
-
125
-
126
-
127
-
128
-
129
-
130
-
131
-
132
-
133
-
 134
134 -
 135
135 -
 136
136 -
 137
137 -
 138
138 -
 139
139 -
 140
140 -
 141
141 -
 142
142 -
 143
143 -
 144
144 -
145
-
146
-
147
-
148
-
149
-
150
-
151
-
152
-
153
-
154
-
155
-
156
-
157
-
158
-
159
-
160
-
161
-
162
-
163
-
164
-
165
-
166
-
167
-
168
-
169
-
170
-
171
-
172
-
173
-
174
-
175
-
176
 |
 |
