1998 Nissan Sentra Owner's Manual - Page 153
1998 Nissan Sentra Manual
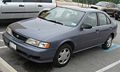
Page 153 highlights
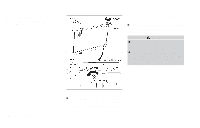
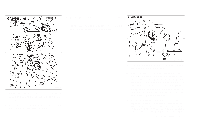
8. Start the engine. Check for leakage around the drain plug and oil filter. Correct as required. 9. Turn the engine off and wait several minutes. Check the oil level with the dipstick. Add engine oil if necessary. WARNING ● Prolonged and repeated contact with used engine oil may cause skin cancer. ● Try to avoid direct skin contact with used oil. If skin contact is made, wash thoroughly with soap or hand cleaner as soon as possible. ● Keep used engine oil out of reach of children. DI1151 DI1222M 6. Clean and reinstall the drain plug and washer. Securely tighten the drain plug with a wrench. Drain plug tightening torque: 22 to 29 ft-lb (29 to 39 N•m) Do not overtighten. 7. Refill engine with recommended oil through the oil filler opening then install the oil filler cap securely. See the ''Technical and consumer information'' section for refill capacity. CHANGING ENGINE OIL FILTER 1. Park the vehicle on a level surface and apply the parking brake. 2. Turn the engine off. 3. Place a large drain pan under the oil filter. 4. Loosen the oil filter with an oil filter wrench. Then remove the oil filter by turning it by hand. CAUTION Be careful not to burn yourself. The engine oil may be hot. 8-10 Do-it-yourself
-
 1
1 -
2
-
3
-
4
-
5
-
6
-
7
-
8
-
9
-
10
-
11
-
12
-
13
-
14
-
15
-
16
-
17
-
18
-
19
-
20
-
21
-
22
-
23
-
24
-
25
-
26
-
27
-
28
-
29
-
30
-
31
-
32
-
33
-
34
-
35
-
36
-
37
-
38
-
39
-
40
-
41
-
42
-
43
-
44
-
45
-
46
-
47
-
48
-
49
-
50
-
51
-
52
-
53
-
54
-
55
-
56
-
57
-
58
-
59
-
60
-
61
-
62
-
63
-
64
-
65
-
66
-
67
-
68
-
69
-
70
-
71
-
72
-
73
-
74
-
75
-
76
-
77
-
78
-
79
-
80
-
81
-
82
-
83
-
84
-
85
-
86
-
87
-
88
-
89
-
90
-
91
-
92
-
93
-
94
-
95
-
96
-
97
-
98
-
99
-
100
-
101
-
102
-
103
-
104
-
105
-
106
-
107
-
108
-
109
-
110
-
111
-
112
-
113
-
114
-
115
-
116
-
117
-
118
-
119
-
120
-
121
-
122
-
123
-
124
-
125
-
126
-
127
-
128
-
129
-
130
-
131
-
132
-
133
-
134
-
135
-
136
-
137
-
138
-
139
-
140
-
141
-
142
-
143
-
144
-
145
-
146
-
147
-
 148
148 -
 149
149 -
 150
150 -
 151
151 -
 152
152 -
 153
153 -
 154
154 -
 155
155 -
 156
156 -
 157
157 -
 158
158 -
159
-
160
-
161
-
162
-
163
-
164
-
165
-
166
-
167
-
168
-
169
-
170
-
171
-
172
-
173
-
174
-
175
-
176
-
177
-
178
-
179
-
180
-
181
-
182
-
183
-
184
-
185
-
186
-
187
-
188
-
189
-
190
-
191
-
192
-
193
-
194
-
195
-
196
-
197
-
198
-
199
-
200
-
201
-
202
-
203
-
204
-
205
-
206
-
207
-
208
-
209
-
210
-
211
-
212
-
213
-
214
-
215
-
216
 |
 |
