2010 Nissan GT-R Owner's Manual - Page 236
2010 Nissan GT-R Manual

Page 236 highlights
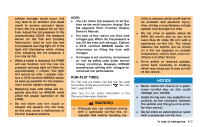
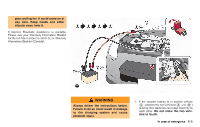
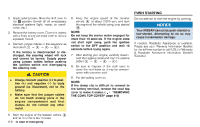
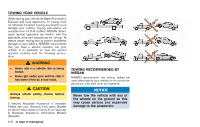
PUSH STARTING 2. Apply parking brake. Move the shift lever to P the & position. Switch off all unnecessary electrical systems (light, heater, air conditioner, etc.). 3. Remove the battery cover. Cover the battery with a firmly wrung out moist cloth to reduce explosion hazard. 4. Connect jumper cables in the sequence as 1 2 3 4 illustrated If the battery is disconnected or discharged, the steering wheel will lock and cannot be turned. Supply power using jumper cables before pushing the ignition switch and disengaging the steering lock. 6. Keep the engine speed of the booster A vehicle * at about 2,000 rpm, and start the engine of the vehicle being jump started B *. Do not attempt to start the engine by pushing. NOTICE Your NISSAN cannot be push-started or tow-started. Attempting to do so may cause transmission damage. If needed, Roadside Assistance is available. Please see your Warranty Information Booklet for the toll-free number to call (U.S.) or Warranty & Roadside Assistance Information Booklet (Canada). NOTE: Do not keep the starter motor engaged for more than 10 seconds. If the engine does not start right away, push the ignition switch to the OFF position and wait 10 seconds before trying again. 7. After starting your engine, carefully disconnect the negative cable and then the positive 4 3 2 1 cable 8. Be sure to dispose of the cloth used to cover the vent holes as it may be contaminated with corrosive acid. 9. Put the battery cover on. CAUTION . Always connect positive (+) to positive (+) and negative (−) to body ground (as illustrated), not to the battery. Make sure that the jumper cables do not touch moving parts in the engine compartment and that clamps do not contact any other metal. A * NOTE: If the clamp clip is difficult to connect to the battery terminal, remove the cowl top cover to make it easier. ( "REMOVING THE COWL TOP COVER" page 8-8) . 5. Start the engine of the booster vehicle and let it run for a few minutes. 6-6 In case of emergency
-
 1
1 -
2
-
3
-
4
-
5
-
6
-
7
-
8
-
9
-
10
-
11
-
12
-
13
-
14
-
15
-
16
-
17
-
18
-
19
-
20
-
21
-
22
-
23
-
24
-
25
-
26
-
27
-
28
-
29
-
30
-
31
-
32
-
33
-
34
-
35
-
36
-
37
-
38
-
39
-
40
-
41
-
42
-
43
-
44
-
45
-
46
-
47
-
48
-
49
-
50
-
51
-
52
-
53
-
54
-
55
-
56
-
57
-
58
-
59
-
60
-
61
-
62
-
63
-
64
-
65
-
66
-
67
-
68
-
69
-
70
-
71
-
72
-
73
-
74
-
75
-
76
-
77
-
78
-
79
-
80
-
81
-
82
-
83
-
84
-
85
-
86
-
87
-
88
-
89
-
90
-
91
-
92
-
93
-
94
-
95
-
96
-
97
-
98
-
99
-
100
-
101
-
102
-
103
-
104
-
105
-
106
-
107
-
108
-
109
-
110
-
111
-
112
-
113
-
114
-
115
-
116
-
117
-
118
-
119
-
120
-
121
-
122
-
123
-
124
-
125
-
126
-
127
-
128
-
129
-
130
-
131
-
132
-
133
-
134
-
135
-
136
-
137
-
138
-
139
-
140
-
141
-
142
-
143
-
144
-
145
-
146
-
147
-
148
-
149
-
150
-
151
-
152
-
153
-
154
-
155
-
156
-
157
-
158
-
159
-
160
-
161
-
162
-
163
-
164
-
165
-
166
-
167
-
168
-
169
-
170
-
171
-
172
-
173
-
174
-
175
-
176
-
177
-
178
-
179
-
180
-
181
-
182
-
183
-
184
-
185
-
186
-
187
-
188
-
189
-
190
-
191
-
192
-
193
-
194
-
195
-
196
-
197
-
198
-
199
-
200
-
201
-
202
-
203
-
204
-
205
-
206
-
207
-
208
-
209
-
210
-
211
-
212
-
213
-
214
-
215
-
216
-
217
-
218
-
219
-
220
-
221
-
222
-
223
-
224
-
225
-
226
-
227
-
228
-
229
-
230
-
 231
231 -
 232
232 -
 233
233 -
 234
234 -
 235
235 -
 236
236 -
 237
237 -
 238
238 -
 239
239 -
 240
240 -
 241
241 -
242
-
243
-
244
-
245
-
246
-
247
-
248
-
249
-
250
-
251
-
252
-
253
-
254
-
255
-
256
-
257
-
258
-
259
-
260
-
261
-
262
-
263
-
264
-
265
-
266
-
267
-
268
-
269
-
270
-
271
-
272
-
273
-
274
-
275
-
276
-
277
-
278
-
279
-
280
-
281
-
282
-
283
-
284
-
285
-
286
-
287
-
288
-
289
-
290
-
291
-
292
-
293
-
294
-
295
-
296
-
297
-
298
-
299
-
300
-
301
-
302
-
303
-
304
-
305
-
306
-
307
-
308
-
309
-
310
-
311
-
312
-
313
-
314
-
315
-
316
-
317
-
318
-
319
-
320
-
321
 |
 |