2009 Yamaha Motorsports RS Viking Professional Owners Manual - Page 68
2009 Yamaha Motorsports RS Viking Professional Manual

Page 68 highlights
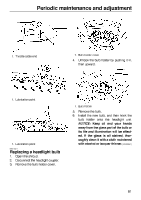
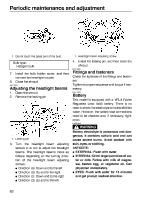
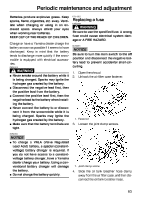
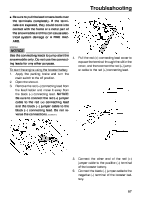
Periodic maintenance and adjustment 1. Do not touch the glass part of the bulb. 1. Headlight beam adjusting screw Bulb type: Halogen bulb 7. 8. Install the bulb holder cover, and then connect the headlight coupler. Close the shroud. 4. Install the locking pin, and then close the shroud. ESU12290 Fittings and fasteners Check the tightness of the fittings and fasteners. Tighten in proper sequence and torque if necessary. ESU12303 ESU12250 Adjusting the headlight beams 1. 2. Open the shroud. Remove the locking pin. Battery This model is equipped with a VRLA (Valve Regulated Lead Acid) battery. There is no need to check the electrolyte or to add distilled water. However, the battery lead connections need to be checked and, if necessary, tightened. EWS00540 WARNING Battery electrolyte is poisonous and dangerous. It contains sulfuric acid and can cause severe burns. Avoid contact with skin, eyes, or clothing. ANTIDOTE: G EXTERNAL: Flush with water. G INTERNAL: Drink large quantities of water or milk. Follow with milk of magnesia, beaten egg, or vegetable oil. Call physician immediately. G EYES: Flush with water for 15 minutes and get prompt medical attention. 1. Locking pin 3. Turn the headlight beam adjusting screws in or out to adjust the headlight beams. The headlight beams move as follows depending on the turning direction of the headlight beam adjusting screws. G Direction (a): Down and to the left G Direction (b): Up and to the right G Direction (c): Down and to the right G Direction (d): Up and to the left 62
-
 1
1 -
2
-
3
-
4
-
5
-
6
-
7
-
8
-
9
-
10
-
11
-
12
-
13
-
14
-
15
-
16
-
17
-
18
-
19
-
20
-
21
-
22
-
23
-
24
-
25
-
26
-
27
-
28
-
29
-
30
-
31
-
32
-
33
-
34
-
35
-
36
-
37
-
38
-
39
-
40
-
41
-
42
-
43
-
44
-
45
-
46
-
47
-
48
-
49
-
50
-
51
-
52
-
53
-
54
-
55
-
56
-
57
-
58
-
59
-
60
-
61
-
62
-
 63
63 -
 64
64 -
 65
65 -
 66
66 -
 67
67 -
 68
68 -
 69
69 -
 70
70 -
 71
71 -
 72
72 -
 73
73 -
74
-
75
-
76
-
77
-
78
-
79
-
80
-
81
-
82
-
83
-
84
-
85
-
86
-
87
-
88
 |
 |
