3M X75 Operation Guide - Page 41
NETWORK Menu continued
 |
View all 3M X75 manuals
Add to My Manuals
Save this manual to your list of manuals |
Page 41 highlights
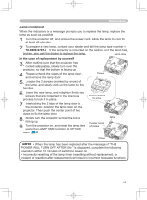
Multifunctional settings NETWORK Menu (continued) This projector provides the NETWORK function. When you start to use this function, please consult your dealer for further information. To start, connect the LAN port to a gateway device via a CAT-5 cable, then set up the projector according to the Network environment in which you use it. When your network enables the DHCP function You can set automatically, if you set the DHCP function to TURN ON using the NETWORK menu. Please refer to the section NETWORK menu (40). When your network doesn't support the DHCP function or when you use a fixed address even if your network can support the DHCP function Please set the IP address, the subnet mask, the default gateway and the DHCP using the NETWORK menu. At first, set the DHCP function to TURN OFF. It is also possible to configure the projector's network settings using a Web browser (Internet Explorer 5.0 or higher; Netscape 6.2 or higher) on a computer connected to the network. When using a Web browser to configure the projector's network settings, password access is required. However, since a password is not configured when the product is shipped from the factory, if a password has not been configured, then you can simply click on Login without entering a password to access the Projector Network Configuration dialog. To configure the settings using a Web browser, proceed as follows: ex. Case of IP Address = 192.168.1.10 Screen 1 1. Enter http://192.168.1.10 into the Web browser's address field. 2. Once Screen 1 is displayed (as shown on the right), enter the password and then click on "Login". 3. Once Screen 2 is displayed (as shown on the right), select the desired item by clicking the corresponding ENTER button. Information Screen 2 Allows you to confirm the current network settings. (Screen 3) IP Configuration Allows you to configure IP address, subnet mask and default gateway if DHCP is disabled. (Screen 4) DHCP Setting Allows you to enable or disable DHCP. (Screen 5) Password Setting Allows you to change the login password. (Screen 6) 41
-
 1
1 -
2
-
3
-
4
-
5
-
6
-
7
-
8
-
9
-
10
-
11
-
12
-
13
-
14
-
15
-
16
-
17
-
18
-
19
-
20
-
21
-
22
-
23
-
24
-
25
-
26
-
27
-
28
-
29
-
30
-
31
-
32
-
33
-
34
-
35
-
 36
36 -
 37
37 -
 38
38 -
 39
39 -
 40
40 -
 41
41 -
 42
42 -
 43
43 -
 44
44 -
 45
45 -
 46
46 -
47
-
48
-
49
-
50
-
51
-
52
-
53
-
54
-
55
-
56
-
57
 |
 |
