AIWA XD-DV370 Operating Instructions - Page 14
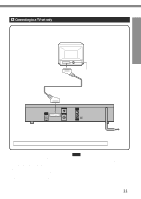
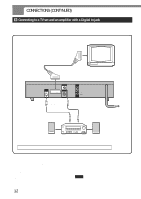
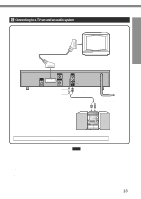
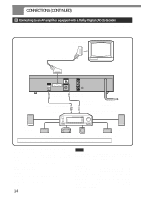
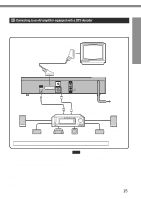
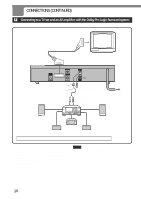
onnecting to an AV amplifier equipped with a Dolby Digital AC-3 decoder
 |
View all AIWA XD-DV370 manuals
Add to My Manuals
Save this manual to your list of manuals |
Page 14 highlights
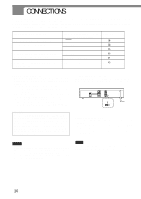
CONNECTIONS (CONTINUED) D Connecting to an AV amplifier equipped with a Dolby Digital (AC-3) decoder Use either the commercially available optical cord or 75 ohm coaxial cord when connecting this unit to an AV amplifier with a Digital In jack. The supplied video cord is also available instead of the coaxial cord. to 21 pin scart connector TV set 21 pin scart cable (not supplied) to 21 pin scart connector Rear of the unit DIGITAL OUT OPTICAL DIGITAL OUT COAXIAL S-VIDEO OUT AUDIO OUT L R NTSC PAL AUTO VIDEO OUT to DIGITAL OUT OPTICAL jack to DIGITAL OUT COAXIAL jack Optical cord (not supplied) or Coaxial cord (not supplied) to an AC power socket (AC 230 V, 50 Hz) to a digital input jack Amplifier equipped with a Dolby Digital decorder Front speaker (L) Front speaker (R) Surround speaker (L) Centre speaker Subwoofer Surround speaker (R) When your TV set is equipped with an S-video input terminal, see page 17. Set the setup menu correctly after connecting! According to the audio equipment and TV set to which the unit is connected, set the "Digital Audio Output" and "TV Aspect" of the setup menu correctly referring to the following below. See "CHANGING SETUP VALUE" on page 39 in detail. Digital Audio Output DOLBY DIGITAL/PCM TV Aspect When your TV set is a conventional-screen size TV: 4:3 Letter box When your TV set is a wide-screen size TV: 16:9 Wide 14 NOTE When the picture noise appears while copy-protected DVDs are played, connect the unit directly to a TV set. Do not connect through a VCR, TV/VCR or AV selector. CAUTION If the AV amplifier is not equipped with a Dolby Digital decoder, do not select "DOLBY DIGITAL/PCM" in the "Digital Audio Output" when connecting the AV amplifier with an optical or coaxial connecting cord. Merely attempting to play a DVD may cause a high level of noise which could be harmful to your ears and damage the speakers. In such a case, be sure to select "PCM" in the "Digital Audio Output".
-
 1
1 -
2
-
3
-
4
-
5
-
6
-
7
-
8
-
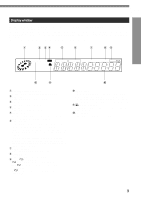 9
9 -
 10
10 -
 11
11 -
 12
12 -
 13
13 -
 14
14 -
 15
15 -
 16
16 -
 17
17 -
 18
18 -
 19
19 -
20
-
21
-
22
-
23
-
24
-
25
-
26
-
27
-
28
-
29
-
30
-
31
-
32
-
33
-
34
-
35
-
36
-
37
-
38
-
39
-
40
-
41
-
42
-
43
-
44
-
45
-
46
-
47
-
48
-
49
-
50
 |
 |
