ASRock H81M-DGS R2.0 User Manual - Page 37
Using Smart Connect, Step 6
 |
View all ASRock H81M-DGS R2.0 manuals
Add to My Manuals
Save this manual to your list of manuals |
Page 37 highlights
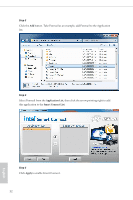
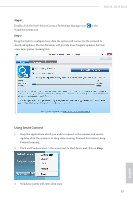
H81M-DGS R2.0 Step 6 Double-click the Intel® Smart Connect Technology Manager icon Windows system tray. in the Step 7 Drag the slider to configure how often the system will connect to the network to download updates. Shorter durations will provide more frequent updates, but may cause more power consumption. Using Smart Connect 1. Keep the applications which you wish to connect to the internet and receive updates while the system is in sleep state running. Foxmail for instance, keep Foxmail running. 2. Click on Windows Start -> the arrow next to Shut down, and click on Sleep. 3. Windows system will enter sleep state. 33 English
-
 1
1 -
2
-
3
-
4
-
5
-
6
-
7
-
8
-
9
-
10
-
11
-
12
-
13
-
14
-
15
-
16
-
17
-
18
-
19
-
20
-
21
-
22
-
23
-
24
-
25
-
26
-
27
-
28
-
29
-
30
-
31
-
 32
32 -
 33
33 -
 34
34 -
 35
35 -
 36
36 -
 37
37 -
 38
38 -
 39
39 -
 40
40 -
 41
41 -
 42
42 -
43
-
44
-
45
-
46
-
47
-
48
-
49
-
50
-
51
-
52
-
53
-
54
-
55
-
56
-
57
-
58
-
59
-
60
-
61
-
62
-
63
-
64
-
65
-
66
-
67
-
68
-
69
-
70
-
71
-
72
-
73
 |
 |

33
English
H81M-DGS R2.0
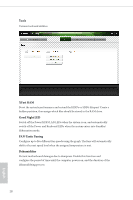
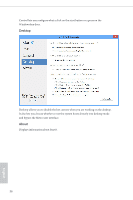
Step 6
Double-click the Intel® Smart Connect Technology Manager icon
in the
Windows system tray.
Step 7
Drag the slider to configure how oſten the system will connect to the network to
download updates. Shorter durations will provide more frequent updates, but may
cause more power consumption.
Using Smart Connect
1.
Keep the applications which you wish to connect to the internet and receive
updates while the system is in sleep state running. Foxmail for instance, keep
Foxmail running.
2.
Click on Windows Start -> the arrow next to Shut down, and click on
Sleep
.
3.
Windows system will enter sleep state.