ASRock Mini Mini Q190D RAID Installation Guide - Page 10
array., RAID Array.
 |
View all ASRock Mini Mini Q190D manuals
Add to My Manuals
Save this manual to your list of manuals |
Page 10 highlights
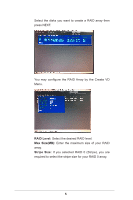
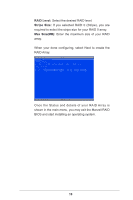
RAID Level: Select the desired RAID level. Stripe Size: If you selected RAID 0 (Stripe), you are required to select the stripe size for your RAID 0 array. Max Size(MB): Enter the maximum size of your RAID array. When your done coniguring, select Next to create the RAID Array. ENTER/SPACE:Select, ESC:Back/Exit, F7:Wipe Disk [Create] [Delete] Adapter 0 [Virtual Disks] ID Array Name Size 0 N/A 1.5TB Level RAID0 Status ONLINE Stripe 64KB Sector Members 512B 0.1 [Physical Disks] ID Port Disk Name 0 0 SATA:WDC WD7500BPVT-80HXZT3 1 0 SATA:WDC WD7500BPVT-80HXZT3 Size Speed Status 750.1GB 3.0Gbps ASSIGNED 750.1GB 3.0Gbps ASSIGNED Marvell EFI RAID Configuration (c) 2010 Marvell Technology. Ltd. Once the Status and details of your RAID Array is shown in the main menu, you may exit the Marvell RAID BIOS and start installing an operating system. 10
-
 1
1 -
2
-
3
-
4
-
 5
5 -
 6
6 -
 7
7 -
 8
8 -
 9
9 -
 10
10
 |
 |
